Dell Latitude E5530 driver and firmware

Related Dell Latitude E5530 Manual Pages
Download the free PDF manual for Dell Latitude E5530 and other Dell manuals at ManualOwl.com
Setup and Features Information Tech Sheet - Page 6
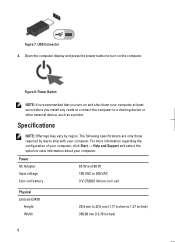
Figure 7. USB Connector 4. Open the computer display and press the power button to turn on the computer.
Figure 8. Power Button
NOTE: It is recommended that you turn on and shut down your computer at least once before you install any cards or connect the computer to a docking device or other external device, such as a printer.
Specifications
NOTE: Offerings may vary by region. The following...
Setup and Features Information Tech Sheet - Page 8

...™ are trademarks of Advanced Micro Devices, Inc. Microsoft®, Windows®, MS-DOS®, Windows Vista®, the Windows Vista start button, and Office Outlook®...players. The Bluetooth® word mark is a registered trademark and owned by the Bluetooth® SIG, Inc. and any use of such mark by Dell Inc. is under license. Wi-Fi® is a registered trademark of Wireless Ethernet...
Statement of Volatility - Page 2
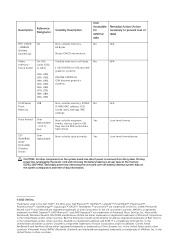
..., U9A, U9B
LOM Serial U18 Flash Memory
Hard drive(s)
User replaceable - one or two.
CDROM/RW/ DVD/ DVD+RW/ Diskette Drives
User replaceable
Volatile memory in off state. No
1 GB GDDR3 for G92 discrete graphics systems.
256 MB GDDR3 for G94 discrete graphics systems.
Non-volatile memory, 8 Mbit No (2 MB) MAC address, LED mode, WOL settings, PXE settings.
Non-volatile magnetic...
User Manual - Page 2
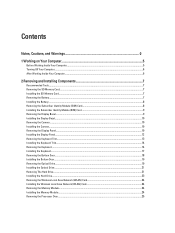
... the Bottom Door...18 Installing the Bottom Door...19 Removing the Optical Drive...19 Installing the Optical Drive...21 Removing The Hard Drive...21 Installing the Hard Drive...23 Removing the Wireless Local Area Network (WLAN) Card 24 Installing the Wireless Local Area Network (WLAN) Card 24 Removing the Memory Module...24 Installing the Memory Module...24 Removing the Processor Door...25
User Manual - Page 3
... Reader Cage...30 Installing the ExpressCard Reader Cage...31 Removing the Bluetooth Module...31 Installing the Bluetooth module...32 Removing the Audio Board...32 Installing the Audio Board...33 Removing the Display Assembly...33 Installing the Display Assembly...36 Removing the Right Support Frame...36 Installing the Right Support Frame...37 Removing the Modem Card...37 Installing the Modem Card...
User Manual - Page 5
... Off Your Computer). CAUTION: To disconnect a network cable, first unplug the cable from your computer and then unplug the cable from the network device.
3. Disconnect all network cables from the computer.
4. Disconnect your computer and all attached devices from their electrical outlets.
5. Press and hold the power button while the computer is unplugged to ground the system board.
6. Remove the...
User Manual - Page 6
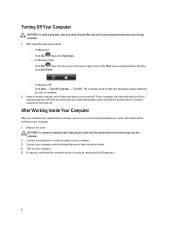
... system, press and hold the power button for about 6 seconds to turn them off.
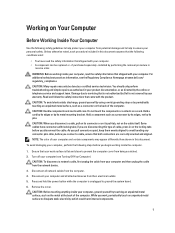
After Working Inside Your Computer
After you complete any replacement procedure, ensure you connect any external devices, cards, and cables before turning on your computer. 1. Replace the cover.
CAUTION: To connect a network cable, first plug the cable into the network device and then plug it into the...
User Manual - Page 7
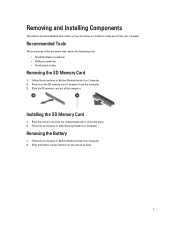
... • Phillips screwdriver • Small plastic scribe
Removing the SD Memory Card
1. Follow the procedures in Before Working Inside Your Computer. 2. Press in on the SD memory card to release it from the computer. 3. Slide the SD memory card out of the computer.
Installing the SD Memory Card
1. Push the memory card into the compartment until it clicks into place. 2. Follow the procedures...
User Manual - Page 8
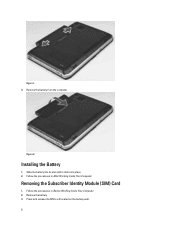
... battery from the computer.
Figure 2.
Installing the Battery
1. Slide the battery into its slot until it clicks into place. 2. Follow the procedures in After Working Inside Your Computer.
Removing the Subscriber Identity Module (SIM) Card
1. Follow the procedures in Before Working Inside Your Computer. 2. Remove the battery. 3. Press and release the SIM card located on the...
User Manual - Page 9
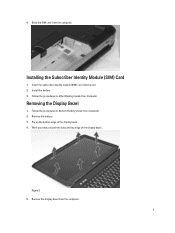
... SIM card from the computer.
Installing the Subscriber Identity Module (SIM) Card
1. Insert the subscriber identity module (SIM) card into the slot. 2. Install the battery. 3. Follow the procedures in After Working Inside Your Computer.
Removing the Display Bezel
1. Follow the procedures in Before Working Inside Your Computer. 2. Remove the battery. 3. Pry up the bottom edge of the display bezel...
User Manual - Page 10
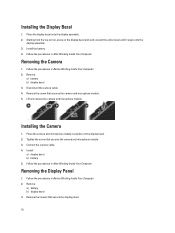
...Lift and remove the camera and microphone module.
Installing the Camera
1. Place the camera and microphone module in position on the display bezel. 2. Tighten the screw that secures the camera and microphone module. 3. Connect the camera cable. 4. Install:
a) display bezel b) battery 5. Follow the procedures in After Working Inside Your Computer.
Removing the Display Panel
1. Follow the procedures...
User Manual - Page 12
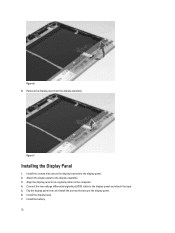
... the display brackets to the display panel. 2. Attach the display panel to the display assembly. 3. Align the display panel in its original position in the computer. 4. Connect the low-voltage differential signaling (LVDS) cable to the display panel and attach the tape. 5. Flip the display panel over and install the screws that secure the display panel. 6. Install the display bezel. 7. Install the...
User Manual - Page 14
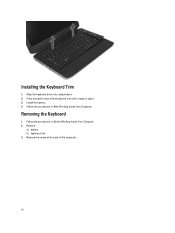
... trim to its compartment. 2. Press along the sides of the keyboard trim until it snaps in place. 3. Install the battery. 4. Follow the procedures in After Working Inside Your Computer.
Removing the Keyboard
1. Follow the procedures in Before Working Inside Your Computer. 2. Remove:
a) battery b) keyboard trim 3. Remove the screw at the back of the...
User Manual - Page 17
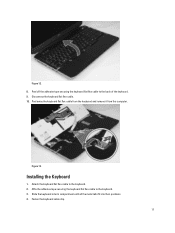
... the keyboard. 9. Disconnect the keyboard flat flex cable. 10. Peel away the keyboard flat flex cable from the keyboard and remove it from the computer.
Figure 13.
Installing the Keyboard
1. Attach the keyboard flat flex cable to the keyboard. 2. Affix the adhesive tape securing the keyboard flat flex cable to the keyboard. 3. Slide the keyboard into...
User Manual - Page 18
... side ensuring that all the snaps are fully engaged with the computer.
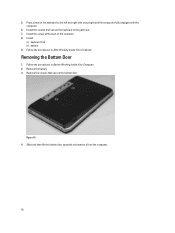
6. Install the screws that secure the keyboard to the palm rest. 7. Install the screw at the back of the computer. 8. Install :
a) keyboard trim b) battery 9. Follow the procedures in After Working Inside Your Computer.
Removing the Bottom Door
1. Follow the procedures in Before Working Inside...
User Manual - Page 19
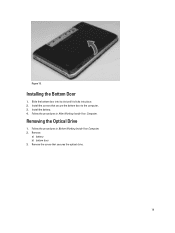
... the bottom door into its slot until it clicks into place. 2. Install the screws that secure the bottom door to the computer. 3. Install the battery. 4. Follow the procedures in After Working Inside Your Computer.
Removing the Optical Drive
1. Follow the procedures in Before Working Inside Your Computer. 2. Remove:
a) battery b) bottom door 3. Remove the screw that secures the...
User Manual - Page 21
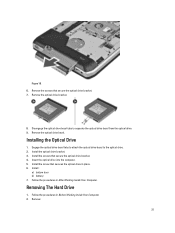
...optical drive bezel tabs to separate the optical drive bezel from the optical drive. 9. Remove the optical drive bezel.
Installing the Optical Drive
1. Engage the optical drive bezel tabs to attach the optical drive bezel to the optical drive. 2. Install the optical drive bracket. 3. Install the screws that secure the optical drive bracket. 4. Insert the optical drive into the computer. 5. Install...
User Manual - Page 23
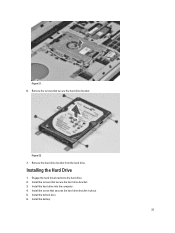
... secure the hard drive bracket.
Figure 22. 7. Remove the hard drive bracket from the hard drive.
Installing the Hard Drive
1. Engage the hard drive bracket to the hard drive. 2. Install the screws that secure the hard drive bracket. 3. Install the hard drive into the computer. 4. Install the screw that secures the hard drive bracket in place. 5. Install the bottom door. 6. Install the battery.
23
User Manual - Page 24
...
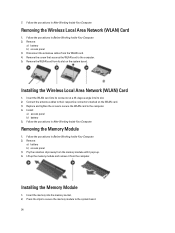
1. Follow the procedures in Before Working Inside Your Computer. 2. Remove:
a) battery b) access panel 3. Disconnect the antennae cables from the WLAN card. 4. Remove the screw that secures the WLAN card to the computer. 5. Remove the WLAN card from its slot on the system board.
Installing the Wireless Local Area Network (WLAN) Card
1. Insert the WLAN card into its connector at a 45-degree angle...
User Manual - Page 61
... L2 Cache, Processor L3 Cache, HT Capable, and 64-Bit Technology.
• Device Information: Displays Primary Hard Drive, Fixed bay Device, System eSATA Device, Dock eSATA Device, LOM MAC Address, Video Controller, Video BIOS Version, Video Memory, Panel Type, Native Resolution, Audio Controller, Modem Controller, Wi-Fi Device, Cellular Device, Bluetooth Device.
Battery Information
Displays the...