Dell OptiPlex 3240 All-in-One driver and firmware
Drivers and firmware downloads for this Dell item
Related Dell OptiPlex 3240 All-in-One Manual Pages
Download the free PDF manual for Dell OptiPlex 3240 All-in-One and other Dell manuals at ManualOwl.com
Owners Manual - Page 3
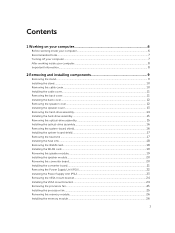
... 15 Installing the optical-drive assembly 16 Removing the system-board shield...16 Installing the system-board shield...17 Removing the heat sink ...17 Installing the heat sink...18 Removing the WLAN card...18 Installing the WLAN card...19 Removing the speaker module...19 Installing the speaker module...20 Removing the converter board...20 Installing the converter board...21 Removing the Power...
Owners Manual - Page 4
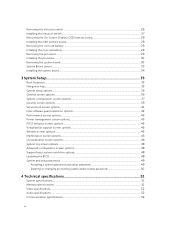
...screen options...45 Virtualization support screen options 45 Wireless screen options...45 Maintenance screen options...45 Cloud desktop screen options...46 System log screen options...48 Advanced configuration screen options 48 SupportAssist system resolution options 48 Updating the BIOS ...48 System and setup password...49
Assigning a system password and setup password 49 Deleting or changing...
Owners Manual - Page 6
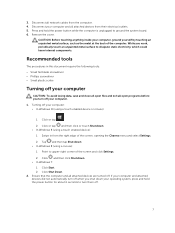
...avoid damaging your computer, perform the following steps before you begin working inside the computer.
1. Ensure that your work surface is flat and clean to prevent the computer cover from being scratched. 2. Turn off your computer (see Turning off your computer).
CAUTION: To disconnect a network cable, first unplug the cable from your computer and then unplug the cable from the network device.
6
Owners Manual - Page 7
... network cables from the computer. 4. Disconnect your computer and all attached devices from their electrical outlets. 5. Press and hold the power button while the computer is unplugged to ground the system board. 6. Remove the cover.
CAUTION: Before touching anything inside your computer, ground yourself by touching an unpainted metal surface, such as the metal at the back of the computer...
Owners Manual - Page 9
...
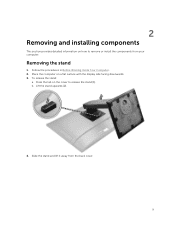
This section provides detailed information on how to remove or install the components from your computer.
Removing the stand
1. Follow the procedures in Before Working Inside Your Computer. 2. Place the computer on a flat surface with the display side facing downwards. 3. To release the stand:
a. Press the tab on the cover to release the stand [1]. b. Lift...
Owners Manual - Page 10
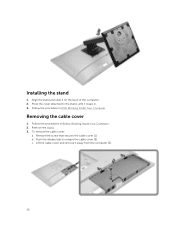
Installing the stand
1. Align the stand and slide it on the back of the computer. 2. Press the cover attached to the stand, until it snaps in. 3. Follow the procedure in After Working Inside Your Computer.
Removing the cable cover
1. Follow the procedures in Before Working Inside Your Computer. 2. Remove the stand. 3. To remove the cable cover:
a. Remove...
Owners Manual - Page 11
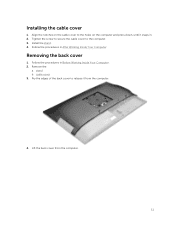
... down, until it snaps in. 2. Tighten the screw to secure the cable cover to the computer. 3. Install the stand. 4. Follow the procedures in After Working Inside Your Computer.
Removing the back cover
1. Follow the procedures in Before Working Inside Your Computer. 2. Remove the:
a. stand b. cable cover 3. Pry the edges of the back cover to release it...
Owners Manual - Page 12
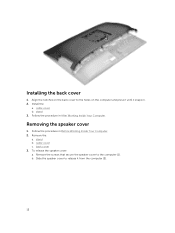
... on the back cover to the holes on the computer and press it until it snaps in. 2. Install the:
a. cable cover b. stand 3. Follow the procedure in After Working Inside Your Computer.
Removing the speaker cover
1. Follow the procedure in Before Working Inside Your Computer. 2. Remove the:
a. stand b. cable cover c. back cover 3. To release the speaker cover...
Owners Manual - Page 13
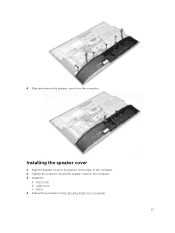
4. Slide and remove the speaker cover from the computer.
Installing the speaker cover
1. Align the speaker cover to its position on the back of the computer. 2. Tighten the screws to secure the speaker cover to the computer. 3. Install the:
a. back cover b. cable cover c. stand 4. Follow the procedure in After Working Inside Your Computer.
13
Owners Manual - Page 15
... and it snaps in. 3. Install:
a. back cover b. stand 4. Follow the procedure in After Working Inside Your Computer.
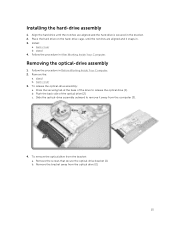
Removing the optical-drive assembly
1. Follow the procedure in Before Working Inside Your Computer. 2. Remove the:
a. stand b. back cover 3. To release the optical-drive assembly: a. Press the securing tab at the base of the drive to release the optical drive [1]. b. Push the back...
Owners Manual - Page 16
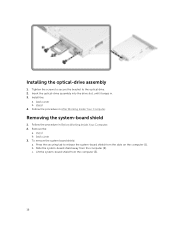
... the screws to secure the bracket to the optical drive. 2. Insert the optical-drive assembly into the drive slot, until it snaps in. 3. Install the:
a. back cover b. stand 4. Follow the procedure in After Working Inside Your Computer.
Removing the system-board shield
1. Follow the procedure in Before Working Inside Your Computer. 2. Remove the:
a. stand b. back cover 3. To remove the...
Owners Manual - Page 17
...
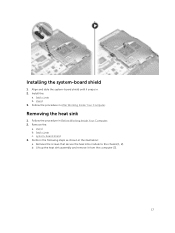
1. Align and slide the system-board shield until it snaps in. 2. Install the:
a. back cover b. stand 3. Follow the procedure in After Working Inside Your Computer.
Removing the heat sink
1. Follow the procedure in Before Working Inside Your Computer. 2. Remove the:
a. stand b. back cover c. system-board shield 3. Perform the following steps as shown in the illustration...
Owners Manual - Page 18
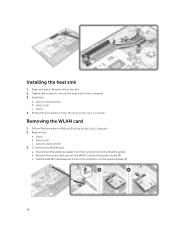
... secure the heat sink to the computer. 3. Install the:
a. system-board shield b. back cover c. stand 4. Follow the procedure in After Working Inside Your Computer.
Removing the WLAN card
1. Follow the procedure in Before Working Inside Your Computer. 2. Remove the:
a. stand b. back cover c. system-board shield 3. To remove the WLAN card: a. Disconnect the antenna cables from the connectors on the...
Owners Manual - Page 19
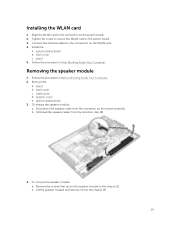
Installing the WLAN card
1. Align the WLAN card to the connector on the system board. 2. Tighten the screw to secure the WLAN card to the system board. 3. Connect the antenna cables to the connectors on the WLAN card. 4. Install the:
a. system-board shield b. back cover c. stand 5. Follow the procedure in After Working Inside Your Computer.
Removing the speaker module
1. Follow the procedure...
Owners Manual - Page 20
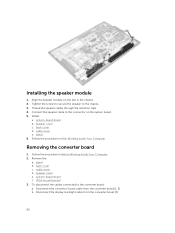
... to secure the speaker to the chassis. 3. Thread the speaker cables through the retention clips. 4. Connect the speaker cable to the connector on the system board. 5. Install:
a. system-board shield b. speaker cover c. back cover d. cable cover e. stand 6. Follow the procedure in After Working Inside Your Computer.
Removing the converter board
1. Follow the procedure in Before Working Inside Your...
Owners Manual - Page 21
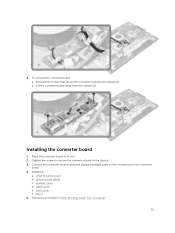
...board
1. Place the convertor board in its slot. 2. Tighten the screws to secure the converter board to the chassis. 3. Connect the converter-board cable and display-backlight cable to the connectors on the converter
board. 4. Install the:
a. VESA mount bracket b. system board shield c. speaker cover d. cable cover e. back cover f. stand 5. Follow the procedure in After Working Inside Your Computer...
Owners Manual - Page 23
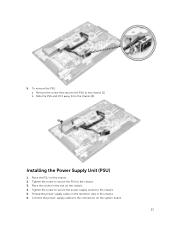
...the PSU to the chassis [1]. b. Slide the PSU and lift it away from the chassis [2].
Installing the Power Supply Unit (PSU)
1. Place the PSU on the chassis. 2. Tighten the screw to secure... the screw to secure the power supply socket to the chassis. 5. Thread the power-supply cable on the retention clips in the chassis. 6. Connect the power-supply cables to the connectors on the system board.
23
Owners Manual - Page 46
....
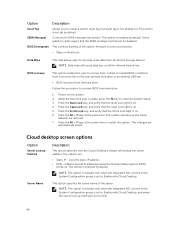
BIOS Downgrade This controls flashing of the system firmware to previous revisions.
• Wipe on Next boot
Data Wipe
This field allows users to securely erase data from all internal storage devices. NOTE: Data wipe will cause data loss on all the internal hard drives.
BIOS recovery
This option enables the user to recover from certain corrupted BIOS conditions from a recovery file...
Owners Manual - Page 49
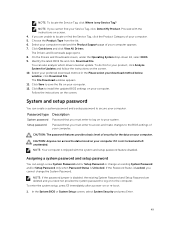
... method below window; click Download File. The File Download window appears. 11. Click Save to save the file on your computer. 12. Click Run to install the updated BIOS settings on your computer. Follow the instructions on the screen.
System and setup password
You can create a system password and a setup password to secure your computer.
Password type Description
System password Password that...
Owners Manual - Page 52
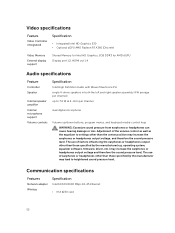
... software, firmware, driver, etc.) may increase the earphones or headphones output voltage and therefore the sound pressure level. The use of earphones or headphones other than those specified by the manufacturer may lead to heightened sound pressure level.
Communication specifications
Features
Network adapter Wireless
Specification
Intel 10/100/1000 Mbps RJ-45 Ethernet
• M.2 2230 card...