Dell Vostro 15 3549 driver and firmware
Related Dell Vostro 15 3549 Manual Pages
Download the free PDF manual for Dell Vostro 15 3549 and other Dell manuals at ManualOwl.com
Owners Manual - Page 3
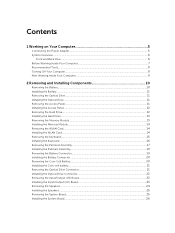
... the Battery...11 Removing the Optical Drive...11 Installing the Optical Drive...11 Removing the Access Panel...11 Installing the Access Panel...12 Removing the Hard Drive...12 Installing the Hard Drive...13 Removing the Memory Module...13 Installing the Memory Module...14 Removing the WLAN Card...14 Installing the WLAN Card...14 Removing the Keyboard...15 Installing the Keyboard...16 Removing the...
Owners Manual - Page 4
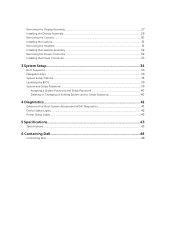
...the Display Assembly...29 Removing the Camera...30 Installing the Camera...31 Removing the Heatsink...31 Installing the Heatsink Assembly...32 Removing the Power Connector...32 Installing the Power Connector...33
3 System Setup...34
Boot Sequence...34 Navigation Keys...34 System Setup Options...35 Updating the BIOS ...39 System and Setup Password...39
Assigning a System Password and Setup Password...
Owners Manual - Page 7
15. VGA connector 17. power connector 19. battery
16. air vents 18. security-cable slot 20. service-tag label
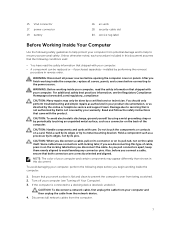
Before Working Inside Your Computer
Use the following safety guidelines to help protect your computer...online or telephone service and support team. Damage due to servicing that is not authorized by Dell is not covered by your warranty. Read and follow the safety instructions that came ...
Owners Manual - Page 8

5. Disconnect your computer and all attached devices from their electrical outlets. 6. Close the display and turn the computer upside-down on a flat work surface.
NOTE: To avoid damaging the system board, you must remove the main battery before you service the computer. 7. Remove the main battery. 8. Turn the computer top-side up. 9. Open the display. 10. Press the power button to...
Owners Manual - Page 9
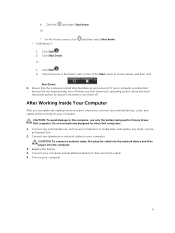
... the battery designed for this particular Dell computer. Do not use batteries designed for other Dell computers.
1. Connect any external devices, such as a port replicator or media base, and replace any cards, such as an ExpressCard.
2. Connect any telephone or network cables to your computer.
CAUTION: To connect a network cable, first plug the cable into the network device and then plug it into...
Owners Manual - Page 10
... Installing Components
This section provides detailed information on how to remove or install the components from your computer.
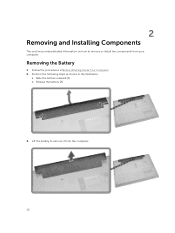
Removing the Battery
1. Follow the procedures in Before Working Inside Your Computer. 2. Perform the following steps as shown in the illustration:
a. Slide the latches outward [1]. b. Release the battery [2].
3. Lift the battery to remove it from the computer...
Owners Manual - Page 11
... in the illustration:
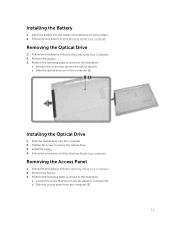
a. Remove the screw that secures the optical drive [1]. b. Slide the optical drive out of the computer [2].
Installing the Optical Drive
1. Slide the optical drive into the computer. 2. Tighten the screw to secure the optical drive. 3. Install the battery. 4. Follow the procedures in After Working Inside Your computer.
Removing the Access Panel
1. Follow the procedures in...
Owners Manual - Page 12
... panel into the chassis. 2. Tighten the screw to secure the access panel to the chassis. 3. Install battery. 4. Follow the procedures in After Working Inside Your computer.
Removing the Hard Drive
1. Follow the procedures in Before Working Inside Your Computer. 2. Remove the Battery. 3. Remove the access panel. 4. Perform the following steps as shown in the...
Owners Manual - Page 13
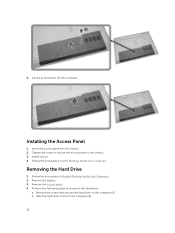
c. Lift the hard drive upwards from the computer [3].
Installing the Hard Drive
1. Slide the hard drive into the connector. 2. Tighten the screw to secure it to the chassis. 3. Install:
a. access panel b. battery 4. Follow the procedures in After Working Inside Your computer.
Removing the Memory Module
1. Follow the procedures in Before Working Inside Your Computer. 2. Remove:
a. battery b. access...
Owners Manual - Page 14
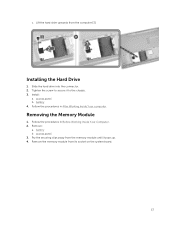
... memory module into the socket and press to lock the securing clips. 2. Install the access panel. 3. Install the battery. 4. Follow the procedures in After Working Inside Your computer.
Removing the WLAN Card
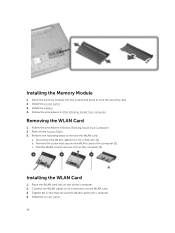
1. Follow the procedures in Before Working Inside Your Computer. 2. Remove the Access Panel. 3. Perform the following steps to remove the WLAN card:
a. Disconnect the WLAN cables...
Owners Manual - Page 16
...
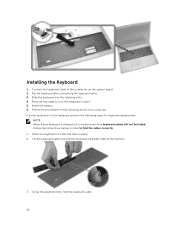
1. Connect the keyboard cable to the connector on the system board. 2. Flip the keyboard after connecting the keyboard cable. 3. Slide the keyboard into the retaining slots. 4. Press the top edge to lock the keyboard in place. 5. Install the battery. 6. Follow the procedures in After Working Inside Your computer. If a new keyboard is to be replaced...
Owners Manual - Page 19
...notches until it clicks in place. 2. Connect the touchpad and power cables to the system board. 3. Tighten the screws to secure it to the system board. 4. Turn the computer over and tighten the screws at the base of the computer. 5. Install:
a. keyboard b. memory module c. hard drive d. WLAN card e. access panel f. optical disk-drive g. battery 6. Follow the procedures in After Working Inside Your...
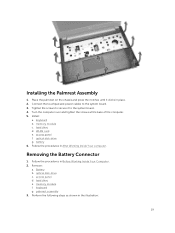
Owners Manual - Page 20
... the computer. 2. Install the:
a. palmrest assembly b. keyboard c. memory module d. hard drive e. WLAN card f. access panel g. optical disk-drive h. battery 3. Follow the procedures in After Working Inside Your computer.
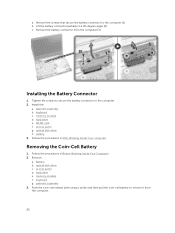
Removing the Coin-Cell Battery
1. Follow the procedures in Before Working Inside Your Computer. 2. Remove:
a. Battery b. optical disk-drive c. access panel d. hard drive e. memory...
Owners Manual - Page 21
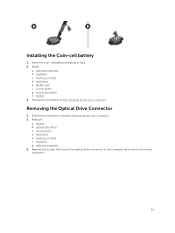
...lock. 2. Install:
a. palmrest assembly b. keyboard c. memory module d. hard drive e. WLAN card f. access panel g. optical disk-drive h. battery 3. Follow the procedures in After Working Inside Your computer.
Removing the Optical Drive Connector
1. Follow the procedures in Before Working Inside Your Computer. 2. Remove:
a. battery b. optical disk-drive c. access panel d. hard drive e. memory module...
Owners Manual - Page 22
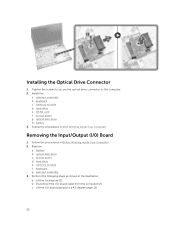
... the optical drive connector to the computer. 2. Install the:
a. palmrest assembly b. keyboard c. memory module d. hard drive e. WLAN card f. access panel g. optical disk-drive h. battery 3. Follow the procedures in After Working Inside Your computer.
Removing the Input/Output (I/0) Board
1. Follow the procedures in Before Working Inside Your Computer. 2. Remove:
a. Battery b. optical disk-drive...
Owners Manual - Page 23
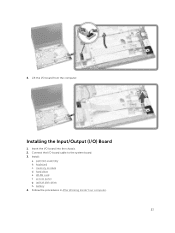
4. Lift the I/O board from the computer.
Installing the Input/Output (I/O) Board
1. Insert the I/O board into the chassis. 2. Connect the I/O board cable to the system board. 3. Install:
a. palmrest assembly b. keyboard c. memory module d. hard drive e. WLAN card f. access panel g. optical disk-drive h. battery 4. Follow the procedures in After Working Inside Your computer.
23
Owners Manual - Page 25
... Your computer.
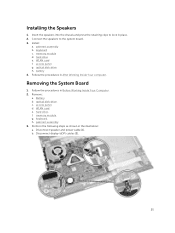
Removing the System Board
1. Follow the procedures in Before Working Inside Your Computer. 2. Remove:
a. Battery. b. optical disk-drive. c. access panel. d. WLAN card. e. hard drive. f. memory module. g. keyboard. h. palmrest assembly. 3. Perform the following steps as shown in the illustration: a. Disconnect speaker and power cable [1]. b. Disconnect display (eDP) cables [2].
25
Owners Manual - Page 26
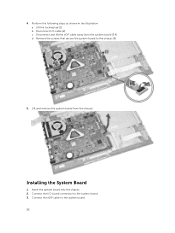
... Disconnect I/O cable [2]. c. Disconnect and lift the eDP cable away from the system board [3,4]. d. Remove the screws that secure the system board to the chassis [5].
5. Lift and remove the system board from the chassis.
Installing the System Board
1. Insert the system board into the chassis. 2. Connect the I/O board connector to the system board. 3. Connect the eDP cable to the system board. 26
Owners Manual - Page 27
... the speakers to the system board. 5. Connect the power connector to the system board. 6. Tighten the screws to secure the system board to the computer. 7. Install:
a. palmrest assembly b. keyboard c. memory module d. hard drive e. WLAN card f. access panel g. optical disk-drive h. battery 8. Follow the procedures in After Working Inside Your computer.
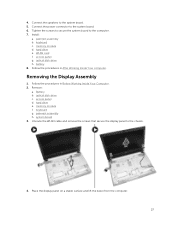
Removing the Display Assembly
1. Follow the...
Owners Manual - Page 39
..., and load default settings before exiting from System Setup.
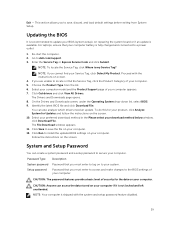
Updating the BIOS
It is recommended to update your BIOS (system setup), on replacing the system board or if an update is available. For laptops, ensure that your computer battery is fully charged and connected to a power outlet
1. Re-start the computer. 2. Go to dell.com/support. 3. Enter the Service Tag or Express Service Code and...