Dell Vostro 3460 driver and firmware

Related Dell Vostro 3460 Manual Pages
Download the free PDF manual for Dell Vostro 3460 and other Dell manuals at ManualOwl.com
User Manual - Page 1
Dell Vostro 3460/3560
Setup And Features Information
About Warnings
WARNING: A WARNING indicates a potential for property damage, personal injury, or death.
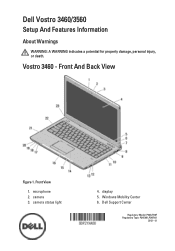
Vostro 3460 - Front And Back View
Figure 1. Front View
1. microphone 2. camera 3. camera status light
4. display 5. Windows Mobility Center 6. Dell Support Center
Regulatory Model: P34G,P24F Regulatory Type: P34G001,P24F001
2012 - 01
User Manual - Page 3
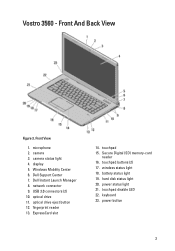
... display 5. Windows Mobility Center 6. Dell Support Center 7. Dell Instant Launch Manager 8. network connector 9. USB 3.0 connectors (2) 10. optical drive 11. optical drive eject button 12. fingerprint reader 13. ExpressCard slot
14. touchpad 15. Secure Digital (SD) memory-card
reader 16. touchpad buttons (2) 17. wireless status light 18. battery status light 19. hard disk status light 20. power...
User Manual - Page 6
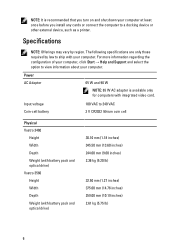
...; Help and Support and select the option to view information about your computer.
Power AC Adapter
65 W and 90 W
NOTE: 65 W AC adapter is available only for computers with integrated video card.
Input voltage Coin-cell battery
100 VAC to 240 VAC 3 V CR2032 lithium coin cell
Physical Vostro 3460
Height Width Depth Weight (with battery pack and optical drive) Vostro 3560 Height...
User Manual - Page 8

...™ are trademarks of Advanced Micro Devices, Inc. Microsoft®, Windows®, MS-DOS®, Windows Vista®, the Windows Vista start button, and Office Outlook®...players. The Bluetooth® word mark is a registered trademark and owned by the Bluetooth® SIG, Inc. and any use of such mark by Dell Inc. is under license. Wi-Fi® is a registered trademark of Wireless Ethernet...
Owner's Manual - Page 2
...™ are trademarks of Advanced Micro Devices, Inc. Microsoft®, Windows®, MS-DOS®, Windows Vista®, the Windows Vista start button, and Office Outlook®...players. The Bluetooth® word mark is a registered trademark and owned by the Bluetooth® SIG, Inc. and any use of such mark by Dell Inc. is under license. Wi-Fi® is a registered trademark of Wireless Ethernet...
Owner's Manual - Page 3
... the Memory...12 Removing the Optical Drive...13 Installing the Optical Drive...14 Removing the Hard Drive...14 Installing the Hard Drive...16 Removing the Keyboard...16 Installing the Keyboard...18 Removing the Palmrest...18 Installing the Palmrest...23 Removing the Wireless Local Area Network (WLAN) Card 23 Installing the Wireless Local Area Network (WLAN) Card 24 Removing the Display Assembly...
Owner's Manual - Page 4
... the Processor...37 Installing the Processor...38 Removing the mini-SATA Card...38 Installing the mini-SATA Card...39 Removing the USB Daughter Board...39 Installing the USB Daughter Board...41
3 System Setup...43
Boot Sequence...43 Navigation Keys...43 System Setup Options...44 Updating the BIOS ...48 System and Setup Password...48
Assigning a System Password and Setup Password 48 Deleting...
Owner's Manual - Page 5
... Turn off your computer (see Turning Off Your Computer). 3. If the computer is connected to a docking device (docked) such as the optional Media Base or Battery Slice,
undock it.
CAUTION: To disconnect a network cable, first unplug the cable from your computer and then unplug the cable from the network device. 4. Disconnect all network cables from the computer. 5. Disconnect your computer and all...
Owner's Manual - Page 6
... cables before turning on your computer.
CAUTION: To avoid damage to the computer, use only the battery designed for this particular Dell computer. Do not use batteries designed for other Dell computers.
1. Connect any external devices, such as a port replicator, battery slice, or media base, and replace any cards, such as an ExpressCard.
2. Connect any telephone or network cables to your computer...
Owner's Manual - Page 9
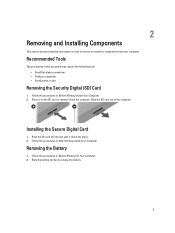
... • Phillips screwdriver • Small plastic scribe
Removing the Security Digital (SD) Card
1. Follow the procedures in Before Working Inside Your Computer. 2. Press in on the SD card to release it from the computer. Slide the SD card out of the computer.
Installing the Secure Digital Card
1. Push the SD card into the slot until it clicks into place. 2. Follow the...
Owner's Manual - Page 10
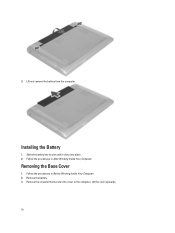
3. Lift and remove the battery from the computer.
Installing the Battery
1. Slide the battery into its slot until it clicks into place. 2. Follow the procedures in After Working Inside Your Computer.
Removing the Base Cover
1. Follow the procedures in Before Working Inside Your Computer. 2. Remove the battery. 3. Remove the screw(s) that secures the cover to...
Owner's Manual - Page 12
... Working Inside Your Computer.
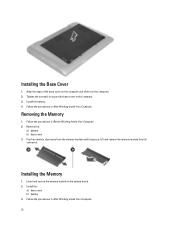
Removing the Memory
1. Follow the procedures in Before Working Inside Your Computer. 2. Remove the:
a) battery b) base cover 3. Pry the retention clips away from the memory module until it pops-up. Lift and remove the memory module from its connector.
Installing the Memory
1. Insert and secure the memory module to the system board. 2. Install the:
a) base cover...
Owner's Manual - Page 13
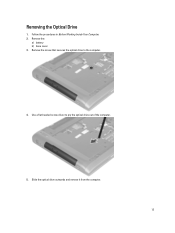
Removing the Optical Drive
1. Follow the procedures in Before Working Inside Your Computer. 2. Remove the:
a) battery b) base cover 3. Remove the screw that secures the optical drive to the computer.
4. Use a flat-headed screw driver to pry the optical drive out of the computer.
5. Slide the optical drive outwards and remove it from the computer.
13
Owner's Manual - Page 14
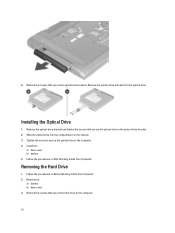
... that secure the optical-drive bracket. Remove the optical-drive bracket from the optical drive.
Installing the Optical Drive
1. Replace the optical-drive bracket and tighten the screws that secure the optical drive to the optical-drive bracket. 2. Slide the optical drive into the compartment on the chassis. 3. Tighten the screw to secure the optical drive to the computer. 4. Install the:
a) base...
Owner's Manual - Page 16
....
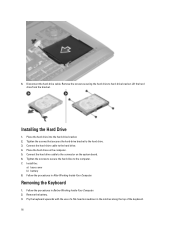
Installing the Hard Drive
1. Place the hard drive into the hard-drive bracket. 2. Tighten the screws that secures the hard-drive bracket to the hard drive. 3. Connect the hard-drive cable to the hard drive. 4. Place the hard drive on the computer. 5. Connect the hard drive cable to the connector on the system board. 6. Tighten the screws to secure the hard drive to the computer. 7. Install the...
Owner's Manual - Page 18

... tape to the system board. 3. Insert the keyboard in its compartment. 4. Press down until the keyboard clicks into place. 5. Install the battery. 6. Follow the procedures in After Working Inside Your Computer.
Removing the Palmrest
1. Follow the procedures in Before Working On Your Computer. 2. Remove the:
a) battery b) base cover c) memory d) optical drive e) hard drive f) keyboard 3. Remove the...
Owner's Manual - Page 23
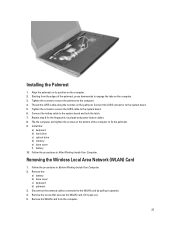
... 6 for the fingerprint, touchpad and power-button cables. 8. Flip the computer and tighten the screws on the bottom of the computer to fix the palmrest. 9. Install the:
a) keyboard b) hard drive c) optical drive d) memory e) base cover f) battery 10. Follow the procedures in After Working Inside Your Computer.
Removing the Wireless Local Area Network (WLAN) Card
1. Follow the procedures in Before...
Owner's Manual - Page 24
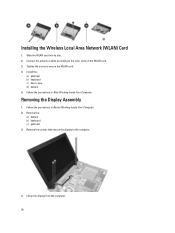
Installing the Wireless Local Area Network (WLAN) Card
1. Slide the WLAN card into its slot. 2. Connect the antenna cables according to the color code on the WLAN card. 3. Tighten the screw to secure the WLAN card. 4. Install the:
a) palmrest b) keyboard c) base cover d) battery 5. Follow the procedures in After Working Inside Your Computer.
Removing the Display Assembly
1. Follow the procedures ...
Owner's Manual - Page 35
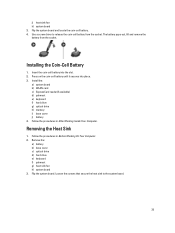
...-cell battery into the slot. 2. Press on the coin-cell battery until it secures into place. 3. Install the:
a) system board b) WLAN card c) ExpressCard reader(if available) d) palmrest e) keyboard f) hard drive g) optical drive h) memory i) base cover j) battery 4. Follow the procedures in After Working Inside Your Computer.
Removing the Heat Sink
1. Follow the procedures in Before Working On Your...
Owner's Manual - Page 48
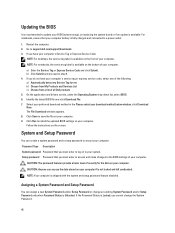
Updating the BIOS
It is recommended to update your BIOS (system setup), on replacing the system board or if an update is available. For notebooks, ensure that your computer battery is fully charged and connected to a power outlet
1. Restart the computer. 2. Go to support.dell.com/support/downloads. 3. If you have your computer's Service Tag or Express Service Code:
NOTE: For desktops, the service ...