Gigabyte R160-S34 driver and firmware
Related Gigabyte R160-S34 Manual Pages
Download the free PDF manual for Gigabyte R160-S34 and other Gigabyte manuals at ManualOwl.com
Manual - Page 2

...11
Network...11 Network Security ...12
Users ...13 Services ...14 IPMI ...15 Time Setting ...17 Sessions ...18 LDAP ...19 Updates ...20 Utilities ...21 Server Information ...22 Power Control ...22 Voltages ...23 Thermal ...24 Fans ...24 Temperature ...25 System Event Log ...26 Event Management ...27 Platform Event ...27 Trap Settings ...28 Email Settings ...29 Serial Over LAN ...30 Remote Console...
Manual - Page 6
... configuration requirements:
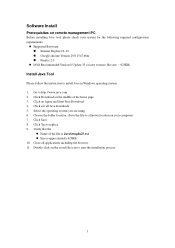
Supported Browsers: Internet Explorer 8~12 Google chrome Version 29.0.1547.66m Firefox 2.0
JAVA Recommended Version 8 Update 25 or later version (file size: ~ 623KB)
Install Java Tool
Please follow the instruction to install Java in Windows operating system. 1. Go to http://www.java.com 2. Click Download on the middle of the...
Manual - Page 9

Using the Web UI
The BMC firmware features an embedded web server, enabling users to connect to the BMC using an Internet browser (Microsoft® Internet Explorer™). The web server shall support 4 concurrent connections Web-based GUI is supported on the following browsers: Microsoft Windows: • Internet Explorer 8 ~ 12 • Mozilla® Firefox® 2.0 or later Linux...
Manual - Page 21
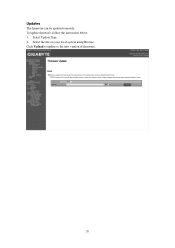
Updates
The firmware can be updated remotely. To update firmware, follow the instruction below: 1. Select Update Type. 2. Select the file on your local system using Browse. Click Upload to update to the new version of firmware.
20
Manual - Page 1
... TECHNOLOGY CO., LTD.
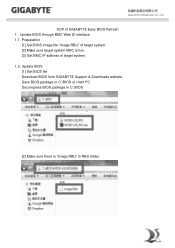
SOP of GIGABYTE Easy BIOS Refresh 1. Update BIOS through BMC Web UI interface 1.1. Preparation
[1] Get BIOS image file "image.RBU" of target system. [2] Make sure target system BMC is live. [3] Get BMC IP address of target system. 1.2. Update BIOS [1] Get BIOS file Download BIOS from GIGABYTE Support & Downloads website. Save BIOS package in C:\BIOS of client PC. Decompress...
Manual - Page 2
GIGA -BYTE TECHNOLOGY CO., LTD.
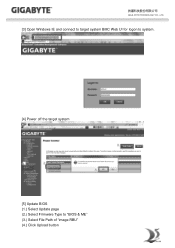
[3] Open Windows IE and connect to target system BMC Web UI for logon to system.
[4] Power off the target system
[5] Update BIOS (1.) Select Update page (2.) Select Firmware Type to "BIOS & ME" (3.) Select File Path of "image.RBU" (4.) Click Upload button
Manual - Page 6
... CO., LTD.
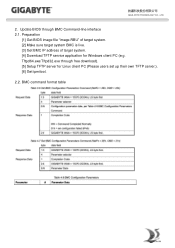
2. Update BIOS through BMC Command-line interface 2.1. Preparation
[1] Get BIOS image file "image.RBU" of target system. [2] Make sure target system BMC is live. [3] Get BMC IP address of target system. [4] Download TFTP service application for Windows client PC (e.g. Tftpd64.exe/Tftpd32.exe through free download). [5] Setup TFTP server for Linux client PC (Please users set up their...
Manual - Page 8
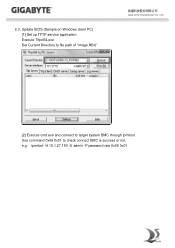
2.3. Update BIOS (Sample on Windows client PC) [1] Set up TFTP service application Execute Tftpd64.exe Set Current Directory to file path of "image.RBU"
GIGA -BYTE TECHNOLOGY CO., LTD.
[2] Execute cmd.exe and connect to target system BMC through ipmitool. Use command 0x06 0x01 to check connect BMC is success or not. e.g. ipmitool -H 10.1.27.150 -U admin -P password raw 0x06 0x01
Manual - Page 3
...
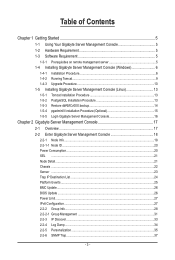
Chapter 1 Getting Started 5 1-1 Using Your Gigabyte Server Management Console 5 1-2 Hardware Requirement 5 1-3 Software Requirement 5
1-3-1 Prerequisites on remote management server 5 1-4 Installing Gigabyte Server Management Console (Windows 6
1-4-1 Installation Procedure 6 1-4-2 Running Tomcat...9 1-4-3 Upgrade Procedure 10 1-5 Installing Gigabyte Server Management Console (Linux 13...
Manual - Page 5
... using Gigabyte Server Management Console, please check your system for the following required configuration requirements:
• System Processor: 2 GHz and above • System Memory: Minimum 4 GB RAM • Free Disk Space: 1000 GB at least • Node servers : 255 maximum
1-3 Software Requirement
1-3-1 Prerequisites on remote management server Supported Browsers: • Internet Explorer...
Manual - Page 6
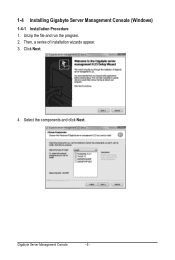
1-4 Installing Gigabyte Server Management Console (Windows)
1-4-1 Installation Procedure 1. Unzip the file and run the program. 2. Then, a series of installation wizards appear. 3. Click Next.
4. Select the components and click Next.
Gigabyte Server Management Console
- 6 -
Manual - Page 11
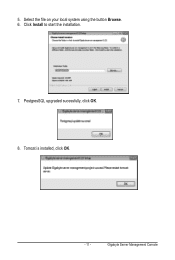
5. Select the file on your local system using the button Browse. 6. Click Install to start the installation.
7. PostgresSQL upgraded sucessfully, click OK. 8. Tomcat is installed, click OK.
- 11 -
Gigabyte Server Management Console
Manual - Page 13
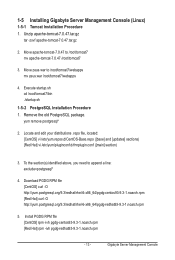
... ([base] and [updates] sections) [Red Hat] vi /etc/yum/pluginconf.d/rhnplugin.conf ([main] section)
3. To the section(s) identified above, you need to append a line: exclude=postgresql*
4. Download PGDG RPM file [...-9.3-1.noarch.rpm
5. Install PGDG RPM file [CentOS] rpm -ivh pgdg-centos93-9.3-1.noarch.rpm [Red Hat] rpm -ivh pgdg-redhat93-9.3-1.noarch.rpm
- 13 -
Gigabyte Server Management Console
Manual - Page 16
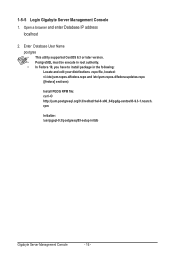
1-5-5 Login Gigabyte Server Management Console 1. Open a browser and enter Database IP address
localhost
2. Enter Database User Name postgres • This utility supported CentOS 6.3 or later version. • PostgreSQL must be execute in root authority. • In Fedora 19, you have to install package in the following: Locate and edit your distributions .repo file, located: vi /etc...
Manual - Page 26
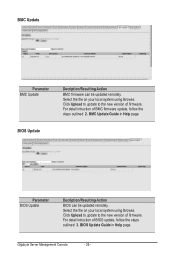
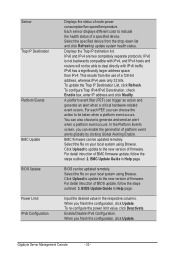
...of BMC firmware update, follow the steps outlined 2. BMC Update Guide in Help page.
BIOS Update
Parameter BIOS Update
Decription/Resulting Action
BIOS can be updated remotely. Select the file on your local system using Browse. Click Upload to update to the new version of firmware. For detail intruction of BIOS update, follow the steps outlined 3. BIOS Update Guide in Help page.
Gigabyte Server...
Manual - Page 32
... Update Guide in Help page.
BIOS can be updated remotely. Select the file on your local system using Browse. Click Upload to update to the new version of firmware. For detail intruction of BIOS update, follow the steps outlined 3. BIOS Update Guide in Help page.
Input the desired value in the respective columns. When you finish the configuration, click Update. To re-configure the power...
Manual - Page 12

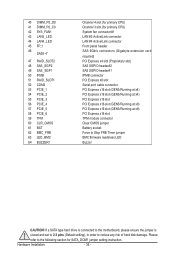
...138;Š 1 x Serial port connector ŠŠ 2 x SATA SPGIO headers ŠŠ 2 x SAS SPGIO headers ŠŠ 1 x Software RAID key connector ŠŠ 1 x IPMB connector ŠŠ 4 x USB 3.0 ports ŠŠ 2 x USB 2.0 ports ŠŠ 5 x RJ-45 ports (1 x 10/100/1000 Mbps dedicated management LAN port) ŠŠ 1 x COM port ŠŠ 1 x VGA port ŠŠ 1 x PS...
Manual - Page 35

...
SATA port 1 DOM support jumper Clearing Supervisor Password jumper ME update jumper
15 S3_MASK
S3 Power On Select jumper
16 ME_RCVR
ME recovry jumper
17 BIOS_RCVR
BIOS recovery jumper
18 CASE_OPEN
Case open intrusion alert header
19 SW_RAID
Software RAID Key jumper
20 SATA_SGP
sSATA SGPIO header #2
21 SSATA_SGP
sSATA SGPIO header #1
22 S S ATA 0 / S S ATA1 / S S ATA 2 / SATA...
Manual - Page 36
...) Channel 3 slot (for primary CPU) System fan connector#1 LAN #3 Active/Link connector LAN #4 Active/Link connector Front panel header SAS 6Gb/s connectors (Gigabyte extension card
required) PCI Express x4 slot (Proprietary slot) SAS SGPIO header#2 SAS SGPIO header#1 IPMB connector PCI Express x8 slot Serial port cable connector PCI Express x16 slot (GEN3/Running at x4) PCI Express x16 slot (GEN3...
Manual - Page 123

... not found DXE Core Firmware Volume was not found Recovery failed S3 Resume failed Reset PPI is not available
5-9-2 DEX Beep Codes
# of Beeps 1 4 5 5 6 7
Description Invalid password Some of the Architectural Protocols are not available No Console Output Devices are found No Console Input Devices are found Flash update is failed Reset protocol is not available
BIOS Setup
- 123 -