Lexmark X3330 driver and firmware

Related Lexmark X3330 Manual Pages
Download the free PDF manual for Lexmark X3330 and other Lexmark manuals at ManualOwl.com
Service Manual - Page 3

... errors....copies of publications related to this product by calling 1-800-553-9727. In other countries, contact your point of purchase.
References in this publication to products, programs, or services...Lexmark International, Inc. All rights reserved.
UNITED STATES GOVERNMENT RIGHTS This software and any accompanying documentation provided under this agreement are commercial computer software...
Service Manual - Page 11
... information contains an error indicator table, symptom tables, and service checks used to isolate failing field replaceable units (FRUs).
3. Diagnostic aids contains tests and checks used to locate or repeat symptoms of All-In-One problems.
4. Repair information provides instructions for making All-In-One adjustments and removing and installing FRUs.
5. Locations and connections...
Service Manual - Page 13
1. General information
4479-XXX
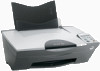
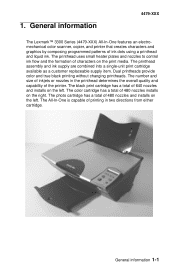
The Lexmark™ 3300 Series (4479-XXX) All-In-One features an electromechanical color scanner, copier, and printer that creates characters and graphics by composing programmed patterns of ink dots using a printhead and liquid ink. The printhead uses small heater plates and nozzles to control ink flow and the formation...
Service Manual - Page 22
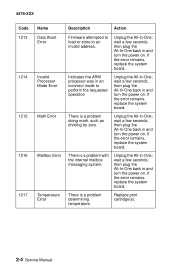
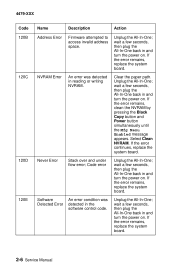
... 1217
Name Data Abort Error
Invalid Processor Mode Error
Math Error
Mailbox Error
Temperature Error
Description
Action
Firmware attempted to load or store to an invalid address.
Unplug the All-In-One; wait a few seconds, then plug the All-In-One back in and turn the power on. If the error remains, replace the system board.
Indicates the ARM processor was in an...
Service Manual - Page 24
..., clean the NVRAM by pressing the Black Copy button and Power button simultaneously until the Mfg Menu Enabled message appears. Select Clean NVRAM. If the error continues, replace the system board.
Never Error
Stack over and under flow error; Code error
Software
An error condition was
Detected Error detected in the
software control code.
Unplug the All-In-One; wait a few seconds...
Service Manual - Page 26
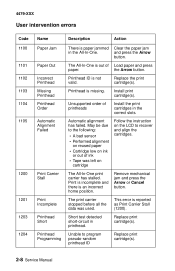
... home position.
Remove mechanical jam and press the Arrow or Cancel button.
The print carrier stopped before all the data was used.
This error is reported as Print Carrier Stall (1200).
Short test detected short-circuit in printhead.
Replace print cartridge(s).
Unable to program pseudo-random printhead ID
Replace print cartridge(s).
2-8 Service Manual
Service Manual - Page 31
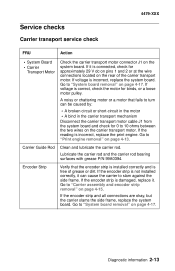
...
• A bind in the carrier transport mechanism
Disconnect the carrier transport motor cable J1 from the system board and check for 0 to 10 ohms between the two wires on the carrier transport...Carrier Guide Rod
Clean and lubricate the carrier rod.
Lubricate the carrier rod and the carrier rod bearing surfaces with grease P/N 99A0394.
Encoder Strip
Verify that the encoder strip is installed ...
Service Manual - Page 32

... • Printhead cables Ensure that all printhead cables are fully seated....board. Go to "System board removal" on page 4-17.
If the lamp does not come on as the CIS module assembly is scanning, check connector J10 on the system board. If connection is okay and the problem remains, replace the scanner module assembly. Go to "Scanner module assembly removal" on page 4-10.
2-14 Service Manual
Service Manual - Page 37
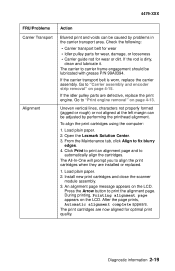
... • Carrier guide rod for wear or... computer:
1. Load plain paper. 2. Open the Lexmark Solution... Center. 3. From the Maintenance tab, click Align to fix blurry
edges. 4. Click Print to print an alignment page and to
automatically align the cartridges. The All-In-One will prompt you to align the print cartridges when they are installed or replaced.
1. Load plain paper. 2. Install...
Service Manual - Page 39

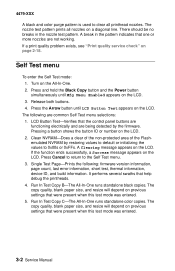
..., press the Arrow button.
The single test page consists of the following information: • Build Date • Code Level - Page Count • Last Error • Maint • USB Serial Number • MFG • CMD • Model • Class • USB Vendor ID • Digital Logic Type • Printer Engine • Printhead Type • Scanner
Diagnostic aids 3-1
Service Manual - Page 40
...-Prints the following: firmware version information, page count, last error information, short test, thermal information, device ID, and build information. It performs several swaths that help debug the printheads. 4. Run In Test Copy B-The All-In-One runs standalone black copies. The copy quality, blank paper size, and resize will depend on previous settings that were present when...
Service Manual - Page 41
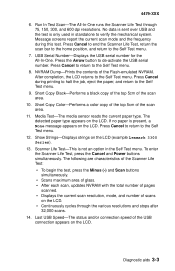
... test, press the Minus (-) and Scan buttons simultaneously. • Scans maximum area of glass. • After each scan, updates NVRAM with the total number of pages scanned. • Displays the current scan resolution, mode, and number of scans on the LCD. • Continuously cycles through the various resolutions and stops after 32,000 scans.
14. Last USB Speed-The status and/or...
Service Manual - Page 43

... damage to ESD-sensitive parts, follow the instructions below in addition to all the usual precautions, such as turning off power before removing system board:
• Keep the ESD-sensitive part ...being grounded.)
• Prevent ESD-sensitive parts from being accidentally touched by other personnel. Install machine covers when you are not working on the machine, and do not put unprotected ESD...
Service Manual - Page 44
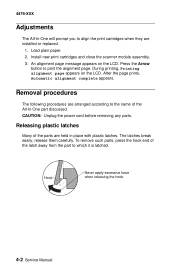
...-In-One will prompt you to align the print cartridges when they are installed or replaced.
1. Load plain paper. 2. Install new print cartridges and close the scanner module assembly. 3. An alignment page... are arranged according to the name of the All-In-One part discussed. CAUTION: Unplug the power cord before removing any parts.
Releasing plastic latches
Many of the parts are held in place with...
Service Manual - Page 57
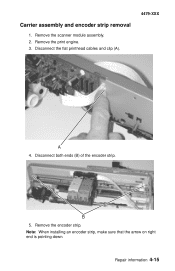
Carrier assembly and encoder strip removal
1. Remove the scanner module assembly. 2. Remove the print engine. 3. Disconnect the flat printhead cables and clip (A).
4479-XXX
4. Disconnect both ends (B) of the encoder strip.
5. Remove the encoder strip. Note: When installing an encoder strip, make sure that the arrow on right end is pointing down.
Repair information 4-15