Samsung S22B310B driver and firmware

Related Samsung S22B310B Manual Pages
Download the free PDF manual for Samsung S22B310B and other Samsung manuals at ManualOwl.com
User Manual Ver.1.0 (English) - Page 2
...2-4
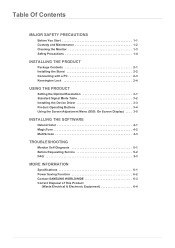
USING THE PRODUCT
Setting the Optimal Resolution 3-1 Standard Signal Mode Table 3-2 Installing the Device Driver 3-3 Product Operating Buttons 3-4 Using the Screen Adjustment Menu (OSD: On Screen Display) . . . . 3-5
INSTALLING THE SOFTWARE
Natural Color 4-1 MagicTune 4-2 MultiScreen 4-3
TROUBLESHOOTING
Monitor Self-Diagnosis 5-1 Before Requesting Service 5-2 FAQ 5-3
MORE INFORMATION...
User Manual Ver.1.0 (English) - Page 3

... of this manual is reserved by Samsung Electronics, Co., Ltd. The contents of this manual may not be partially or in whole reproduced, distributed or used in any form without the written permission of Samsung Electronics, Co., Ltd. The SAMSUNG logo and SyncMaster are the registered trademarks of Samsung Electronics, Co., Ltd. Microsoft, Windows and Windows NT are...
User Manual Ver.1.0 (English) - Page 4
...
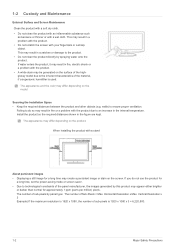
The appearance and the color may differ depending on the model.
Securing the Installation Space • Keep the required distances between the product and other objects (e.g....installing the product with a stand
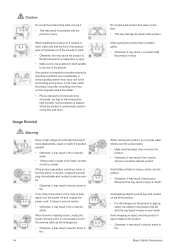
About persistent images
• Displaying a still image for a long time may create a persistent image or stain on the screen. If you do not use the product for a long time, set the power...
User Manual Ver.1.0 (English) - Page 7
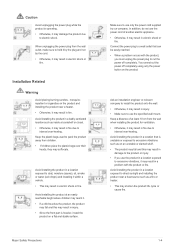
... reached. • When a problem occurs with the product,
you must unplug the power plug to cut the power off completely. You cannot cut the power off completely using only the power button on the product.
Ask an installation engineer or relevant company to install the product onto the wall. • Otherwise, it may result in injury...
User Manual Ver.1.0 (English) - Page 8
...moving it.
• This may result in a problem with the product or injury.
When installing the product on a console or shelf, make sure that the front of the product does... power off and unplug the power cord. Contact a service center.
• Otherwise, it may result in fire or electric shock.
When thunder or lighting occurs, unplug the power cord and under no circumstance touch the antenna cable ...
User Manual Ver.1.0 (English) - Page 11
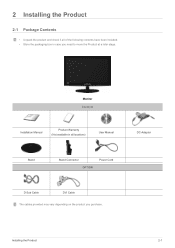
... of the following contents have been included. • Store the packaging box in case you need to move the Product at a later stage.
Monitor Contents
Installation Manual
Product Warranty (Not available in all locations)
User Manual
DC-Adapter
Stand
Stand Connector OPTION
Power Cord
D-Sub Cable
DVI Cable
The cables provided may vary depending on the product you purchase...
User Manual Ver.1.0 (English) - Page 12
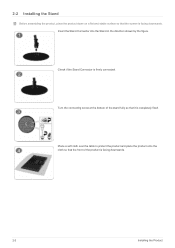
2-2 Installing the Stand
Before assembling the product, place the product down on a flat and stable surface so that the screen is facing downwards. Insert the Stand ... cloth over the table to protect the product and place the product onto the cloth so that the front of the product is facing downwards.
2-2
Installing the Product
User Manual Ver.1.0 (English) - Page 13
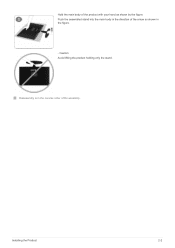
Hold the main body of the product with your hand as shown by the figure. Push the assembled stand into the main body in the direction of the arrow as shown in the figure.
- Caution Avoid lifting the product holding only the stand.
Disassembly is in the reverse order of the assembly.
Installing the Product
2-2
User Manual Ver.1.0 (English) - Page 14
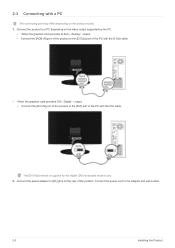
...; When the graphics card provides DVI
Digital
output • Connect the [DVI IN] port of the product to the [DVI] port of the PC with the DVI cable.
The [DVI IN] terminal is supplied for the digital (DVI)-dedicated models only. 2. Connect the power adapter to [DC] jack on the rear of the product. Connect the power cord to the adapter and wall socket.
2-3
Installing the Product
User Manual Ver.1.0 (English) - Page 15
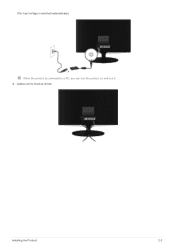
(The input voltage is switched automatically.)
When the product is connected to a PC, you can turn the product on and use it. 3. Cables can be fixed as shown.
Installing the Product
2-3
User Manual Ver.1.0 (English) - Page 16
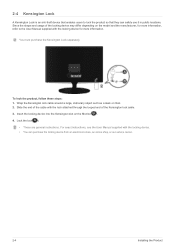
... looped end of the Kensington lock cable. 3. Insert the locking device into the Kensington slot on the Monitor( ). 4. Lock the lock( ).
• These are general instructions. For exact instructions, see the User Manual supplied with the locking device. • You can purchase the locking device from an electronics store, an online shop, or our service center.
2-4
Installing the Product
User Manual Ver.1.0 (English) - Page 20
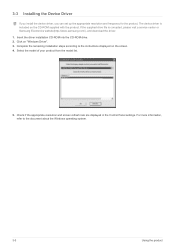
....samsung.com/), and download the driver. 1. Insert the driver installation CD-ROM into the CD-ROM drive. 2. Click on "Windows Driver". 3. Complete the remaining installation steps according to the instructions displayed on the screen. 4. Select the model of your product from the model list.
5. Check if the appropriate resolution and screen refresh rate are displayed in the Control Panel settings...
User Manual Ver.1.0 (English) - Page 30
... Samsung products and enables adjusting the displayed colors on the product and matches the colors on the product with the colors of the printed pictures. For more information, refer to the online help of the software (F1).
The Natural Color is provided online. You can download it from the website below and install; http://www.samsung...
User Manual Ver.1.0 (English) - Page 31
... by the graphics card, motherboard and the networking environment.
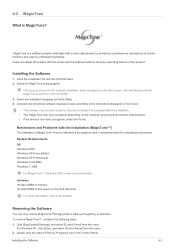
System Requirements OS •Windows 2000 •Windows XP Home Edition •Windows XP Professional •Windows Vista 32Bit •Windows 7 32Bit
For MagicTune™, Windows 2000 or later is recommended.
Hardware •At least 32MB of memory •At least 60MB of free space on the hard disk drive
For more information...
User Manual Ver.1.0 (English) - Page 32
....
• For technical support, the FAQ (frequently asked questions) or information about the software upgrade for MagicTune™, please visit our website.
• MagicTune does not be compatible with all video cards. For better woking, Win7 OS is recommended. • Before using MagicTune, we suggest that video card driver should be updated as latest version.
4-2
Installing the Software
User Manual Ver.1.0 (English) - Page 33
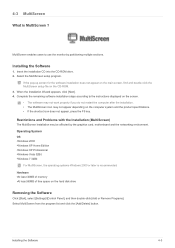
... card, motherboard and the networking environment. Operating System OS •Windows 2000 •Windows XP Home Edition •Windows XP Professional •Windows Vista 32Bit •Windows 7 32Bit
For MultiScreen, the operating systems Windows 2000 or later is recommended. Hardware •At least 32MB of memory •At least 60MB of free space on the hard disk drive
Removing the Software...
User Manual Ver.1.0 (English) - Page 35
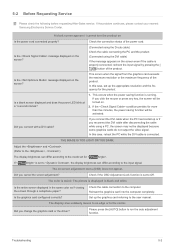
... through a cellophane paper?
Is the graphics card configured correctly?
Check the cable connection to the computer. Reinsert the graphics card into the computer completely. Set up the graphics card referring to the user manual.
The display area suddenly moves to an edge or to the center.
Did you change the graphics card or the driver?
Please press the [AUTO] button to...
User Manual Ver.1.0 (English) - Page 36
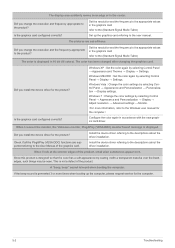
...; Personalization → Display settings.
Windows 7 : Change the color settings by selecting Control Panel → Appearance and Personalization → Display → Adjust resolution → Advanced settings → Monitor.
(For more information, refer to the Windows user manual for the computer.)
Configure the color again in accordance with the new graphics card driver.
When I connect...
User Manual Ver.1.0 (English) - Page 37
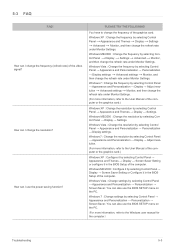
... Panel → Appearance and Personalization → Display → Adjust resolution.
(For more information, refer to the User Manual of the computer or the graphics card.)
Windows XP : Configure it by selecting Control Panel → Appearance and Themes → Display → Screen Saver Setting or configure it in the BIOS Setup of the computer.
Windows ME/2000 : Configure it by selecting...
User Manual Ver.1.0 (English) - Page 39
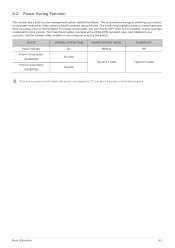
...long periods. The PowerSaver system operates with a VESA DPM compliant video card installed in your computer. Use the software utility installed on your computer to set up this feature.
STATE
Power Indicator Power Consumption
(S19B310B) Power Consumption
(S22B310B)
NORMAL OPERATION On
20 watts
30 watts
POWER SAVING MODE Blinking
Typical 0.3 watts
POWER OFF Off
Typical 0.3 watts
If there is no...