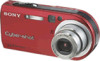
Sony DSC-P100R - Cyber-shot Camera driver and firmware
Related Sony DSC-P100R Manual Pages
Download the free PDF manual for Sony DSC-P100R and other Sony manuals at ManualOwl.com
Operating Instructions - Page 2
... questions about this product, you may call:
Sony Customer Information Services Center 1-800-222-SONY (7669)
The number below is for the FCC related matters only.
Regulatory Information
Declaration of Conformity
Trade Name:
SONY
Model No.:
DSC-P100
Responsible Party: Sony Electronics Inc.
Address:
16450 W. Bernardo Dr,
San Diego, CA 92127
U.S.A.
Telephone No.: 858-942-2230
This device...
Operating Instructions - Page 4
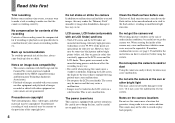
... playback is not possible due to a malfunction of your camera or recording media, etc.
Back up recommendation To avoid the potential risk of data loss, always copy (back up) data to a disk.
Notes on image data compatibility • This camera conforms with the Design rule for
Camera File system universal standard established by the JEITA (Japan...
Operating Instructions - Page 5
... a trademark of Sony
Corporation.
• Microsoft, Windows, WindowsMedia, and
DirectX are either registered trademarks or
trademarks of Microsoft Corporation in the
United States and/or other countries.
• Macintosh, Mac OS, QuickTime, iMac, iBook, PowerBook, Power Mac and eMac are trademarks or registered trademarks of Apple Computer, Inc.
• Macromedia and Flash are trademarks...
Operating Instructions - Page 7
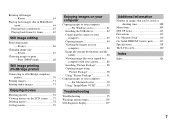
... to a PictBridge compliant printer 70
Printing images 71 Printing index-images 73
Enjoying movies
Shooting movies 76 Viewing movies on the LCD screen .......77 Deleting movies 78 Cutting movies 79
Enjoying images on your computer
Copying images to your computer - For Windows users 81
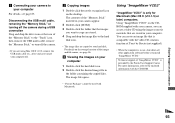
Installing the USB driver 82 Connecting the camera to your
computer 83 Copying images 84 Viewing the...
Operating Instructions - Page 8
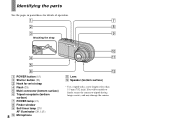
... strap D Flash (28) E Multi connector (bottom surface) F Tripod receptacle (bottom
surface) G POWER lamp (15) H Finder window I Self-timer lamp (27)/
AF illuminator (29, 113)
8 J Microphone
q; qa
qs
K Lens L Speaker (bottom surface)
• Use a tripod with a screw length of less than 5.5 mm (7/32 inch). You will be unable to firmly secure the camera to tripods...
Operating Instructions - Page 11

...; Be sure to turn off your camera when charging the battery pack (page 15).
• Your camera operates with the "InfoLITHIUM" NP-FR1 battery pack (R type) (supplied). You can use only R type battery pack (page 117).
2 Battery eject lever
, Install the battery pack, then close the battery/"Memory Stick" cover.
Make sure the battery...
Operating Instructions - Page 22
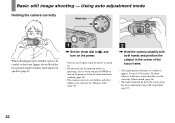
... auto adjustment mode
Holding the camera correctly
Mode dial
When shooting pictures with the camera, be careful so that your fingers do not block the lens portion, finder window, flash emitter or speaker (page 8).
1
, Set the mode dial to , and turn on the power.
• The lens cover opens when the power is turned on.
• Do...
Operating Instructions - Page 23
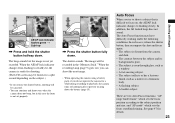
...; You can continue and shoot even when the camera does not beep, but in this case the focus is not set properly.
60min
VGA
101
95
S AF
4
, Press the shutter button fully down.
The shutter sounds. The image will be recorded in the "Memory Stick." When the recording lamp (page 9) goes out, you can shoot the...
Operating Instructions - Page 49
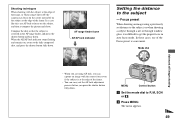
... the frame, or when using Center AF, the camera may focus on the center instead of on the ...flashing and remains on, return to the fully composed shot, and press the shutter button fully down.
60min P
VGA FINE 101 98
S AF
F2.8 30
AF range finder frame
AE/AF lock indicator
60min P
m
VGAFINE 101 98
Setting....
MENU
Control button
a Set the mode dial to P, M, SCN or .
b Press MENU. The ...
Operating Instructions - Page 81
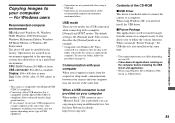
...not provided on your computer
When neither a USB connector nor a "Memory Stick" slot is provided, you can copy images using an additional device. See the Sony Website for details. http://www.sony.net/
Contents of the CD-ROM
x USB Driver This driver is needed in order to connect the camera to a computer. When using Windows XP, you need not install the USB driver. x Picture Package This application...
Operating Instructions - Page 82
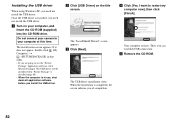
Installing the USB driver
When using Windows XP, you need not install the USB driver. Once the USB driver is installed, you need not install the USB driver.
a Turn on your computer, and insert the CD-ROM (supplied) into the CD-ROM drive.
Do not connect your camera to your computer at this time.
The install menu screen appears. If it does not appear, double-click (My Computer) t
(PICTUREPACKAGE) in...
Operating Instructions - Page 85
...-click [ Sony DSC]. 2 Click [Uninstall]. The "Confirm Device Removal" screen appears. • For Windows 98, 98SE, Me users, click [Remove]. 3 Click [OK]. The device is deleted.
Try the USB driver installation again using the CD-ROM (page 82).
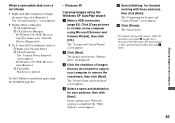
- Windows XP
Copying images using the Windows XP AutoPlay wizard a Make a USB connection
(page 83). Click [Copy pictures to a folder on my computer using...
Operating Instructions - Page 88
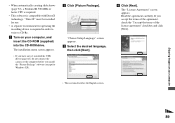
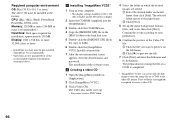
.... Other system requirements are as follows.
Software: Macromedia Flash Player 6.0 or later, Windows Media Player 7.0 or later, DirectX 9.0b or later Sound card: 16-bit stereo sound card with speakers Memory: 64 MB or more (128 MB or more is recommended.) Hard Disk: Disk space required for installation: approximately 200 MB Display: Video card (Direct Draw driver compliant) with 4 MB of VRAM
88
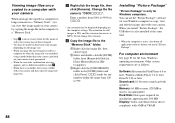
Operating Instructions - Page 89
... operating the recording device is required in order to write to CD-Rs.
a Turn on your computer, and insert the CD-ROM (supplied) into the CD-ROM drive.
The installation menu screen appears.
• If you have not yet installed the USB driver (page 82), do not connect the camera to the computer before you install the "Picture Package" software (except for Windows XP).
b Click...
Operating Instructions - Page 90
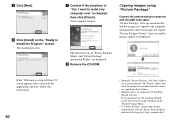
... and the images copied are displayed.
If the "Welcome to setup for Direct X" screen appears after you install the application software, follow the instructions.
90
• Normally "Picture Package" and "Date" folders are created inside the "My Picture" folder, and all of the image files recorded with the camera are copied into these folders.
• Windows XP is set so that...
Operating Instructions - Page 93
... the drive icon or the icon of the "Memory Stick" to the "Trash" icon, then remove the USB multi cable, remove the "Memory Stick," or turn off the camera.
• If you are using Mac OS X v10.0, remove the USB multi cable etc., after you have turned your computer off.
b Copying images
1 Double-click the newly recognized icon on the desktop. The...
Operating Instructions - Page 94
... for all the recommended computer environments mentioned above.
a Installing "ImageMixer VCD2"
1 Turn on your computer. • The display settings should be 1024 × 768 dots or higher and 32,000 colors or higher.
2 Insert the CD-ROM (supplied) into the CD-ROM drive.
3 Double-click the CD-ROM icon. 4 Copy the [IMXINST.SIT] file in the
[MAC] folder to the hard...
Operating Instructions - Page 100
... movie cannot be cut. • Still images cannot be cut.
-
- p Cancel the protection (page 66). -
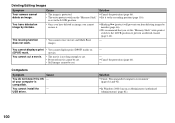
Computers
Symptom
You do not know if the OS of your computer is compatible.
You cannot install the USB driver.
Cause -
-
Solution p Check "Recommended computer environment"
(pages 81 and 92).
p In Windows 2000, log on as Administrator (authorized Administrators) (page 81).
100
Operating Instructions - Page 101
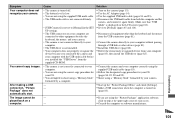
...recognized device from your computer
(page 85), then install the USB driver (page 82).
p Connect the camera and your computer correctly using the supplied USB multi cable (page 83).
p Follow the designated copy procedure for your OS (pages 84, 85, 90 and 92).
p Shoot using a "Memory Stick" formatted by your camera.
p Start up the "Picture Package Menu" and check [Settings]. p Make a USB connection...
Marketing Features & Specifications - Page 2
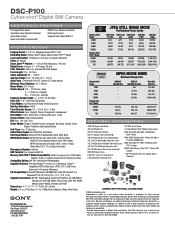
DSC-P100
Cyber-shot® Digital Still Camera
ADDITIONAL FEATURES
3:2 Aspect Ratio Mode Adjustable Color Saturation/Contrast Audio/Video Output Clear Color/Clear Luminance NR
MPEG1 Cue, Review and Divide Multi-Use Terminal Supports High Speed USB 2.0
S P E C I F I C AT I O N S
Imaging Device: 1/1.8" 5.1 Megapixel Super HAD™ CCD Recording Media: Memory Stick® Media, Memory Stick PRO...