Sony HCD-HDX500 - Dvd/receiver Component For Home Theater System driver and firmware
Related Sony HCD-HDX500 Manual Pages
Download the free PDF manual for Sony HCD-HDX500 and other Sony manuals at ManualOwl.com
Operating Instructions - Page 2
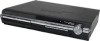
... rear exterior of the control unit. Record the serial number in the space provided below. Refer to them whenever you call upon your Sony dealer regarding this product. Model No. DAV-HDX500/DAV-HDX501W Serial No
2US
WARNING
This equipment has been tested and found to comply with the limits for a Class B digital device, pursuant to Part 15...
Operating Instructions - Page 3
...turned off. • Install this system so that the AC power cord (mains) can be unplugged from the wall socket immediately in the event of trouble.
13) Unplug this ... Audio Corporation.
"Neural" and "Neural Audio" and "Neural Surround" are trademarks of Neural Audio Corporation.
Welcome!
Thank you for purchasing Sony DVD Home Theatre System. Before operating this system, please read this manual ...
Operating Instructions - Page 4
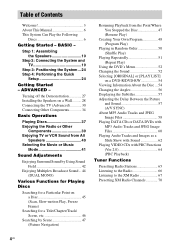
... - BASIC -
Step 1: Assembling the Speakers 10
Step 2: Connecting the System and TV 19
Step 3: Positioning the System ...24 Step 4: Performing the Quick
Setup 24
Getting Started - ADVANCED -
Turning off the Demonstration 27 Installing the Speakers on a Wall.......... 28 Connecting the TV (Advanced 30 Connecting Other Components 34
Basic Operations
Playing Discs 37 Enjoying the Radio or Other...
Operating Instructions - Page 7
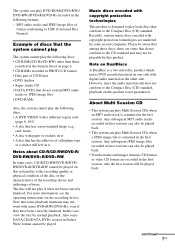
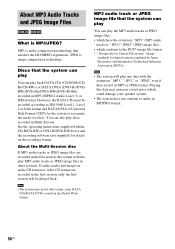
... the formats listed on page 6 • CD-ROMs recorded in PHOTO CD format • Data part of CD-Extras • DVD Audios • Super Audio CD • DATA DVDs that do not contain MP3 audio
tracks or JPEG image files • DVD-RAMs
Also, the system cannot play the following discs: • A DVD VIDEO with a different region code
(page 8, 105) •...
Operating Instructions - Page 8
... appear on the TV screen. Depending on the DVD VIDEO, no region code indication may be given even though playing the DVD VIDEO is prohibited by area restrictions.
Note about playback operations of DVDs and VIDEO CDs
Some playback operations of DVDs and VIDEO CDs may be intentionally set by software producers. Since this system plays DVDs and VIDEO...
Operating Instructions - Page 10
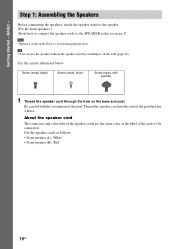
... 21.
Note
• Spread a cloth on the floor to avoid damaging the floor.
Tip
• You can use the speaker without the speaker stand by installing it on the wall (page 28).
Use the screws illustrated below.
Screw (small, black)
Screw (small, silver)
Screw (large, with washer)
1 Thread the speaker cord...
Operating Instructions - Page 20
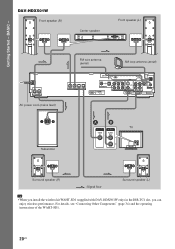
...
DIGITAL IN
SAT/CABLE
OUT
(DVD ONLY)
COMPONENT VIDEO IN
Y
PB/CB
PR/CR
AM SAT/CABLE
R AUDIO IN L VIDEO IN
S VIDEO (DVD ONLY)
Y
PB/CB
PR/CR
COMPONENT VIDEO OUT
VIDEO MONITOR OUT
R AUDIO IN L TV
XM
DMPORT1
FM 75
COAXIAL ANTENNA
DMPORT2
Subwoofer
AB
TV
VIDEO IN
AUDIO OUT
L
R
Surround speaker (R)
:Signal flow
Surround speaker (L)
Tip
• When you install the wireless...
Operating Instructions - Page 25
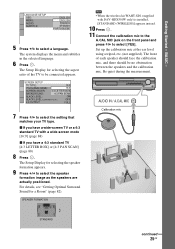
... system displays the menu and subtitles in the selected language.
6 Press .
The Setup Display for selecting the aspect ratio of the TV to be connected appears.
SCREEN SETUP
TV TYPE:
16:9
YCBCR/RGB (HDMI):
16:9
SCREEN SAVER: 4:3 LETTER BOX
BACKGROUND:
4:3 PAN SCAN
BLACK LEVEL:
ON
BLACK LEVEL (COMPONENT OUT):
OFF
4:3 OUTPUT:
FULL
7 Press X/x to select the setting that
matches your TV...
Operating Instructions - Page 26

...84).
• If you want to change any of the settings, see "Using the Setup Display" (page 86).
To recall the Quick Setup display
1 Press DISPLAY when the system is in
stop mode.
The Control Menu display appears.
2 Press X/x to select
press .
[SETUP], then
The options for [SETUP] appear.
1 2 ( 2 7 ) 1 8 ( 3 4 ) T 0:00:02
DVD VIDEO
QUICK QUICK CUSTOM RESET BNR
3 Press X/x to select [QUICK...
Operating Instructions - Page 28
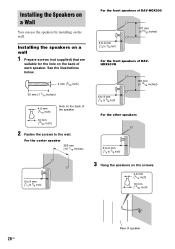
... on a Wall
You can use the speakers by installing on the wall.
Installing the speakers on a wall
1 Prepare screws (not supplied) that are
suitable for the hole... the wall.
For the center speaker 265 mm (10 7/16 inches)
6 to 9 mm (1/4 to 3/8 inch)
For the front speakers of DAV-HDX500
6 to 9 mm (1/4 to 3/8 inch)
170 mm (6 23/32 inches)
For the front speakers of DAVHDX501W
6 to 9 mm (1/4 to 3/8...
Operating Instructions - Page 29
... and strength. As a plaster board wall is especially fragile, attach the screws securely to a beam and fasten them to the wall. Install the speakers on a vertical and flat wall where reinforcement is applied.
• Contact a screw shop or installer regarding the wall material or screws to be used.
• Sony is not responsible for...
Operating Instructions - Page 33
... the software type, and selects the appropriate conversion method. Note that the picture will not be clear or no picture will appear if you select these settings when either of the above conditions are not met.
Note
• When you connect the unit and the TV with the HDMI cord during the system is set to...
Operating Instructions - Page 34
...
OPTICAL
DIGITAL IN
SAT/CABLE
OUT
(DVD ONLY)
COMPONENT VIDEO IN
Y
PB/CB
PR/CR
AM SAT/CABLE
R AUDIO IN L VIDEO IN
S VIDEO (DVD ONLY)
Y
PB/CB
PR/CR
COMPONENT VIDEO OUT
VIDEO MONITOR OUT
R AUDIO IN L TV
XM
DMPORT1
FM 75
COAXIAL ANTENNA
DMPORT2
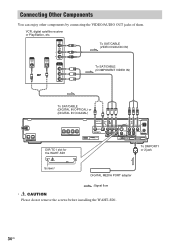
To DMPORT1 or 2 jack
Screws*
DIGITAL MEDIA PORT adapter
:Signal flow
* CAUTION Please do not remove the screws before installing...
Operating Instructions - Page 36
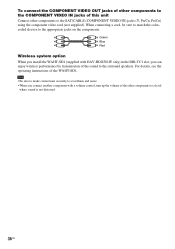
... jacks of this unit Connect other components to the SAT/CABLE (COMPONENT VIDEO IN) jacks (Y, PB/CB, PR/CR) using the component video cord (not supplied). When connecting a cord, be sure to match the colorcoded sleeves to the appropriate jacks on the components.
Green Blue Red
Wireless system option When you install the WAHT-SD1 (supplied with DAV...
Operating Instructions - Page 43
... field is set to "A.F.D. STD" automatically.
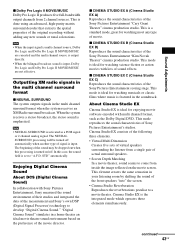
Enjoying Digital Cinema Sound About DCS (Digital Cinema Sound)
In collaboration with Sony Pictures Entertainment, Sony measured the sound environment of their studios and integrated the data of the measurement and Sony's own DSP (Digital Signal Processor) technology to develop "Digital Cinema Sound." "Digital Cinema Sound" simulates in a home theater an...
Operating Instructions - Page 58
... and DATA DVDs of Universal Disk Format (UDF) for the system to recognize the tracks (or files). You can also play discs recorded in Multi Session. See the operating instructions supplied with the CD-R/CD-RW or DVD-R/DVD-RW drives and the recording software (not supplied) for details on the recording format.
About the Multi-Session disc If MP3 audio tracks...
Operating Instructions - Page 59
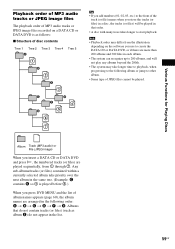
... depending on the software you use to create the DATA CD or DATA DVD, or if there are more than 200 albums and 300 files in each album.
• The system can recognize up ... files cannot be played.
Various Functions for Playing Discs
Album Track (MP3 audio) or File (JPEG image)
When you insert a DATA CD or DATA DVD and press H, the numbered tracks (or files) are played sequentially, from...
Operating Instructions - Page 68
....
OPTICAL
COMPONENT VIDEO IN
Y
PB/CB
PR/CR
AM SAT/CABLE
R AUDIO IN L VIDEO IN
S VIDEO (DVD ONLY)
Y
PB/CB
PR/CR
COMPONENT VIDEO OUT
VIDEO MONITOR OUT
R AUDIO IN L TV
XM
DMPORT1
FM 75
COAXIAL ANTENNA
DMPORT2
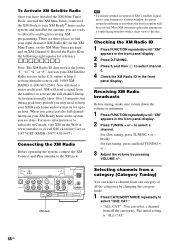
XM Jack
Note
• To ensure optimal reception of XM's satellite signal, move your antenna to various window locations around your home...
Operating Instructions - Page 70
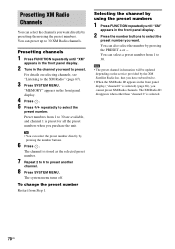
...on selecting channels, see "Listening to the XM Radio" (page 67).
3 Press SYSTEM MENU.
"MEMORY" appears in the front panel display.
4 Press . 5 Press X/x repeatedly to select the
preset number. Preset numbers ... will be updated depending on the service provided by the XM Satellite Radio Inc. that you have subscribed to.
• When the XM Radio ID appears in the front panel display ("channel 0"...
Operating Instructions - Page 116
... COLD RESET 94 COMPONENT VIDEO OUT
32 Continuous play 37 Control Menu Display 111 Controlling the TV 72 CUSTOM 86 CUSTOM PARENTAL
CONTROL 79 CUSTOM SETUP 90
D
D. C. A. C. 84, 103 DATA CD 60 DATA DVD 60 DEMO 27 Demonstration 27 Digital Cinema Auto
Calibration 84, 103 Digital Cinema Sound 43
116US
Digital connection 35 Digital Direct Twin Drive
Subwoofer 103 DIGITAL MEDIA PORT 77 DIMMER 76...