TP-Link Pharos Control driver and firmware
Drivers and firmware downloads for this TP-Link item
Related TP-Link Pharos Control Manual Pages
Download the free PDF manual for TP-Link Pharos Control and other TP-Link manuals at ManualOwl.com
PharosControl User Guide - Page 2
...tp-link.com
Intended Readers
This Guide is intended for network managers familiar with IT concepts and network terminologies.
Conventions
Some models featured in this guide may be unavailable in your country or region. For local sales information, visit http://www.tp-link.com.
When using this guide, please notice that features of Pharos Control may vary slightly depending on the software version...
PharosControl User Guide - Page 3
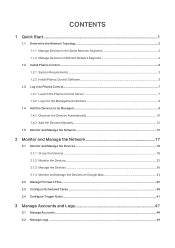
... 2 1.1.2 Manage Devices in Different Network Segment 2
1.2 Install Pharos Control...3 1.2.1 System Requirements...3 1.2.2 Install Pharos Control Software...3
1.3 Log in to Pharos Control...7 1.3.1 Launch the Pharos Control Server...7 1.3.2 Log in to the Management Interface...9
1.4 Add the Devices to be Managed...9 1.4.1 Discover the Devices Automatically...10 1.4.2 Add the Devices Manually...12...
PharosControl User Guide - Page 4

1 Quick Start
Pharos Control is the management software for TP-Link Pharos devices. With this software, you can centrally manage all Pharos devices using a web browser. Follow the steps below to complete the basic set up. 1. Determine the Network Topology 2. Install Pharos Control 3. Log in to Pharos Control 4. Add the Devices to be Managed 5. Monitor and Manage the Network
1
PharosControl User Guide - Page 5
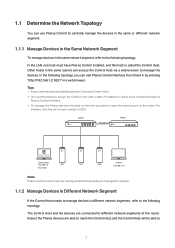
... Tips ··Ensure the network reachability between Client and Control Host. ··It's recommended to assign the Control Host with a static IP address to allow more convenient login to
Pharos Control interface. ··To manage the Pharos devices remotely via Internet, you need to open the service port on the router. For
example, here the service port number is 9321.
Switch
192...
PharosControl User Guide - Page 6
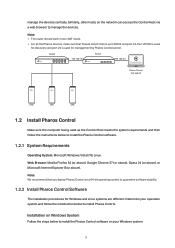
...for management by Pharos Control server.
Switch
192.168.1.0
Router
192.168.2.0
Pharos Control
Pharos Control 192.168.2.2
CPE
CPE
CPE
1.2 Install Pharos Control
Make sure the computer being used as the Control Host meets the system requirements and then follow the instructions below to install the Pharos Control software.
1.2.1 System Requirements
Operating System: Microsoft Windows Vista...
PharosControl User Guide - Page 7
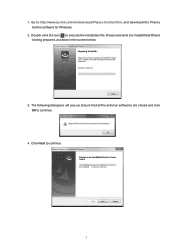
1. Go to http://www.tp-link.com/en/download/Pharos-Control.html, and download the Pharos Control software for Windows.
2. Double-click the icon to execute the installation file. Please wait while the InstallShield Wizard is being prepared, as shown in the screen below.
3. The following dialog box will pop up. Ensure that all the antivirus softwares are closed and click OK to...
PharosControl User Guide - Page 9
... monitor or manage the devices.
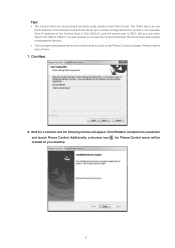
··The username and password set here will be used to log in to the Pharos Control software. Please make a note of them.
7. Click Next.
8. Wait for a moment and the following window will appear. Click Finish to complete the installation
and launch Pharos Control. Additionally, a shortcut icon created on your desktop.
for Pharos Control server will be
6
PharosControl User Guide - Page 10

... requires Java Runtime Environment (JRE). Make sure that your Linux system has been installed with JRE 1.7 (or above). 1. Go to http://www.tp-link.com/en/download/Pharos-Control.html and download the software
package for Linux. Decompress the package and you can find three software files: one for Deb system and two for RPM system (32-bit and...
PharosControl User Guide - Page 12
... database with a previous backup file.
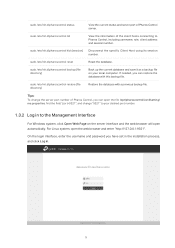
Tips To change the server port number of Pharos Control, you can open the file /opt/pharoscontrol/conf/setting/ me.properties, find the field "port=9321", and change "9321" to your desired port number.
1.3.2 Log in to the Management Interface
For Windows system, click Open Web Page on the server interface and...
PharosControl User Guide - Page 18
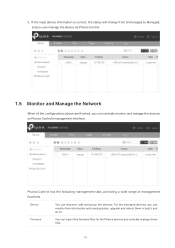
... the devices on Pharos Control's management interface.
Pharos Control has the following management tabs, providing a wide range of management functions.
Device
You can discover, add and group the devices. For the managed devices, you can monitor their information and running status, upgrade and reboot them in batch, and so on.
Firmware
You can import the firmware files for the Pharos devices...
PharosControl User Guide - Page 26
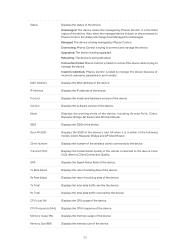
... to manage the device.
Invalid Credentials: Pharos Control is failed to manage the device because of incorrect username, password or port number.
MAC Address
Displays the MAC address of the device.
IP Address
Displays the IP address of the device.
Product
Displays the model and hardware version of the device.
Version
Displays the software version of the device.
Mode
Displays the working...
PharosControl User Guide - Page 30
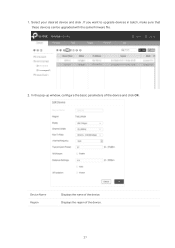
1. Select your desired device and click . If you want to upgrade devices in batch, make sure that these devices can be upgraded with the same firmware file.
2. In the pop-up window, configure the basic parameters of the device and click OK.
Device Name Region
Displays the name of the device. Displays the region of the device.
27
PharosControl User Guide - Page 32
... you set. CPE210 does not support this option.
Enable or disable AP Isolation. AP Isolation is used to isolate all wireless stations connected to this device so that they cannot communicate with each other. This function will be disabled if WDS/Bridge is enabled.
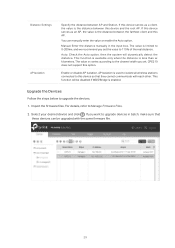
Upgrade the Devices
Follow the steps below to upgrade the devices. 1. Import the firmware files...
PharosControl User Guide - Page 33
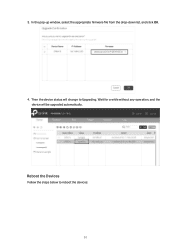
3. In the pop-up window, select the appropriate firmware file from the drop-down list, and click OK.
4. Then the device status will change to Upgrading. Wait for a while without any operation, and the device will be upgraded automatically.
Reboot the Devices
Follow the steps below to reboot the devices:
30
PharosControl User Guide - Page 38
... on the map, which means that the devices cannot be moved with this option enabled.
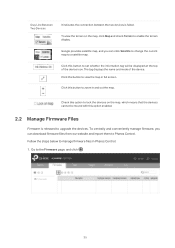
2.2 Manage Firmware Files
Firmware is released to upgrade the devices. To centrally and conveniently manage firmware, you can download firmware files from our website and import them to Pharos Control. Follow the steps below to manage firmware files in Pharos Control: 1. Go to the Firmware page, and click .
35
PharosControl User Guide - Page 39
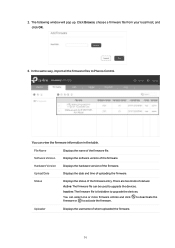
... window will pop up. Click Browse, choose a firmware file from your local host, and click OK.
3. In the same way, import all the firmware files to Pharos Control.
You can view the firmware information in the table.
File Name
Displays the name of the firmware file.
Software Version
Displays the software version of the firmware.
Hardware Version
Displays the hardware version of the firmware...
PharosControl User Guide - Page 40
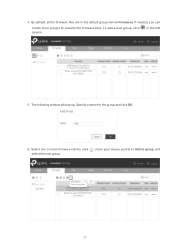
4. By default, all the firmware files are in the default group named Firmwares. If needed, you can
create more groups to classify the firmware files. To add a new group, click column.
in the left
5. The following window will pop up. Specify a name for the group and click OK.
6. Select one or more firmware entries, click select the new group.
, move your mouse pointer to Add to group, and
37
PharosControl User Guide - Page 41
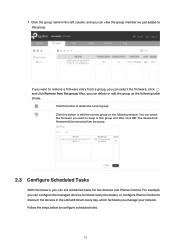
... deselected firmware will be removed from the group.
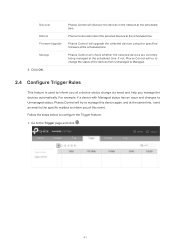
2.3 Configure Scheduled Tasks
With this feature, you can set scheduled tasks for the devices and Pharos Control. For example, you can configure the managed devices to reboot every two weeks, or configure Pharos Control to discover the devices in the LAN at 8:00 am every day, which facilitates you manage your network. Follow...
PharosControl User Guide - Page 44
... Click OK.
Pharos Control will discover the devices in the network at the scheduled time.
Pharos Control will reboot the selected devices at the scheduled time.
Pharos Control will upgrade the selected devices using the specified firmware at the scheduled time.
Pharos Control will check whether the selected devices are currently being managed at the scheduled time. If not, Pharos Control will try...
PharosControl User Guide - Page 51
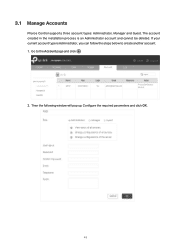
3.1 Manage Accounts
Pharos Control supports three account types: Administrator, Manager and Guest. The account created in the installation process is an Administrator account and cannot be deleted. If your current account type is Administrator, you can follow the steps below to create another account. 1. Go to the Account page and click .
2. Then the following window will...