ViewSonic Pro8300 driver and firmware

Related ViewSonic Pro8300 Manual Pages
Download the free PDF manual for ViewSonic Pro8300 and other ViewSonic manuals at ManualOwl.com
PRO8300 User Guide - Page 1
Pro8300 DLP Projector
User Guide
IMPORTANT: Please read this User Guide to obtain important information on installing and using your product in a safe manner, as well as registering your product for future service. Warranty information contained in this User Guide will describe your limited coverage from ViewSonic Corporation, which is also found on our web site at http://www...
PRO8300 User Guide - Page 2

... undesired operation. This equipment has been tested and found to comply with the limits for a Class B digital device, pursuant to part 15 of the FCC Rules. These limits are designed to provide reasonable protection against harmful interference in a residential installation. This equipment generates, uses, and can radiate radio frequency energy, and if not...
PRO8300 User Guide - Page 7
... Overview ...3
Using the Product 5
Control Panel! ...5 Connection Ports ...6 Remote Control! ...8 Installing the Batteries ...10 Remote Control Operation ...11
Connection 12
Connecting a computer or monitor ...13 Connecting Video source devices ...14
Operation 17
Powering On/Off the Projector ...17 Adjusting the Projector Height ...18 Adjusting the Projector Zoom and Focus 18 Adjusting...
PRO8300 User Guide - Page 13
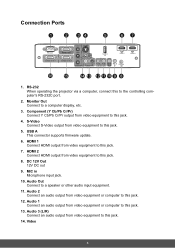
... When operating the projector via a computer, connect this to the controlling computer's RS-232C port.
2. Monitor Out Connect to a computer display, etc.
3. Component (Y Cb/Pb Cr/Pr) Connect Y Cb/Pb Cr/Pr output from video equipment to this jack.
4. S-Video Connect S-Video output from video equipment to this jack.
5. USB A This connector supports firmware update.
6. HDMI 1 Connect HDMI output from...
PRO8300 User Guide - Page 17

... of used batteries according to the instructions. • Make sure the plus and minus terminals are correctly aligned when loading a battery.
Note • Keep the batteries out of the reach of children. There is a danger of death by
accidentally swallowing the batteries.
• Remove batteries from remote control when not using for extended periods...
PRO8300 User Guide - Page 20
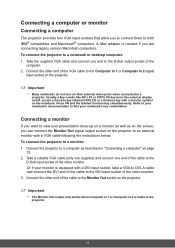
... IBM® compatibles and Macintosh® computers. A Mac adapter is needed if you are connecting legacy version Macintosh computers. To connect the projector to a notebook or desktop computer: 1. Take the supplied VGA cable and connect one end to the D-Sub output socket of the
computer. 2. Connect the other end of the VGA cable to the Computer in 1 or Computer in 2 signal
input socket on the...
PRO8300 User Guide - Page 26
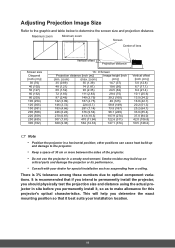
... variations. It is recommended that if you intend to permanently install the projector, you should physically test the projection size and distance using the actual projector in situ before you permanently install it, so as to make allowance for this projector's optical characteristics. This will help you determine the exact mounting position so that it best...
PRO8300 User Guide - Page 29

... range and default setting vary depending on signal type. *2 This function is only available when the projector is installed an optional filter cover. *3 The selectable Function list includes Color Mode, Gamma, Overscan, Noise Reduction, Keystone
and Filter Mode. *4 Saturation is supported under Component, Video and S-Video modes. *5 Sharpness is supported under HDMI, Component, Video and...
PRO8300 User Guide - Page 33
... on following normal power on procedure. Quick Power Off • On: The projector will directly shut down without cooling procedure. • Off: The projector will shut down following normal cooling procedure. DC 12V Trigger Enable or disable to trigger external devices such as an electric screen.
Option
Password Set or delete the password. When the password function is added...
PRO8300 User Guide - Page 39
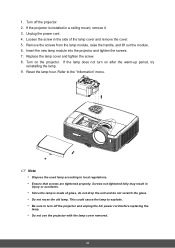
... the projector. 2. If the projector is installed in a ceiling mount, remove it 3. Unplug the power cord. 4. Loosen the screw in the side of the lamp cover and remove the cover. 5. Remove the screws from the lamp module, raise the handle, and lift out the module. 6. Insert the new lamp module into the projector and tighten...
PRO8300 User Guide - Page 41
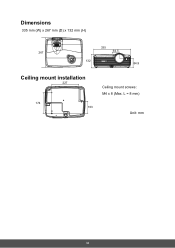
Dimensions
335 mm (W) x 267 mm (D) x 132 mm (H)
335
267
64.5
132 84.9
Ceiling mount installation
227
174 103
Ceiling mount screws: M4 x 8 (Max. L = 8 mm)
Unit: mm
34 34
PRO8300 User Guide - Page 50

Limited Warranty
VIEWSONIC ® PROJECTOR
What the ...DFWVRIQDWXUH LPSURSHUPDLQWHQDQFHXQDXWKRUL]HGSURGXFWPRGL¿FDWLRQRUIDLOXUHWRIROORZ instructions supplied with the product.
E 2SHUDWLRQRXWVLGHRISURGXFWVSHFL¿FDWLRQV c. ...RIWKHSURGXFWGXHWRVKLSPHQW
f. Removal or installation of the product. J &DXVHVH[WHUQDOWRWKHSURGXFWVXFKDVHOHFWULFSRZHUÀXFWXDWLRQV...