Sony VPLSW535C driver and firmware
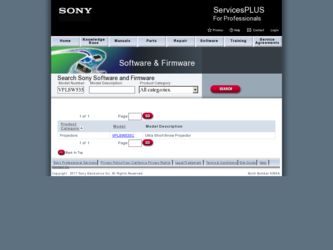
Related Sony VPLSW535C Manual Pages
Download the free PDF manual for Sony VPLSW535C and other Sony manuals at ManualOwl.com
Product Brochure (Ulta Short Throw Projectors) - Page 2

...powerful VPL-S500 series features. The two projectors transform most of a flat surface into an interactive screen, eliminating the need to install expensive interactive whiteboards. Rich interactive capabilities include simultaneous dual-touch annotation, mouse function to operate many third party curriculum software... of these projectors is left powered on while not in use, after a set period of ...
Product Brochure (Ulta Short Throw Projectors) - Page 3

... Disk Free Space
100MB or more
Display
Resolution greater than SVGA (800x600)
*2 : Only 32 bit edition *3 : 32 bit edition and 64 bit edition *4 : Macintosh-compatible interactive software is planned to be available
during August 2012 through Sony Electronics Service Plus website https://www.servicesplus.sel.sony.com/ (the Macintosh-compatible software will not be shipped with the projector...
User Manual (Projector Operating Instructions) - Page 2

...2 Table of Contents
Network
Using Network Features 28 Displaying the Control Window of the Projector with a Web Browser 28 Confirming the Information regarding the Projector 29 Operating the Projector from a Computer 29 Using the e-mail report Function 30
Interactive Function
Using Interactive Function 32 Connecting a Computer with a USB Cable 32 Installing Interactive Presentation Utility...
User Manual (Projector Operating Instructions) - Page 4

... Unit
1 23 4
qg
9
5
8
6
7
0 qa qs qd
qf a Projection window b Remote control detector c ON/STANDBY indicator
(page 36) d LAMP/COVER indicator
(page 36) e Focus ring (page 14) f Lends shift dial V (page 14) g Lens shift dial H (page 14) h Zoom lever (page 14) i Lamp cover (page 40) j Control panel keys (page 6) k Connector panel (page 5) l Speaker
4 Location and...
User Manual (Projector Operating Instructions) - Page 13
... the distance between the projector and screen. Install the projector so that the projected ...Projector
1
Wall outlet
46
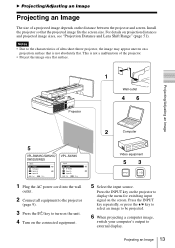
Projecting/Adjusting an Image
2
Computer
5
VPL-SW535C/SW525C/ SW535/SW525
Input
Video S-Video Input-A Input-B
Sel
Skip
VPL-SX535
Input
Video S-Video Input-A Input-B
Sel
Skip
1 Plug the AC power cord into the wall
outlet.
2 Connect all equipment to the projector...
User Manual (Projector Operating Instructions) - Page 16

... "Screen Fitting" to display adjusting menu. 2 Adjust the value by the V/v/B/b keys. The higher the value, the smaller the image becomes.
Note Since the Digital shrink is an electronic correction, the image may be deteriorated.
Turning Off the Power
1 Press the ?/1 key on the unit or the remote commander.
The projector starts shutdown and turns...
User Manual (Projector Operating Instructions) - Page 17

... the v/B key. A selected item takes effect immediately. The previous screen is restored.
Contrast
:Sel
:Set
:Back
4 Make the setting or adjustment for the
selected item.
The setting method varies, depending on the setting item. If the next menu window is displayed, select the item according to the
Adjust
Back
5 Press the MENU key to clear the...
User Manual (Projector Operating Instructions) - Page 26

... image horizontally or vertically according to the installation method.
Installation Attitude Right Side Up/Upside Down: Change the cooling setting to suit to the installation attitude. Continuing to use the wrong setting may affect component reliability.
High Altitude Mode*1 Screen Fitting
On/Off: Set to "On" when using the projector at an altitude of 1,500 m or higher...
User Manual (Projector Operating Instructions) - Page 28

....
Displaying the Control Window of the Projector with a Web Browser
1 Connect the LAN cable.
LAN cable (straight type) (not supplied)
LAN Connector
You can confirm the IP address of the projector in the "Network Setting" on the Connection/Power menu (page 24).
The following window appears in the Web browser:
Hub, router, etc
2 Set the network settings for the
projector using "Network Setting...
User Manual (Projector Operating Instructions) - Page 29

...root."
Information area
Operating the Projector from a Computer
You can control the projector from the computer on the Control page.
Network
Entry area for [Administrator] Entry area for [User]
When you change the password, input a new password after deleting the password (*****) that was set.
Note If you forget your password, consult with qualified Sony personnel.
Operation area
The functions...
User Manual (Projector Operating Instructions) - Page 32

... the Projector" (page 9).
Computer cable
Computer
USB connector (Type A)
Installing Interactive Presentation Utility
Use of these functions requires installation of Interactive Presentation Utility. For Interactive Presentation Utility software update, visit Sony's web site. https://www.servicesplus.sel.sony.com/ http://pro.sony.eu/InteractiveUtility
System Requirements • CPU: Intel...
User Manual (Projector Operating Instructions) - Page 33

... toolbar Save setting: Select a folder to save image
files and file format. Calibrate*: Start Calibration (page 33) Information: Display information about
Interactive Presentation Utility. Exit: Close Interactive Presentation Utility.
* Appears in the pop-up menu when your computer is connected to the projector.
Performing Calibration (Position alignment)
Use the supplied USB cable to connect...
User Manual (Projector Operating Instructions) - Page 36

... Installation menu is set
correctly. (page 26)
Unplug the AC power cord from a wall outlet. After checking that the ON/STANDBY indicator goes out, plug the power cord to a wall outlet again then turn on the projector.
Consult with qualified Sony personnel.
LAMP/COVER indicator
Status
Meaning/Remedies
Flashes in red
Symptoms are indicated by number of flashes. Address...
User Manual (Projector Operating Instructions) - Page 37

... the ?/1 key again (the
Press ?/1 Key to Restart projector will remain on). To turn off the projector directly,
press and hold the ?/1 key.
Lamp Dimming
Reduces lamp output when "With Static Signal" is set. When any change in signal is detected, or an operation (remote control or control panel) is performed, normal brightness is restored.
Page...
User Manual (Projector Operating Instructions) - Page 39

... connecting cables between the projector and
9
external video or audio equipment are securely connected.
Check if the external audio equipment is set properly.
-
Check if the "Speaker" is not set to "Off".
22
Audio is not output if audio muting is activated.
7
Check if the volume is not set to minimum.
7, 22
The remote commander Check if the batteries are installed...
User Manual (Projector Operating Instructions) - Page 41

... until
it is securely in place. Tighten the 2 screws.
Note Be sure to install the lamp securely as it was. If not, the projector cannot be turned on.
6 Connect the AC power cord to a wall
outlet and turn on the projector.
7 Reset the lamp timer for notification of
the next replacement time. Select "Lamp...
User Manual (Projector Operating Instructions) - Page 51

...following describes the projection distance and height from the center of the projection window to edge of screen by each projected screen size. Height H is ... of the projection window to projected image surface). Floor Installation
Projection distance L
Projected image
A
Height H from center of projection window to bottom of screen
Center of the projection window
Others
Projection Distance and...
User Manual (Projector Operating Instructions) - Page 52

Wall Installation
Height H from center of the projection window to top of screen
A
Center of the projection window
Projected image
Projection distance L
L: Projection distance L H: Distance between the edge of the image and the center of the projection window
The lens shift range is the distance you can move the lens shift from the center of...
User Manual (Projector Operating Instructions) - Page 53

...21 2.15 × 1.35 2.80 × 1.75
Projection Distance L
Height H from center of projection window to
edge of screen
0.416-0.428 (16.4-16.8) 0.475-0.489 (18.7-19.2) 0.534-0.550 (21.1-21... image size (Diagonal) H: Distance between the edge of the image and the center of the projection window
Expression#1
Projection Distance L (Min.)
L=0.005931 × D-0.0001 (L=0.233509 × D-0.0024)
Unit:...
User Manual (Projector Operating Instructions) - Page 54

...22 1.83 × 1.37 2.24 × 1.68
Projection Distance L
Height H from center of projection window to
edge of screen
0.424-0.436 (16.7-17.1) 0.495-0.509 (19.5-20.0) 0.566-0.581 (22.3-... image size (Diagonal) H: Distance between the edge of the image and the center of the projection window
Expression#1
Projection Distance L (Min.)
L=0.007067 × D-0.0001 (L=0.278225 × D-0.0047)
Unit:...