Asus CT5430 driver and firmware

Related Asus CT5430 Manual Pages
Download the free PDF manual for Asus CT5430 and other Asus manuals at ManualOwl.com
User Manual - Page 2
... this manual, including the products and software described in it, may be reproduced, transmitted, transcribed, stored in a retrieval system, or translated into any language in any form or by any means, except documentation kept by the purchaser for backup purposes, without the express written permission of ASUSTeK COMPUTER INC. ("ASUS"). Product warranty or service will...
User Manual - Page 3
... Installing the CPU 2-5 2.5.2 Reinstalling the CPU fan and heatsink assembly 2-7 2.6 Installing a DIMM 2-8 2.6.1 Memory configurations 2-8 2.6.2 DIMM installation 2-11 2.7 Installing an expansion card 2-12 2.7.1 Expansion slots 2-12 2.7.2 Expansion card installation 2-13 2.8 Installing an optical drive 2-14 2.9 Installing a Serial ATA disk drive 2-15 2.10 Reinstalling the power supply...
User Manual - Page 4
...limits for a Class B digital device, pursuant to Part 15 of the FCC Rules. These limits are designed to provide reasonable protection against harmful interference in a residential installation. This equipment generates, ... the dealer or an experienced radio/TV technician for help.
The use of shielded cables for connection of the monitor to the graphics card is required to assure compliance with ...
User Manual - Page 5
...power cables for the devices are unplugged before the signal cables are connected.
• If the power supply is broken, do not try to fix it by yourself. Contact a qualified service technician or your retailer.
Operation safety
• Before installing devices... Dispose of used batteries according to the manufacturer's instructions. VORSICHT: Explosionsgetahr bei unsachgemäßen Austausch...
User Manual - Page 6
About this guide
Audience
This guide provides general information and installation instructions about ASUS CT5430 Desktop PC. This guide is intended for experienced users and integrators with hardware knowledge of personal computers.
How this guide is organized
This guide contains the following parts: 1. Chapter 1: System introduction
This chapter gives a general description of ASUS CT5430. The ...
User Manual - Page 7
...to complete a task. IMPORTANT: Instructions that you MUST follow to complete a task. NOTE: Tips and additional information to aid in completing a task.
Where to find more information
Refer to the following sources for additional information and for product and software updates. 1. ASUS Websites
The ASUS websites worldwide provide updated information on ASUS hardware and software products. Refer to...
User Manual - Page 8
... contents
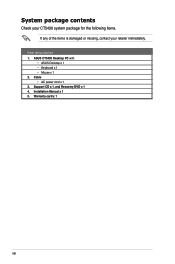
Check your CT5430 system package for the following items. If any of the items is damaged or missing, contact your retailer immediately.
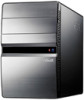
Item description 1. ASUS CT5430 Desktop PC with • ASUS Desktop x 1 • Keyboard x 1 • Mouse x 1 2. Cable • AC power cord x 1 3. Support CD x 1, and Recovery DVD x 1 4. Installation Manual x 1 5. Warranty card x 1
viii
User Manual - Page 12
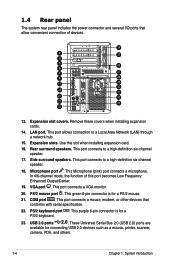
... is for a PS/2 mouse.
21. COM port . This port connects a mouse, modem, or other devices that conforms with serial specification.
22. PS/2 keyboard port . This purple 6-pin connector is for a PS/2 keyboard.
23. USB 2.0 ports 2.0. These Universal Serial Bus 2.0 (USB 2.0) ports are
available for connecting USB 2.0 devices such as a mouse, printer, scanner, camera, PDA, and others.
1-
Chapter...
User Manual - Page 13
... a power cable and plug.
32. Power switch. This switch allows you to turn your PC on/off.
33. 6-pin IEEE 1394a port . This port provides high-speed connectivity for IEEE 1394a-compliant audio/video devices, storage peripherals, and other PC devices.
The information provided is intended as a general guide for reference. Specifications are subject to the Desktop PC you purchased.
ASUS CT5430
1-
User Manual - Page 14
... to Chapter 2 for instructions on installing additional system components.
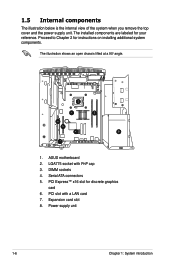
The illustration shows an open chassis lifted at a 90o angle.
2
1
3
6
5
4
8
7
1. ASUS motherboard 2. LGA775 socket with PnP cap 3. DIMM sockets 4. Serial ATA connectors 5. PCI Express™ x16 slot for discrete graphics
card 6. PCI slot with a LAN card 7. Expansion card slot 8. Power supply unit
1-
Chapter...
User Manual - Page 15
Chapter 2
This chapter provides step-by-step instructions on how to install components in the system.
Basic installation
User Manual - Page 16
... to install
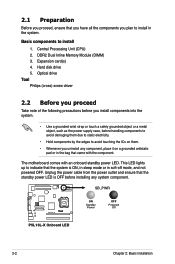
1. Central Processing Unit (CPU) 2. DDR2 Dual Inline Memory Module (DIMM) 3. Expansion card(s) 4. Hard disk drive 5. Optical drive Tool Philips (cross) screw driver
2.2 Before you proceed
Take note of the following precautions before you install components into the system.
• Use a grounded wrist strap or touch a safely grounded object or a metal object, such as the power supply...
User Manual - Page 17
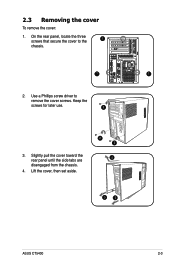
... secure the cover to the
1
chassis.
C T R BASS REAR S P K SIDE S P K
LINE IN FRONT MIC IN
1
1
2. Use a Phillips screw driver to
remove the cover screws. Keep the
screws for later use.
2
3. Slightly pull the cover toward the rear panel until the side tabs are disengaged from the chassis.
4. Lift the cover, then set aside.
2 2
4
3
3
ASUS CT5430
2-
User Manual - Page 18
...
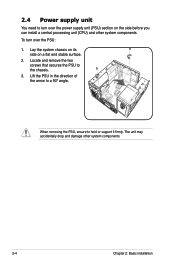
You need to turn over the power supply unit (PSU) section on the side before you can install a central processing unit (CPU) and other system components. To turn over the PSU: 1. Lay the system chassis on its
side ... of the arrow to a 90º angle.
When removing the PSU, ensure to hold or support it firmly. The unit may accidentally drop and damage other system components.
2-
Chapter 2: Basic...
User Manual - Page 19
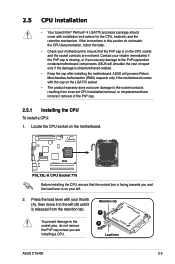
... is facing towards you and the load lever is on your left.
2. Press the load lever with your thumb (A), then move it to the left (B) until it is released from the retention tab.
To prevent damage to the socket pins, do not remove the PnP cap unless you are installing a CPU.
Retention tab A B
Load lever
ASUS CT5430
2-
User Manual - Page 20
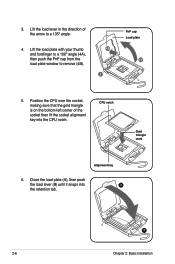
... with your thumb and forefinger to a 100º angle (4A), then push the PnP cap from the load plate window to remove (4B).
4B 3
PnP cap Load plate
4A
5. Position the CPU over the socket, making sure that the gold triangle is on the bottom‑left corner of the socket then fit the...
User Manual - Page 21
... in place.
A B
A
A
B
1
1
B
A
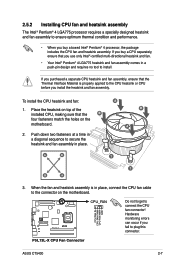
3. When the fan and heatsink assembly is in place, connect the CPU fan cable to the connector on the motherboard.
R
P5L13L-X
CPU FAN IN CPU FAN PWM CPU FAN PWR
GND
CPU_FAN
Do not forget to connect the CPU fan connector! Hardware monitoring errors can occur if you fail to plug this connector.
P5L13L-X CPU Fan Connector
ASUS CT5430
2-
User Manual - Page 28
IRQ assignments for this motherboard
PCI slot PCI Express x16 slot Onboard USB controller 1 Onboard USB controller 2 Onboard USB controller 3 Onboard USB controller 4 Onboard USB 2.0 controller Onboard IDE port Onboard AC' 97 Audio Onboard LAN Onboard 1394
A
B
C
D
E
F
G
H
shared shared shared shared -- -- -- --
shared --
--
--
--
-- -- --
--
--
--
-- shared -- -- --
-- shared ...
User Manual - Page 34
... recovering the system.
6. After the system recovery is completed, you will be asked to insert the support DVD into the optical drive. Click OK and the system reboots.
7. After the system reboots, Windows® Vista™ will begin system configurations. Follow the on-screen instructions to complete the process, and then restart the computer.
This recovery DVD is for ASUS Desktop...
User Manual - Page 35
...memory modules that the system supports and that
you install them properly on the sockets. • Check if your peripheral devices are compatible with the
system. Some USB storage devices, for example, are with different disk drive...optical drive. • Check if you insert the disc properly or if there is any scratch on the disc. • Find out if the disc is with write protection.
ASUS CT5430...