Asus P5M2-M C driver and firmware

Related Asus P5M2-M C Manual Pages
Download the free PDF manual for Asus P5M2-M C and other Asus manuals at ManualOwl.com
User Guide - Page 6

... drive from a RAID set 5-35 5.3.8 Enabling the WriteCache 5-36 5.4. Global Array Manager 5-36 Chapter 6: Driver installation 6.1 RAID driver installation 6-1 6.1.1 Creating a RAID driver disk 6-1 6.1.2 Installing the RAID controller driver 6-2 6.2 LAN driver installation 6-12 6.2.1 Windows® 2000/2003 Server 6-12 6.2.2 Red Hat® Enterprise ver. 3.0 6-13 6.3 VGA driver installation...
User Guide - Page 9
... on RAID and LAN driver installation for this motherboard.
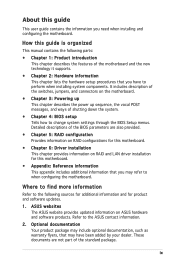
• Appendix: Reference information This appendix includes additional information that you may refer to when configuring the motherboard.
Where to find more information
Refer to the following sources for additional information and for product and software updates.
1. ASUS websites The ASUS website provides updated information on ASUS...
User Guide - Page 35

... card
After installing the expansion card, configure it by adjusting the software settings.
1. Turn on the system and change the necessary BIOS settings, if any. See Chapter 4 for information on BIOS setup.
2. Assign an IRQ to the card. Refer to the tables on the next page. 3. Install the software drivers for the expansion card.
When using PCI cards on shared slots, ensure that the drivers support...
User Guide - Page 61

...] is the latest or the original BIOS file on the bootable floppy disk.
A:\>afudos /iP5M2-M.ROM
4. The utility verifies the file and starts updating the BIOS.
A:\>afudos /iP5M2-M.ROM AMI Firmware Update Utility - Version 1.19(ASUS V2.07(03.11.24BB)) Copyright (C) 2002 American Megatrends, Inc. All rights reserved.
WARNING!! Do not turn off power during flash BIOS Reading file ....... done Reading...
User Guide - Page 62

... disk drive.
A:\>afudos /iP5M2-M.ROM AMI Firmware Update Utility - Version 1.19(ASUS V2.07(03.11.24BB)) Copyright (C) 2002 American Megatrends, Inc. All rights reserved.
WARNING!! Do not turn off power during flash BIOS Reading file ....... done Reading flash ...... done
Advance Check ...... Erasing flash ...... done Writing flash ...... done Verifying flash .... done
Please restart your computer...
User Guide - Page 65

... a network or an Internet Service Provider (ISP).
Installing ASUS Update To install ASUS Update:
1. Place the support CD in the optical drive. The Drivers menu appears. 2. Click the Utilities tab, then click Install ASUS Update VX.XX.XX. 3. The ASUS Update utility is copied to your system.
Quit all Microsoft® Windows® applications before you update the BIOS using this utility.
ASUS P5M2...
User Guide - Page 67

... the BIOS version that you wish to download. Click Next.
5. Follow the screen instructions to complete the update process.
The ASUS Update utility is capable of updating itself through the Internet. Always update the utility to avail all its features.
Updating the BIOS through a BIOS file To update the BIOS through a BIOS file:
1. Launch the ASUS Update utility from the Windows® desktop by...
User Guide - Page 68

... can enable the security password feature or change the power management settings. This requires you to reconfigure your system using the BIOS Setup program so that the computer can recognize these changes and record them in the CMOS RAM of the firmware hub.
The firmware hub on the motherboard stores the Setup utility. When you start up the computer, the system provides you...
User Guide - Page 74

... you want the Serial ATA hard disk drives to use the Advanced Host
Controller Interface (AHCI), set this item to [AHCI]. For details on AHCI, go
to:
www.intel.com/support/chipsets/imst/sb/CS-012304.htm
www.intel.com/support/chipsets/imst/sb/CS-012305.htm
The SATA controller is set to Native mode when this item is set to [RAID] or [AHCI].
ALPE...
User Guide - Page 98

... also allows you to change the hard disk drive partition size without losing any data.
If you want to boot the system from a hard disk drive included in a created RAID set, copy first the RAID driver from the support CD to a floppy disk before you install an operating system to the selected hard disk drive. Refer to section "6.1 RAID driver installation" for details.
ASUS P5M2-M Series
5-
User Guide - Page 99
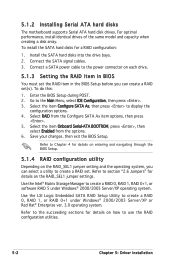
... supports Serial ATA hard disk drives. For optimal performance, install identical drives of the same model and capacity when creating a disk array. To install the SATA hard disks for a RAID configuration:
1. Install the SATA hard disks into the drive bays. 2. Connect the SATA signal cables. 3. Connect a SATA power cable to the power connector on each drive.
5.1.3 Setting the RAID item in BIOS...
User Guide - Page 107

5.2.5 Deleting a RAID set
Take caution when deleting a RAID set. You will lose all data on the hard disk drives when you delete a RAID set.
To delete a RAID set:
1. From the utility main menu, select 2. Delete RAID Volume, then press to display this screen.
Intel(R) Matrix Storage Manager Option ROM v5.0.0.1032 ICH7R wRAID5 Copyright(C) 2003-05 Intel Corporation. All Rights Reserved.
[ DELETE...
User Guide - Page 111

... Embedded SATA RAID Setup Utility automatically detects the installed SATA hard disk drives and displays any existing RAID set(s). Press + to enter the utility.
You may also create a RAID set(s) in a Windows® operating environment using the Global Array Manager (GAM) application. Refer to the GAM user guide in the motherboard support CD for details.
5-14
Chapter 5: Driver installation
User Guide - Page 133

... turn the option On (enabled).
3. When finished, press any key to continue.
5.4 Global Array Manager
You may also create a RAID set(s) in Windows® operating environment using the Global Array Manager (GAM) application. The GAM application is available from the motherboard support CD.
Refer to the GAM user guide in the motherboard support CD for details.
5-36
Chapter 5: Driver installation
User Guide - Page 136

...UP2 32/64 bit Driver Disk G) Flash AMI BIOS for P5M2-M H) Flash AMI BIOS for P5M2-M/C I) Broadcom ASF Firmware Update Please choose A To I:
6. Place a blank, high-density floppy disk to the floppy disk drive, then select the type of RAID driver disk you want to create by typing the number before the option
7. Press . 8. Follow screen instructions to create the driver disk.
ASUS P5M2-M Series
6-
User Guide - Page 137

... versions that are not listed in the Makedisk menu, explore the support CD and copy the RAID driver disk from the following path: \Drivers\ICH7R\LSI\Linux.
6.1.2 Installing the RAID controller driver Windows® 2000/2003 Server OS
During Windows® 2000/2003 Server OS installation To install the RAID controller driver when installing Windows® 2000/2003 Server OS: 1. Boot the computer...
User Guide - Page 139
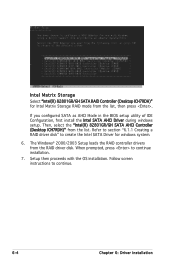
... BIOS setup utility of IDE Configuration, first install the Intel SATA AHCI Driver during windows setup. Then, select the "Intel(R) 82801GR/GH SATA AHCI Controller (Desktop ICH7RDH)" from the list. Refer to section "6.1.1 Creating a RAID driver disk" to create the Intel SATA Driver for windows system.
6. The Windows® 2000/2003 Setup loads the RAID controller drivers from the RAID driver disk...
User Guide - Page 140

... Upgrade Device Driver Wizard window appears. Click Next.
8. Insert the RAID driver disk you created earlier to the floppy disk drive.
9. Select the option "Search for a suitable driver for my device (recommended)", then click Next.
10. The wizard searches the RAID controller drivers. When found, click Next to install the drivers.
11. Click Finish after the driver installation is done.
ASUS P5M2...
User Guide - Page 147

... LAN driver installation
This section provides instructions on how to install the Broadcom® Gigabit LAN controller drivers.
6.2.1 Windows® 2000/2003 Server
To install the Broadcom® Gigabit LAN controller driver on a Windows® 2000/2003 Server OS:
1. Restart the computer, then log on with Administrator privileges. 2. Insert the motherboard/system support CD to the optical drive...
User Guide - Page 149

... operating system. To install the XGI Graphicsdriver:
1. Restart the computer, then log on with Administrator privileges. 2. Insert the motherboard/system support CD to the optical drive. The
support CD automatically displays the Drivers menu if Autorun is enabled in your computer.
Windows® automatically detects the VGA controller and displays a New Hardware Found window. Click Cancel to...