Brother International PT-2410 driver and firmware
Drivers and firmware downloads for this Brother International item
Related Brother International PT-2410 Manual Pages
Download the free PDF manual for Brother International PT-2410 and other Brother International manuals at ManualOwl.com
Users Manual - English and Spanish - Page 2
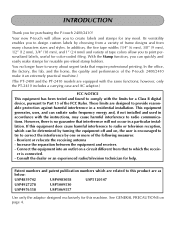
...; however, only the PT-2410 includes a carrying case and AC adaptor.)
FCC NOTICE This equipment has been tested and found to comply with the limits for a Class B digital device, pursuant to Part 15 of the FCC Rules. These limits are designed to provide reasonable protection against harmful interference in a residential installation. This equipment generates, uses...
Users Manual - English and Spanish - Page 3
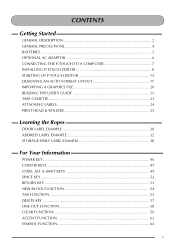
... TO A COMPUTER 7 INSTALLING P-TOUCH EDITOR 8 STARTING UP P-TOUCH EDITOR 15 DESIGNING AN AUTO FORMAT LAYOUT 17 IMPORTING A GRAPHICS FILE 20 READING THE USER'S GUIDE 21 TAPE CASSETTE 23 ATTACHING LABELS 24 PRINT HEAD & ROLLERS 25
Learning the Ropes
DOOR LABEL EXAMPLE 28 ADDRESS LABEL EXAMPLE 32 STORAGE SHELF LABEL EXAMPLE 38
For Your Information
POWER KEY...
Users Manual - English and Spanish - Page 8
GENERAL PRECAUTIONS
• Use only Brother TZ tapes with this machine. Do not use tapes that do not have the mark.
• Do not pull on the... is not being used for a long period of time and it is not necessary to
keep the text files stored in the memory, disconnect the AC adaptor, and remove the batteries to prevent them from leaking and damaging the machine. • If the AC adaptor ...
Users Manual - English and Spanish - Page 9
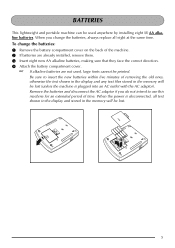
... To change the batteries: 1 Remove the battery compartment cover on the back of the machine. 2 If batteries are already installed, remove them. 3 Insert eight new AA alkaline batteries, making sure that they face the correct direction. 4 Attach the... use this machine for an extended period of time. When the power is disconnected, all text shown in the display and stored in the memory will be lost.
5
Users Manual - English and Spanish - Page 10
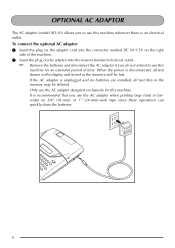
... this
machine for an extended period of time. When the power is disconnected, all text shown in the display and stored in the memory will be lost. If the AC adaptor is unplugged and no batteries are installed, all text files in the memory may be deleted. Only use the AC adaptor designed exclusively...
Users Manual - English and Spanish - Page 11
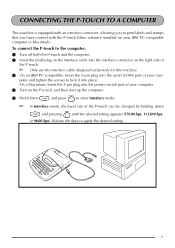
... 8-pin plug into the printer (serial) port of your computer.
4 Turn on the P-touch, and then start up the computer.
Interface
5 Hold down Code and press ? to enter Interface mode. .' In Interface mode, the baud rate of the P-touch can be changed by holding down Style Code and pressing $ until the desired setting appears (57600 bps...
Users Manual - English and Spanish - Page 12
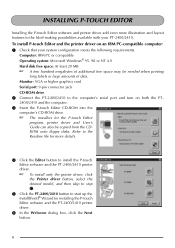
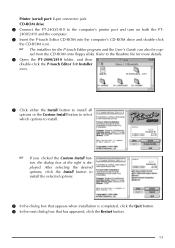
...: VGA or higher graphics card Serial port: 9-pin connector jack CD-ROM drive 2 Connect the PT-2400/2410 to the computer's serial port and turn on both the PT2400/2410 and the computer. 3 Insert the P-touch Editor CD-ROM into the computer's CD-ROM drive.
The installers for the P-touch Editor
program, printer driver and User's Guide can also be copied from the CDROM onto floppy disks. Refer...
Users Manual - English and Spanish - Page 13
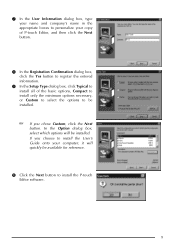
... the minimum options necessary, or Custom to select the options to be installed.
If you chose Custom, click the Next
button. In the Option dialog box, select which options will be installed. If you choose to install the User's Guide onto your computer, it will quickly be available for reference.
0 Click the Next button to...
Users Manual - English and Spanish - Page 14
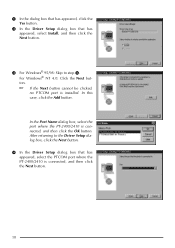
... step D. For Windows® NT 4.0: Click the Next button.
If the Next button cannot be clicked,
no PTCOM port is installed. In this case, click the Add button.
In the Port Name dialog box, select the port where the PT-2400/2410 is connected, and then click the OK button. After returning to the Driver Setup dialog box, click...
Users Manual - English and Spanish - Page 15
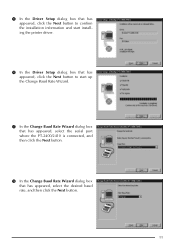
... the Next button to confirm the installation information and start installing the printer driver.
F In the Driver Setup dialog box that has appeared, click the Next button to start up the Change Baud Rate Wizard.
G In the Change Baud Rate Wizard dialog box that has appeared, select the serial port where the PT-2400/2410 is connected, and then click...
Users Manual - English and Spanish - Page 16
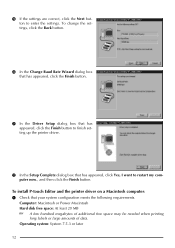
...Finish button to finish setting up the printer driver.
L In the Setup Complete dialog box that has appeared, click Yes, I want to restart my computer now., and then click the Finish button.
To install P-touch Editor and the printer driver on a Macintosh computer: 1 Check that your system configuration meets the following requirements.
Computer: Macintosh or Power Macintosh Hard disk free space: At...
Users Manual - English and Spanish - Page 17
... jack CD-ROM drive 2 Connect the PT-2400/2410 to the computer's printer port and turn on both the PT2400/2410 and the computer. 3 Insert the P-touch Editor CD-ROM into the computer's CD-ROM drive and double-click the CD-ROM icon.
The installers for the P-touch Editor program and the User's Guide can also be cop-
ied from the CD-ROM onto floppy disks. Refer...
Users Manual - English and Spanish - Page 18
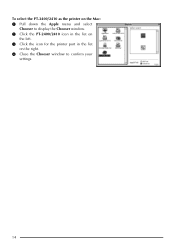
To select the PT-2400/2410 as the printer on the Mac: 1 Pull down the Apple menu and select
Chooser to display the Chooser window. 2 Click the PT-2400/2410 icon in the list on
the left. 3 Click the icon for the printer port in the list
on the right. 4 Close the Chooser window to confirm your
settings.
14
Users Manual - English and Spanish - Page 19
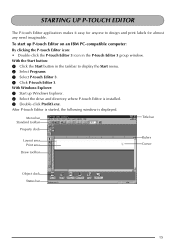
... the Start menu. 2 Select Programs. 3 Select P-touch Editor 3. 4 Click P-touch Editor 3. With Windows Explorer: 1 Start up Windows Explorer. 2 Select the drive and directory where P-touch Editor is installed. 3 Double-click Ptedit3.exe. After P-touch Editor is started, the following window is displayed.
Menu bar Standard toolbar
Title bar
Property dock
Layout area Print area
Draw toolbar...
Users Manual - English and Spanish - Page 20
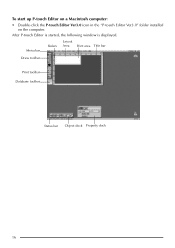
To start up P-touch Editor on a Macintosh computer:
• Double-click the P-touch Editor Ver3.0 icon in the "P-touch Editor Ver3.0" folder installed on the computer.
After P-touch Editor is started, the following window is displayed.
Menu bar
Layout Rulers Area Print area Title bar
Draw toolbar
Print toolbar Database toolbar
Status bar Object dock Property dock
16
Users Manual - English and Spanish - Page 24
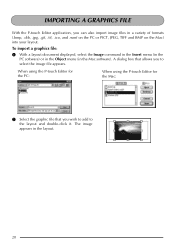
... on the PC or PICT, JPEG, TIFF and BMP on the Mac) into your layout.
To import a graphics file:
1 With a layout document displayed, select the Image command in the Insert menu (in the PC software) or in the Object menu (in the Mac software). A dialog box that allows you to select the image file...
Users Manual - English and Spanish - Page 25
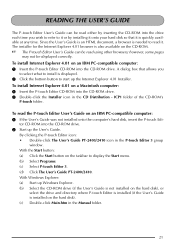
... Select Programs. (c) Select P-touch Editor 3. (d) Click The User's Guide PT-2400/2410. With Windows Explorer: (a) Start up Windows Explorer. (b) Select the CD-ROM drive (if the User's Guide is not installed on the hard disk), or
select the drive and directory where P-touch Editor is installed (if the User's Guide is installed on the hard disk). (c) Double-click Main.htm in the Manual folder.
21
Users Manual - English and Spanish - Page 26

... P-touch Editor User's Guide on a Macintosh computer: 1 If the User's Guide was not installed onto the computer's hard disk, insert the P-touch Edi-
tor CD-ROM into the CD-ROM drive. 2 Double-click Main.htm in the User's Guide folder of the CD-ROM's P-touch folder (if the
User's Guide is not installed on the hard disk), or of the installed P-touch Editor Ver3.0 folder...
Users Manual - English and Spanish - Page 121
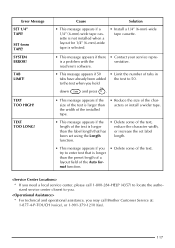
Error Message SET 1/4" TAPE!
SET 6mm TAPE! SYSTEM ERROR!
TAB LIMIT!
TEXT TOO HIGH!
TEXT TOO LONG!
Cause
Solution
• This message appears if a 1/4" (6-mm)-wide tape cassette is not installed when a layout for 1/4" (6-mm)-wide tape is selected.
• Install a 1/4" (6-mm)-wide tape cassette.
• This message appears if there • Contact your service repre-
is a problem...
Users Manual - English and Spanish - Page 122

HARDWARE Input device: LCD:
Print tape:
Power supply: Print head: Dimensions: Weight: SOFTWARE Buffer size: Memory size: Character size: Print styles:
SPECIFICATIONS
Keyboard - 51 keys 7 × 5...power-off if no key is pressed for 5 minutes 128 dot / 180 dpi 7 25/64" (188 mm) (W) × 9 13/64" (234 mm) (D) × 2 35/64" (67 mm) (H) 2 lbs (900 g) (without a tape cassette and batteries installed...