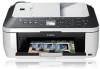
Canon PIXMA MX330 driver and firmware
Related Canon PIXMA MX330 Manual Pages
Download the free PDF manual for Canon PIXMA MX330 and other Canon manuals at ManualOwl.com
Guía de inicio [Spanish Version] - Page 41
...
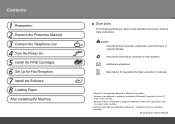
CD-ROM Drive Required
Display
XGA 1024 x 768
• Windows: Note: Operation can only be guaranteed on a PC with Windows Vista, XP or 2000 pre-installed.
• Some functions may not be available with Windows Media Center • To upgrade from Windows XP to Windows Vista, first uninstall software bundled
with the Canon inkjet printer. • Macintosh: Hard Disk must be formatted as Mac...
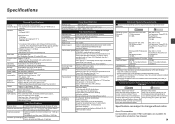
Getting Started - Page 2
...Power On 5 Install the FINE Cartridges 6 Set Up for Fax Reception 7 Install the Software 8 Loading Paper
After Installing the Machine
■ Symbols
The following symbols are used to mark important instructions. Observe these instructions.
Caution Instructions...8226; Windows is a trademark or registered trademark of Microsoft Corporation in the U.S.
and/or other countries. • Windows Vista is...
Getting Started - Page 3
...7 8
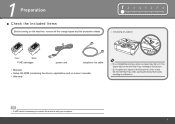
□ Choosing a Location
Color
Black
FINE cartridges
power cord
telephone line cable
• Manuals • Setup CD-ROM (containing the drivers, applications and on-screen manuals) • Warranty
• Do not install the machine where an object may fall on it. The ... Cover, resulting in malfunction.
• A USB cable is necessary to connect the machine with your computer.
Getting Started - Page 5

... cable (A).
When using as a fax only: Go to "4 Turn the Power On" on page 4.
Remove the telephone connector cap (B), then connect a telephone with the telephone line cable.
• If you cannot send faxes after installing the machine, check the telephone line type. For details, refer to "Confirming the Telephone Line Connection" in the on-screen manual: Basic Guide...
Getting Started - Page 7
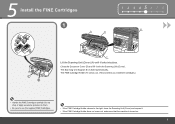
... (Cover) (A) until it locks into place. Close the Document Cover (D) and lift it with the Scanning Unit (Cover). The Scanning Unit Support (E) is fixed automatically. The FINE Cartridge Holder (F) comes out. (This is where you install the cartridges.)
• Handle the FINE Cartridges carefully. Do not drop or apply excessive pressure to them.
•...
Getting Started - Page 9
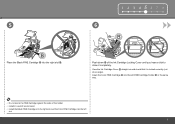
... Cartridge into the left FINE Cartridge Holder in the same way.
• Do not knock the FINE Cartridge against the sides of the holder. • Install in a well-lit environment. • Install the Black FINE Cartridge into the right slot, and the Color FINE Cartridge into the left
slot.
Getting Started - Page 10
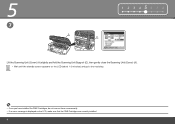
...) (A) slightly and fold the Scanning Unit Support (E), then gently close the Scanning Unit (Cover) (A). • Wait until the standby screen appears on the LCD (about 1-2 minutes) and go to the next step.
• Once you have installed the FINE Cartridges, do not remove them unnecessarily. • If an error message is displayed on the LCD, make...
Getting Started - Page 11
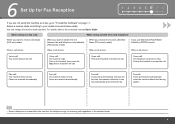
6 Set Up for Fax Reception
1 2 3 4 567 8
If you are not using the machine as a fax, go to "7 Install the Software" on page 11. Select a receive mode according to your needs to receive faxes easily. You can change the receive mode any time. For details, refer to the on-screen manual: Basic Guide.
When using as a fax only:
When using as...
Getting Started - Page 13

...
To use the machine by connecting it to a computer, software including the drivers needs to be copied (installed) to the computer's hard disk. The screens below are based on Windows Vista operating system Ultimate Edition (hereafter referred to as "Windows Vista") and Mac OS X v.10.5.x.
• Quit all running applications before installation. • You need to log on as the administrator...
Getting Started - Page 14

... box appears:
A
1 Remove the USB cable connected to your computer. The dialog box may close. In this case, proceed from .
2 Click Cancel to quit the dialog box. 3 Proceed from .
12
TURN OFF THE MACHINE (A).
Turn on the computer, then insert the Setup CD-ROM into the CD-ROM drive.
The setup program should start automatically.
Windows Vista
Go to Step...
Getting Started - Page 16
7
Windows
Macintosh
5
6
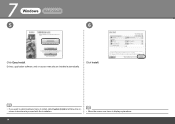
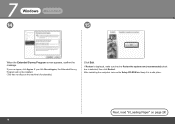
Click Easy Install. Drivers, application software, and on-screen manuals are installed automatically.
Click Install.
• If you want to select particular items to install, click Custom Install and follow the onscreen instructions to proceed with the installation.
• Move the cursor over items to display explanations.
14
Getting Started - Page 17
Windows Macintosh
7
1 2 3 4 5 678 8
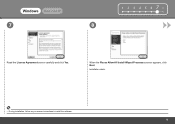
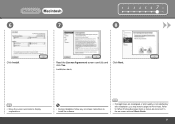
Read the License Agreement screen carefully and click Yes.
When the Please Allow All Install Wizard Processes screen appears, click Next.
Installation starts.
• During installation, follow any on-screen instructions to install the software. 15
Getting Started - Page 18
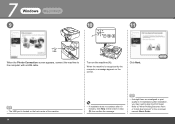
...computer with a USB cable.
Turn on the machine (A).
When the machine is recognized by the computer, a message appears on the screen.
Click Next.
• The USB port is located on the back center of the machine. 16
• If installation...after installation, you may need to align the Print Head. Refer to "When Printing Becomes Faint or Colors Are Incorrect" in the on-screen manual: Basic Guide.
Getting Started - Page 20
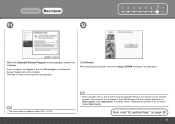
... Program will not be installed. (This has no effect on the machine's functionality.)
Click Exit.
If Restart is displayed, make sure that the Restart the system now (recommended) check box is selected, then click Restart. After restarting the computer, remove the Setup CD-ROM and keep it in a safe place.
Next, read "8 Loading Paper" on page...
Getting Started - Page 22
7
Windows
Macintosh
4
5
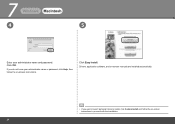
Enter your administrator name and password. Click OK.
If you do not know your administrator name or password, click Help, then follow the on-screen instructions.
Click Easy Install. Drivers, application software, and on-screen manuals are installed automatically.
• If you want to select particular items to install, click Custom Install and follow the on-screen ...
Getting Started - Page 23
... cursor over items to display explanations.
• During installation, follow any on-screen instructions to install the software.
• If straight lines are misaligned or print quality is not satisfactory after installation, you may need to align the Print Head. Refer to "When Printing Becomes Faint or Colors Are Incorrect" in the on-screen manual: Basic Guide.
21
Getting Started - Page 25
... Mac OS X v.10.3.9.
• When using Mac OS X v.10.3.9, before using the Operation Panel on the machine to save scanned originals to the computer, it is necessary to select MP Navigator EX as the launch application on Image Capture under Applications. For details, refer to "Saving Scanned Data" in the on-screen manual: Basic Guide.
Next, read "8 Loading...
Getting Started - Page 27
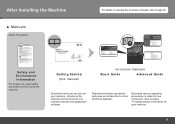
... Information
For proper use, read safety precautions before using the machine.
Getting Started (this manual)
on-screen manuals
Basic Guide
Advanced Guide
Describes how to set up and use your machine. Introduces the machine and its functions, the included manuals and application software.
Describes the basic operations and gives an introduction to other functions available.
Describes various...
Getting Started - Page 29
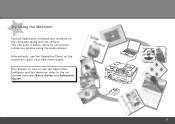
... software are installed on the computer along with the drivers. You can print creative items by correcting/ enhancing photos using the applications. Alternatively, use the Operation Panel on the machine to print your own items easily. For details on how to use the application software and the machine, refer to the onscreen manuals: Basic Guide and Advanced Guide...
Getting Started - Page 35
...
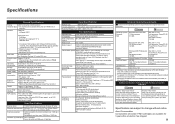
CD-ROM Drive Required
Display
XGA 1024 x 768
• Windows: Note: Operation can only be guaranteed on a PC with Windows Vista, XP or 2000 pre-installed.
• Some functions may not be available with Windows Media Center • To upgrade from Windows XP to Windows Vista, first uninstall software bundled
with the Canon inkjet printer. • Macintosh: Hard Disk must be formatted as Mac...