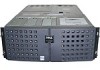
Dell PowerEdge 4350 driver and firmware

Related Dell PowerEdge 4350 Manual Pages
Download the free PDF manual for Dell PowerEdge 4350 and other Dell manuals at ManualOwl.com
Dell PowerEdge Systems Microprocessor Upgrade Guide - Page 3
... You Begin 1-3
Recording the System Configuration 1-3 Updating the ESM Firmware 1-3 Updating the BIOS 1-4 Saving RCU Configuration Settings 1-4 Installing Upgrade Microprocessors in the PowerEdge 1300 1-4 Installing Upgrade Microprocessors in the PowerEdge 2300 1-6 Installing Upgrade Microprocessors in the PowerEdge 4300 1-8 Installing Upgrade Microprocessors in the PowerEdge 4350 1-11...
Dell PowerEdge Systems Microprocessor Upgrade Guide - Page 5
... 4300 PowerEdge 4350
Installing one or more microprocessors in your server may involve the following activities:
Verifying the basic input/output system (BIOS) revision and saving the current configuration data
Accessing the system board (see your system's Installation and Troubleshooting Guide)
Replacing the system board mounting plate or tray (PowerEdge 2300 and 4300) Installing the upgrade...
Dell PowerEdge Systems Microprocessor Upgrade Guide - Page 6
... PowerEdge system and the number of microprocessors you are installing. Each kit will have one or more new Pentium II or Pentium III microprocessor(s), diskettes containing the Resource Configuration Utility (RCU), BIOS, embedded server management (ESM) firmware, and diagnostics. Also included, for some system models, is a cooling shroud and mounting hardware or a replacement system board...
Dell PowerEdge Systems Microprocessor Upgrade Guide - Page 7
... the System Setup program and make a record of the settings.
If an ESM firmware diskette is included with your kit, update your ESM firmware with the version contained on that diskette by performing the following steps. The latest version of the ESM firmware is also available online at http://support.dell.com. 1. Insert the ESM firmware diskette provided in the upgrade kit into...
Dell PowerEdge Systems Microprocessor Upgrade Guide - Page 8
...latest version of the RCU is available online at http://support.dell.com.
To upgrade to Pentium II or Pentium III microprocessors in the PowerEdge 1300, perform the following steps: 1. Access the system board, which involves the following steps:
a. Disconnecting power and peripheral cables. b. Removing the covers. c. Rotating the power supply. See your system Installation and Troubleshooting Guide...
Dell PowerEdge Systems Microprocessor Upgrade Guide - Page 9
... installed microprocessor(s). By default, the serial numbers of Pentium III microprocessors are not displayed. See the procedures in "Using the System Setup Program" in your User's Guide for accessing and modifying entries in the System Setup screens.
d. Reset the chassis intrusion detector while in the System Setup program by changing Chassis Intrusion to Not Detected.
NOTE: If a setup password...
Dell PowerEdge Systems Microprocessor Upgrade Guide - Page 10
...:
a. Disconnecting power and peripheral cables. b. Removing the covers. c. Removing the front bezel. d. Removing the cooling fan shroud. e. Replacing the system board mounting plate or tray. Applies only when
installing 600 MHz or greater microprocessors. See your system Installation and Troubleshooting Guide for specific instructions, if needed.
1-6 Dell PowerEdge Systems - Microprocessor Upgrade
Dell PowerEdge Systems Microprocessor Upgrade Guide - Page 11
... other antistatic surface.
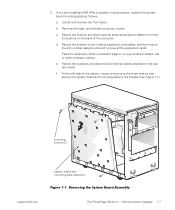
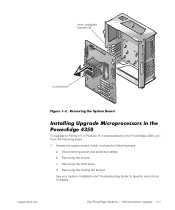
e. Record the locations and disconnect all internal cables attached to the system board.
f. At the left side of the system, locate and remove the three screws that secure the system board and mounting plate to the chassis (see Figure 1-1).
mounting screws (3)
system board and mounting-plate assembly
support.dell.com
Dell PowerEdge Systems - Microprocessor Upgrade 1-7
Dell PowerEdge Systems Microprocessor Upgrade Guide - Page 12
... you are installing a 600-MHz (or greater) microprocessor in your PowerEdge 4300, the system board mounting tray must be replaced. A replacement mounting tray is provided with the upgrade kit. If you are upgrading a PowerEdge 4300 with a microprocessor with an operating frequency less than 600 MHz, you do not need to replace the system board mounting tray.
1-8 Dell PowerEdge Systems...
Dell PowerEdge Systems Microprocessor Upgrade Guide - Page 13
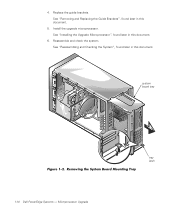
... tray, as shown in Figure 1-3) and lift the system board away from the mounting tray.
2. To install the upgrade mounting tray assembly (provided in your upgrade kit) in your PowerEdge 4300 system, perform the preceding steps in reverse order.
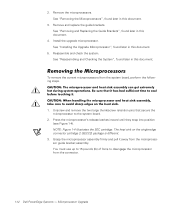
3. Remove the microprocessors.
See "Removing the Microprocessors", found later in this document.
support.dell.com
Dell PowerEdge Systems - Microprocessor...
Dell PowerEdge Systems Microprocessor Upgrade Guide - Page 14
...the guide brackets. See "Removing and Replacing the Guide Brackets", found later in this document.
5. Install the upgrade microprocessor. See "Installing the Upgrade Microprocessor", found later in this document.
6. Reassemble and check the system. See "Reassembling and Checking the System", found later in this document.
system board tray
1-10 Dell PowerEdge Systems - Microprocessor Upgrade
tray...
Dell PowerEdge Systems Microprocessor Upgrade Guide - Page 15
... 4350, perform the following steps: 1. Access the system board, which involves the following steps:
a. Disconnecting power and peripheral cables. b. Removing the covers. c. Removing the front bezel. d. Removing the cooling fan shroud. See your system Installation and Troubleshooting Guide for specific instructions, if needed.
support.dell.com
Dell PowerEdge Systems - Microprocessor Upgrade...
Dell PowerEdge Systems Microprocessor Upgrade Guide - Page 16
.... The heat sink on the single-edge connector cartridge 2 (SECC2) package is different.
3. Grasp the microprocessor assembly firmly and pull it away from the microprocessor guide bracket assembly. You must use up to 15 pounds (lb) of force to disengage the microprocessor from the connector.
1-12 Dell PowerEdge Systems - Microprocessor Upgrade
Dell PowerEdge Systems Microprocessor Upgrade Guide - Page 17
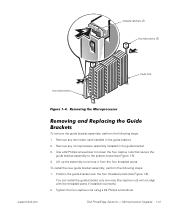
.... To install the new guide bracket assembly, perform the following steps: 1. Position the guide bracket over the four threaded posts (see Figure 1-6).
You can install the guide bracket only one way (the captive nuts will not align with the threaded posts if installed incorrectly). 2. Tighten the four captive nuts using a #2 Phillips screwdriver.
Dell PowerEdge Systems - Microprocessor Upgrade 1-13
Dell PowerEdge Systems Microprocessor Upgrade Guide - Page 21
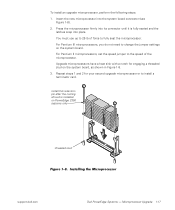
...Upgrade microprocessors have a heat sink with a notch for engaging a threaded stud on the system board, as shown in Figure 1-8. 3. Repeat steps 1 and 2 for your second upgrade microprocessor or to install a terminator card.
install this retention pin after the cooling shroud is installed on PowerEdge 2300 systems only
threaded stud
support.dell.com
Dell PowerEdge Systems - Microprocessor Upgrade...
Dell PowerEdge 4350 System Upgrade Installation Guide - Page 3

... Fan Assembly Removal 9 System Cable Removal 11 System Board Removal 11 System Board Installation 13 System Cable Reinstallation 16 Memory Module Installation 20 Expansion Card Reinstallation 21 System Label Replacement 24 System Badge Replacement 24 Replacing the Computer in Its Rack 24 Operating System Updates for Multiple Microprocessors 25
Microsoft Windows NT 4.0 25 Novell NetWare...
Dell PowerEdge 4350 System Upgrade Installation Guide - Page 5
... system board Third redundant power supply Hot-plug Peripheral Component Interconnect (PCI) expansion-card components Associated data and power cables System firmware You also need to upgrade the following components (not included in this kit): Microprocessor(s) Memory
Observe the following caution and warnings while servicing this system:
Dell PowerEdge 4350 System Upgrade Installation Guide 1
Dell PowerEdge 4350 System Upgrade Installation Guide - Page 7
... to remind you of these precautions:
To upgrade your PowerEdge 4350 system to a PowerEdge 6350 system, you need the following tools:
#1 Phillips-head screwdriver #2 Phillips-head screwdriver 1/4" nut driver 3/16" nut driver Small flat-blade screwdriver Needle-nose pliers Use a wrist grounding strap as explained in "Precautionary Measures."
Dell PowerEdge 4350 System Upgrade Installation Guide 3
Dell PowerEdge 4350 System Upgrade Installation Guide - Page 29
... the following steps: 1. Install the Windows NT 4.0 Resource Kit. 2. Reboot the server. 3. Download the uptomp.inf file from ftp://ftp.microsoft.com/bussys/winnt/
winnt-public/reskit/nt40/uptomp/uptomp.inf. 4. Copy the uptomp.inf file to your local Resource Kit folder.
Typically, this is c:\ntreskit. Overwrite the installed uptomp.inf.
Dell PowerEdge 4350 System Upgrade Installation Guide 25
Dell PowerEdge 4350 System Upgrade Installation Guide - Page 30
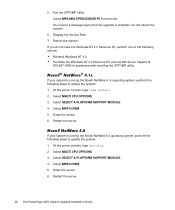
....PSM. 5. Down the server. 6. Restart the server.
If your system is running the Novell NetWare 5.0 operating system, perform the following steps to update the system: 1. At the server console, type nwconfig. 2. Select MULTI CPU OPTIONS. 3. Select SELECT A PLATFORM SUPPORT MODULE. 4. Select MPS14.PSM. 5. Down the server. 6. Restart the server.
26 Dell PowerEdge 4350 System Upgrade Installation Guide