Dell PowerEdge 6600 driver and firmware

Related Dell PowerEdge 6600 Manual Pages
Download the free PDF manual for Dell PowerEdge 6600 and other Dell manuals at ManualOwl.com
User's Guide
(.htm) - Page 19
AC 1
2
AC
: 1
2
3 4
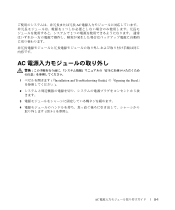
( Installation and Troubleshooting Guide )
Opening the Bezel
( 5-1
)
AC
5-1
User's Guide
(.htm) - Page 20
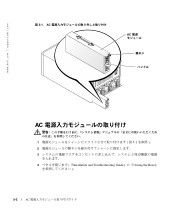
5-1. AC AC
AC
:
1 2 3
4
( 5-1
)
( Installation and Troubleshooting Guide )
Closing the Bezel
5-2
AC
Memory
Installation Guidelines (.pdf) - Page 3
... all safety instructions prior to setup, operation, and service of your system.
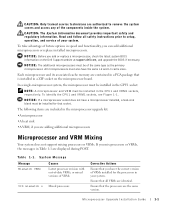
To take advantage of future options in speed and functionality, you can add additional microprocessors or replace installed microprocessors.
NOTICE: Before you add or replace a microprocessor, check the latest system BIOS information on the Dell Support website at support.dell.com, and upgrade the BIOS if necessary...
Memory
Installation Guidelines (.pdf) - Page 4
www.dell.com | support.dell.com
Adding or Replacing a Microprocessor
CAUTION: Before you perform this procedure, you must turn off the system and disconnect it from its power source.
NOTICE: See "Protecting Against Electrostatic Discharge" in the safety instructions in your System Information document.
NOTE: For steps 1 through 5, see your Installation and Troubleshooting Guide for details.
1 ...
Memory
Installation Guidelines (.pdf) - Page 5
... damaged or contaminated.
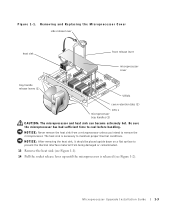
13 Remove the heat sink (see Figure 1-1). 14 Pull the socket release lever up until the microprocessor is released (see Figure 1-2).
Microprocessor Upgrade Installation Guide
1-3
Memory
Installation Guidelines (.pdf) - Page 6
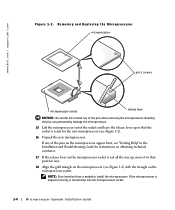
www.dell.com | support.dell....pins on the microprocessor appear bent, see "Getting Help" in the Installation and Troubleshooting Guide for instructions on obtaining technical assistance.
17 If the release lever on the microprocessor...to install the microprocessor. If the microprocessor is aligned correctly, it should drop into the microprocessor socket.
1-4
Mircroprocessor Upgrade Installation Guide
Memory
Installation Guidelines (.pdf) - Page 7
...of the microprocessor enclosure (see Figure 1-1).
26 If you are adding additional microprocessors, install the VRM in the corresponding VRM socket, pushing down firmly to make sure that... see your Installation and Troubleshooting Guide for details.
30 Reseat the following components:
• Peripheral riser card • Memory riser cards • Fans
Microprocessor Upgrade Installation Guide
1-5
Memory
Installation Guidelines (.pdf) - Page 8
..., processor bus, and cache information.
35 Press to enter the System Setup program, and check that the microprocessor categories match the new system configuration (see "Using the System Setup Program" in your User's Guide).
36 Run the system diagnostics to verify that the new microprocessor is operating correctly.
See "Running the System Diagnostics" in the Installation...
Memory
Installation Guidelines (.pdf) - Page 43
16
1 Installation and Troubleshooting Guide
17
18 5-2
ZIF(zero insertion force
19
20 5-1
21 図 5-1
22 5-1
23
24 5-1
25 5-1
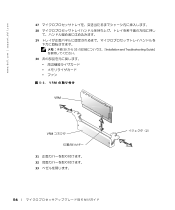
26 VRM VRM 5-3
5-5
Memory
Installation Guidelines (.pdf) - Page 44
www.dell.com | support.dell.com
27 28
29
30 から 33 Installation and Troubleshooting Guide
30
図 5-3. VRM
VRM
VRM
31 32 33
2)
5-6
Memory
Installation Guidelines (.pdf) - Page 45
34
ID
35
Rack
Installation Guide (.pdf) - Page 3
Contents
Safety Instructions 1-1 Rack-to-Tower Kit Contents 1-2 Before You Begin 1-4
Recommended Tools 1-4 Conversion Tasks 1-4 Removing the Rack Doors 1-5 Removing the Cable-Management Arm 1-5 Removing the System From the Rack 1-7 Removing the Bezel, Cover, and Front Panel 1-9 Installing the Front Panel 1-11 Installing the Cover, Pedestal, and Bezel 1-13 Removing the Slide Assemblies...
Rack
Installation Guide (.pdf) - Page 4
Figure 1-7. Figure 1-8. Figure 1-9. Figure 1-10.
Installing the Right-Side Trim Panel 1-13 Attaching Casters to the Pedestal 1-14 Installing the Tower Front Bezel 1-15 Removing the Slide Assemblies (RapidRails and VersaRails Slide Assemblies Shown 1-16
4
Contents
Rack
Installation Guide (.pdf) - Page 5
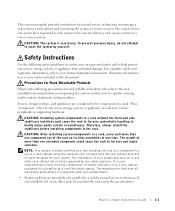
This conversion guide provides instructions for trained service technicians in removing a system from a rack cabinet and converting the system to a tower version. One rack-to-tower conversion kit is required for each system to be converted from a rack version system to a tower version system.
CAUTION: The system is very heavy. To prevent personal injury, do not attempt...
Rack
Installation Guide (.pdf) - Page 6
....dell.com | support.dell...weight of the rack rests on the floor. Install front and side stabilizers on a single rack or front stabilizers for joined...power to the rack.
The total rack load should not exceed 80 percent of the branch circuit rating. • Ensure that proper airflow is provided to components in the rack. • Do not step on or stand on any system/component when servicing...Tower Conversion Guide
Rack
Installation Guide (.pdf) - Page 8

... | support.dell.com
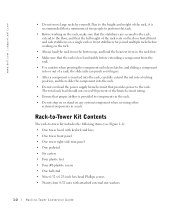
Before You Begin
Before you begin removing your system from the rack and converting it to a tower version system, carefully read "Safety Instructions."
Recommended Tools
The following tools are required to perform the conversion: • #2 Phillips screwdriver • 1/4-inch nut driver • Flat-tipped screwdriver • Torx T-15 driver (for removing and installing the...
Rack
Installation Guide (.pdf) - Page 11
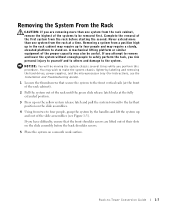
...procedure. You may wish to make the system chassis lighter by labeling and removing the hard drives, power supplies, and the microprocessor tray (for instructions, see the Installation and Troubleshooting Guide).
1 Loosen the thumbscrews that secure the system to the front vertical rails (at the ...back shoulder screws.
5 Place the system on a smooth work surface.
Rack-to-Tower Conversion Guide
1-7
Rack
Installation Guide (.pdf) - Page 15
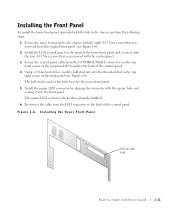
...the control panel.
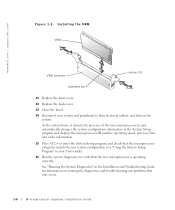
3 Secure the control panel cable from the CONTROL PANEL connector (on the top front corner of the peripheral I/O board) to the back of the control panel.
4 Using a 1/4-inch nut driver, install a... square LED connector clicks when properly installed.
6 Reconnect the cable from the LED connector to the back of the control panel. Figure 1-6. Installing the Tower Front Panel
hole for ...
Rack
Installation Guide (.pdf) - Page 16
www.dell.com | support.dell.com
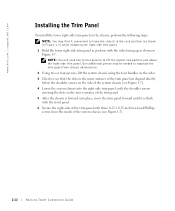
Installing the Trim Panel
To install the tower right-side trim panel on the chassis, perform the following steps:
NOTE: You may find it convenient to leave the chassis in the rack position (as shown in Figure 1-7) while installing the right-side trim...-head Phillips screws from the inside of the system chassis (see Figure 1-7).
1-12
Rack-to-Tower Conversion Guide
Rack
Installation Guide (.pdf) - Page 17
...
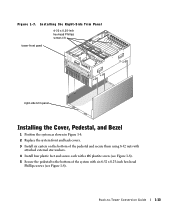
tower front panel
right-side trim panel
Installing the Cover, Pedestal, and Bezel
1 Position the system as shown in Figure 1-8. 2 Replace the system front and back covers. 3 Install six casters on the bottom of the ...pedestal and secure them using 8-32 nuts with
attached external star washers. 4 Install four plastic feet and secure each with a #6 plastite screw (see Figure 1-8). 5 Secure...