Dell Precision Tower 7910 driver and firmware
Drivers and firmware downloads for this Dell item
Related Dell Precision Tower 7910 Manual Pages
Download the free PDF manual for Dell Precision Tower 7910 and other Dell manuals at ManualOwl.com
Dell Precision Tower 5810/7810/7910 and Rack 7910 Dual/Quad Host PCIe Cards Setup Guide - Page 1
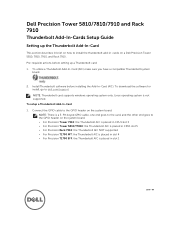
... the host card in a PCIe slot in your Dell Precision
computer. NOTE: The purchased customer install kit will be shipped with the host cards.
2. For instructions on how to install the host card and connect the two-wire cable (included in the kit), see the Owner's Manual for your computer at www.dell.com/manuals. NOTE: To download the drivers for install, go to www.dell.com/support.
Finding More...
Dell Precision Tower 5810/7810/7910 and Rack 7910 Teradici PCoIP Card Host Dual/Quad Setup Guide - Page 1
... Precision Tower 5810/7810/7910 and Rack 7910
Teradici PCoIP Card Host Dual/Quad Setup Guide
Setting up a PCoIP Card Host Dual/Quad
This section provides a quick overview of the host driver installation process on Dell Precision Tower 5810/7810/7910 and Rack 7910. For more details, see the Teradici Support site. Install the PCoIP host driver software from dell.com/support.
NOTE: You cannot upgrade...
Dell Precision Tower 5810/7810/7910 and Rack 7910 Teradici PCoIP Card Host Dual/Quad Setup Guide - Page 2
... User License Agreement Additional information on your product is available at www.dell.com/support/manuals Copyright © 2014 Dell Inc. All rights reserved. This product is protected by U.S. and international copyright and intellectual property laws. Dell™ and the Dell logo are trademarks of Dell Inc. in the United States and/or other jurisdictions. All other...
Dell Precision Tower 5810/7810/7910 and Rack 7910 Thunderbolt Add-In-Cards Setup Guide - Page 1
... on a Dell Precision Tower 5810, 7810, 7910, and Rack 7910. Pre-requisite actions before setting up a Thunderbolt card: 1. To utilize a Thunderbolt Add-In-Card (AIC) make sure you have a compatible Thunderbolt system
board.
2. Install Thunderbolt software before installing the Add-In-Card (AIC). To download the software for install, go to dell.com/support. NOTE: Thunderbolt card supports windows...
Dell Precision Tower 5810/7810/7910 and Rack 7910 Serial PCIe-Card Setup Guide - Page 1
... install the serial add-in-card on a Dell Precision Tower 5810, 7810, 7910, and Rack 7910.
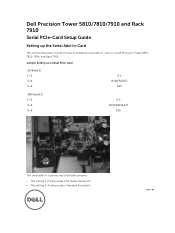
Jumper Setting on a Serial PCIe-Card
J6 (Serial 1) 1-2 3-4 5-6
5 V RI (DEFAULT)
12V
J65 (Serial 1) 1-2 3-4 5-6
5 V DCD (DEFAULT)
12V
The serial add-in-card has two selectable jumpers:
• The setting 1-2 will provide a 5V Power Serial port. • The setting 3-4 will provide a Standard Serial port...
Dell Precision Tower 5810/7810/7910 and Rack 7910 Serial PCIe-Card Setup Guide - Page 2
... The setting 5-6 will provide a 12V Power Serial port. 1. Install serial card software before installing the Add-In-Card (AIC).
NOTE: To download the drivers for install on both Windows operating system and Linux operating system, go to dell.com/support. 2. For Precision Tower 7910: the Serial AIC is placed in the slots CPU1-1, CPU1-3, CPU1-4, CPU2-1, CPU2-2. 3. For Precision Tower 5810/Tower 7810...
Dell Precision Tower 7910 Owners Manual - Page 3
... Optical Drive 20 Installing the Slimline Optical Drive...23 Removing the Memory Shroud...23 Installing the Memory Shroud...24 Removing the Memory...25 Installing the Memory...25 Removing the Coin-Cell Battery...25 Installing the Coin-Cell Battery...26 Removing the Heatsink...26 Installing the Heatsink...27 Removing the HeatSink Fan...28 Installing the Heatsink Fan...28 Removing the PCIe Card...
Dell Precision Tower 7910 Owners Manual - Page 4
... Installing the Power Supply Unit (PSU) Card 48 Removing the System Board...48 Installing the System Board...50 System Board Components...51
3 Additional Information 53
Memory Module Guidelines...53 Front Panel Chassis Lock...53 Power Supply Unit (PSU) Lock...54
4 System Setup...55
Boot Sequence...55 Navigation Keys...55 System Setup Options...56 Updating the BIOS ...64 System and Setup Password...
Dell Precision Tower 7910 Owners Manual - Page 6
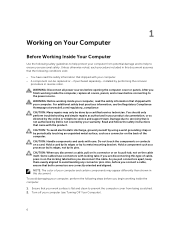
...the online or telephone service and support team. Damage due to servicing that is not authorized by Dell is not covered by your warranty. Read and follow the safety instructions that came with ... computer. CAUTION: Handle components and cards with care. Do not touch the components or contacts on a card. Hold a card by its edges or by its metal mounting bracket. Hold a component such as a processor ...
Dell Precision Tower 7910 Owners Manual - Page 7
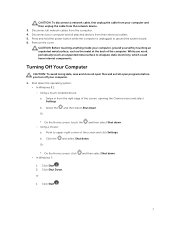
CAUTION: To disconnect a network cable, first unplug the cable from your computer and then unplug the cable from the network device.
3. Disconnect all network cables from the computer. 4. Disconnect your computer and all attached devices from their electrical outlets. 5. Press and hold the power button while the computer is unplugged to ground the system board. 6. Remove the cover.
CAUTION: Before...
Dell Precision Tower 7910 Owners Manual - Page 9
... remove or install the components from your computer.
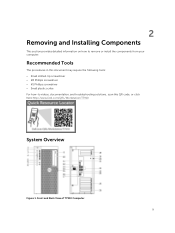
Recommended Tools
The procedures in this document may require the following tools: • Small slotted-tip screwdriver • #2 Phillips screwdriver • #1 Phillips screwdriver • Small plastic scribe For how-to videos, documentation, and troubleshooting solutions, scan this QR code, or click here:http://www.Dell.com...
Dell Precision Tower 7910 Owners Manual - Page 13
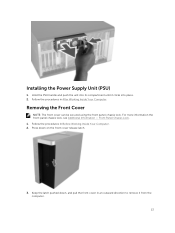
Installing the Power Supply Unit (PSU)
1. Hold the PSU handle and push the unit into its compartment until it clicks into place. 2. Follow the procedures in After Working Inside Your Computer.
Removing...see Additional Information - Front Panel Chassis Lock. 1. Follow the procedures in Before Working Inside Your Computer. 2. Press down on the front cover release latch.
3. Keep the latch pushed down, ...
Dell Precision Tower 7910 Owners Manual - Page 14
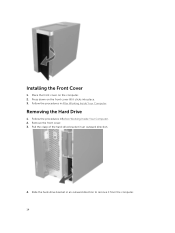
Installing the Front Cover
1. Place the front cover on the computer. 2. Press down on the front cover till it clicks into place. 3. Follow the procedures in After Working Inside Your Computer.
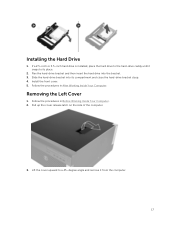
Removing the Hard Drive
1. Follow the procedures inBefore Working Inside Your Computer. 2. Remove the front cover. 3. Pull the clasp of the hard-drive bracket in an...
Dell Precision Tower 7910 Owners Manual - Page 15
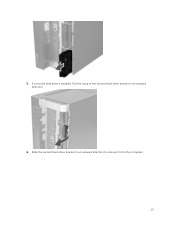
5. If a second hard drive is installed, Pull the clasp of the second hard-drive bracket in an outward direction.
6. Slide the second hard-drive bracket in an outward direction to remove it from the computer. 15
Dell Precision Tower 7910 Owners Manual - Page 16
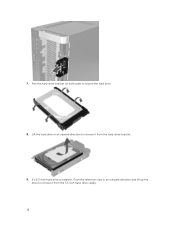
7. Flex the hard-drive bracket on both sides to loosen the hard drive.
8. Lift the hard drive in an upward direction to remove it from the hard-drive bracket.
9. If a 2.5 inch hard drive is installed , Push the retention clips in an outward direction and lift up the drive to remove it from the 3.5 inch hard-drive caddy.
16
Dell Precision Tower 7910 Owners Manual - Page 17
... drive is installed, place the hard drive to the hard-drive caddy until it snaps to its place.
2. Flex the hard-drive bracket and then insert the hard drive into the bracket. 3. Slide the hard-drive bracket into its compartment and close the hard-drive bracket clasp. 4. Install the front cover. 5. Follow the procedures in After Working Inside Your Computer...
Dell Precision Tower 7910 Owners Manual - Page 18
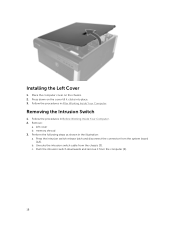
... Intrusion Switch
1. Follow the procedures in Before Working Inside Your Computer. 2. Remove:
a. left cover b. memory shroud 3. Perform the following steps as shown in the illustration: a. Press the intrusion switch release latch and disconnect the connector from the system board
[1,2]. b. Unroute the intrusion switch cable from the chassis [3]. c. Push the intrusion switch downwards and remove...
Dell Precision Tower 7910 Owners Manual - Page 19
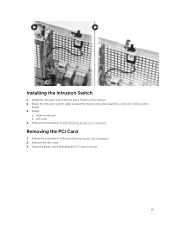
... its place holder on the chassis. 2. Route the intrusion-switch cable around the chassis clips and install the connector to the system
board. 3. Install:
a. memory shroud b. left cover 4. Follow the procedures in After Working Inside Your Computer.
Removing the PCI Card
1. Follow the procedures in Before Working Inside Your Computer. 2. Remove the left cover. 3. Open the plastic latch fastening...
Dell Precision Tower 7910 Owners Manual - Page 64
...; Gen1 • Gen2 • Gen3
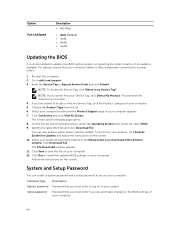
Updating the BIOS
It is recommended to update your BIOS (system setup), on replacing the system board or if an update is available. For laptops, ensure that your computer battery is fully charged and connected to a power outlet
1. Re-start the computer. 2. Go to dell.com/support. 3. Enter the Service Tag or Express Service Code and click Submit.
NOTE: To...
Dell Precision Tower 7910 Owners Manual - Page 66
... cover. NOTE: If you assign a new system and/or setup password with the PSWD jumper installed, the system disables the new password(s) the next time it boots. 6. Connect the computer to the electrical outlet and power-on the computer. 7. Power-off the computer and disconnect the power cable from the electrical outlet. 8. Remove the cover. 9. Replace the jumper on the pins...