Edimax IC-7000PTn V3 driver and firmware

Related Edimax IC-7000PTn V3 Manual Pages
Download the free PDF manual for Edimax IC-7000PTn V3 and other Edimax manuals at ManualOwl.com
Datasheet - Page 1
... motion.
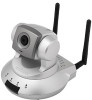
Supports 2-Way Audio The Edimax IC-7000 V3 series is designed with 2-way audio support. It has a microphone and an audio output for speaker connection. By connecting speakers to the camera, users can remotely communicate with people at the site where the network camera is installed, or even ward off an intruder when necessary.
SDHC/SD Card Slot for Local Storage The IC-7000 V3 series...
Datasheet - Page 2
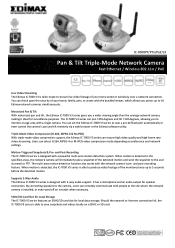
...802.11b/g/n (IC-7000PTn V3 only) PoE IEEE 802.3af (IC-7000PoE V3 only) 1 Ethernet (RJ-45) Port 1 Power Jack 1 Audio Output 1 Microphone 1 Reset Button/WPS (IC-7000PTn V3 only) 1 SDHC Card Slot 1 USB Slot for Wi-Fi Adapter (IC-7000PT V3 only) 2 Detachable Antennas (IC-7000PTn V3 only)
Video / Audio
2‐Way Audio Support Triple‐Mode: H.264, MPEG‐4 & M‐JPEG Recording Format: AVI...
Quick Install Guide - Page 2
... you have purchased and the setup screen may appear slightly different from those shown in this QIG. For more information about this product, please refer to the user manual on the CD-ROM. The software and specifications are subject to change without notice. Please visit our website www.edimax.com for updates. All brand and product...
Quick Install Guide - Page 3
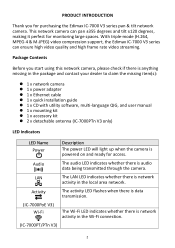
... 1 x network camera 1 x power adapter 1 x Ethernet cable 1 x quick installation guide 1 x CD with utility software, multi-language QIG, and user manual 1 x mounting kit 1 x accessory kit 2 x detachable antenna (IC-7000PTn V3 only)
LED Indicators
LED Name Power
Description
The power LED will light up when the camera is powered on and...
Quick Install Guide - Page 5
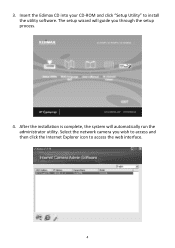
3. Insert the Edimax CD into your CD-ROM and click "Setup Utility" to install the utility software. The setup wizard will guide you through the setup process.
4. After the installation is complete, the system will automatically run the administrator utility. Select the network camera you wish to access and then click the Internet Explorer icon to access the web interface.
4
Manual - Page 2
... you have purchased and the setup screen may appear slightly different from those shown in this QIG. For more information about this product, please refer to the user manual on the CD-ROM. The software and specifications are subject to change without notice. Please visit our website www.edimax.com for updates. All brand and product...
Manual - Page 3

... your Internet Network camera 5 1.1 Package Contents 5 1.2 Basic Introduction 6 1.3 Product Highlights 7 1.4 Familiar with Key Components 8 IC-7000PT V3 10 IC-7000PTn V3 11 IC-7000PoE V3 12 1.5 Camera Installation 16 1.6 Locate the IP Address of this Network camera 19 1.7 Using Camera Admin Software to Locate Camera 23
Chapter II: Using Web Management Interface 35 2.1 Camera Settings...
Manual - Page 4
... Using Surveillance Software 86 3-1 Installing Network camera Surveillance Software 86 3-2 Using Network camera surveillance software 90 3-3 Configure Network camera surveillance software 93 3-3-1 Configure cameras 93 3-3-2 General Settings 102 3-4 Change Display Layout 108 3-5 Full-screen mode 111 3-6 Scan 112 3-7 Zoom-in / Zoom-out 113 3-8 PTZ 114 3-9 Snapshot 115 3-10 Recording 116...
Manual - Page 7
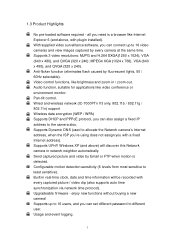
...out. Audio function, suitable for applications like video conference or environment monitor. Pan-tilt control. Wired and wireless network (IC-7000PTn V3 only, 802.11b / 802.11g / 802.11n) support Wireless data encryption (WEP / WPA) Supports DHCP and PPPoE protocol, you can also assign a fixed IP address to the camera also. Supports Dynamic DNS (used to allocate the Network camera‟s Internet...
Manual - Page 23
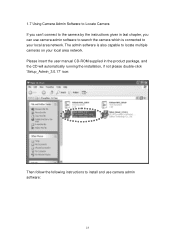
... the camera by the instructions given in last chapter, you can use camera admin software to search the camera which is connected to your local area network. The admin software is also capable to locate multiple cameras on your local area network. Please insert the user manual CD-ROM supplied in the product package, and the CD will automatically running the installation...
Manual - Page 24
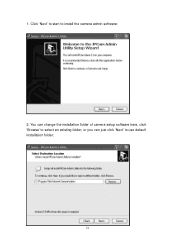
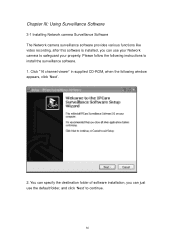
1. Click „Next‟ to start to install the camera admin software:
2. You can change the installation folder of camera setup software here, click „Browse‟ to select an existing folder, or you can just click „Next‟ to use default installation folder:
24
Manual - Page 25
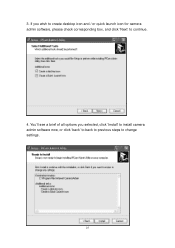
3. If you wish to create desktop icon and / or quick launch icon for camera admin software, please check corresponding box, and click „Next‟ to continue.
4. You‟ll see a brief of all options you selected, click „Install‟ to install camera admin software now, or click „back‟ to back to previous steps to change settings.
25
Manual - Page 26
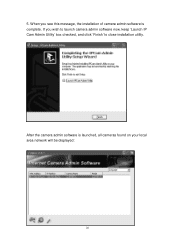
5. When you see this message, the installation of camera admin software is complete. If you wish to launch camera admin software now, keep „Launch IP Cam Admin Utility‟ box checked, and click „Finish‟ to close installation utility.
After the camera admin software is launched, all cameras found on your local area network will be displayed:
26
Manual - Page 31
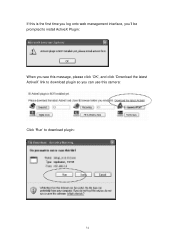
If this is the first time you log onto web management interface, you‟ll be prompted to install ActiveX Plugin: When you see this message, please click „OK‟, and click „Download the latest ActiveX‟ link to download plugin so you can use this camera: Click „Run‟ to download plugin:
31
Manual - Page 34
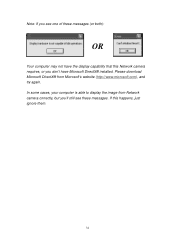
... messages (or both):
OR
Your computer may not have the display capability that this Network camera requires, or you don't have Microsoft DirectX® installed. Please download Microsoft DirectX® from Microsoft's website (http://www.microsoft.com), and try again. In some cases, your computer is able to display the image from Network camera correctly, but you'll still see...
Manual - Page 75
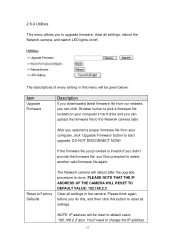
...every setting in this menu will be given below:
Item
Upgrade Firmware
Description
If you downloaded latest firmware file from our website, you can click ‟Browse‟ button to pick a firmware file located on your computer‟s hard drive and you can upload the firmware file to the Network camera later.
After you selected a proper firmware file from your computer, click „Upgrade...
Manual - Page 86
... Software
3-1 Installing Network camera Surveillance Software The Network camera surveillance software provides various functions like video recording, after this software is installed, you can use your Network camera to safeguard your property. Please follow the following instructions to install the surveillance software. 1. Click "16 channel viewer" in supplied CD-ROM, when the following window...
Manual - Page 89
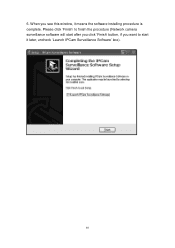
6. When you see this window, it means the software installing procedure is complete. Please click „Finish‟ to finish the procedure (Network camera surveillance software will start after you click „Finish‟ button, if you want to start it later, uncheck „Launch IPCam Surveillance Software‟ box).
89
Manual - Page 92
...
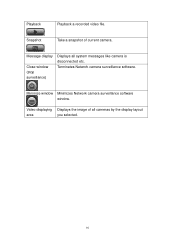
Playback a recorded video file.
Snapshot
Take a snapshot of current camera.
Message display
Close window (stop surveillance)
Displays all system messages like camera is disconnected etc. Terminates Network camera surveillance software.
Minimize window Minimizes Network camera surveillance software window.
Video displaying Displays the image of all cameras by the display layout
area...
Manual - Page 125
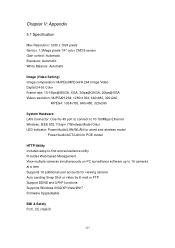
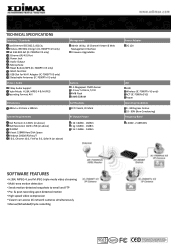
... RJ-45 port to connect to 10/100Mbps Ethernet Wireless: IEEE 802.11b/g/n (*Wireless Model Only) LED Indicator: Power/Audio/LAN/WLAN for wired and wireless model
Power/Audio/ACT/LAN for POE model
HTTP/Utility Includes easy-to-find and surveillance utility Provides Web based Management View multiple cameras simultaneously on PC surveillance software up to 16 cameras at a time Supports 16 additional...