MSI MS9297 driver and firmware

Related MSI MS9297 Manual Pages
Download the free PDF manual for MSI MS9297 and other MSI manuals at ManualOwl.com
User Guide - Page 2
... Support
If a problem arises with your system and no solution can be obtained from the user's manual, please contact your place of purchase or local distributor. Alternatively, please try the following help resources for further guidance.
◙ Visit the MSI website for FAQ, technical guide, BIOS updates,
driver updates, and other information: http://www.msi.com/index. php?func=service...
User Guide - Page 4
...service persons or by users who have been trained on the restrictions and the precautions for this specific site.
2) Access is by means of at least one of the following, special tool, lock and key, or other means of security, and is controlled by the authority responsible for the location.
3) Rack Mount Installation Instructions...mechanical loading.
... be used when addressing this concern.
◙...
User Guide - Page 5
... for a class A digital device, pursuant to part 15 of the FCC rules. These limits are designed to provide reasonable protection against harmful interference when the equipment is operated in a commercial environment. This equipment generates, uses and can radiate radio frequency energy and, if not installed and used in accordance with the instruction manual, may cause...
User Guide - Page 19

... provides you with the information on system assembly procedures. While doing the installation, be careful in holding the components and follow the installation procedures. For some components, if you install in the wrong orientation, the components will not work properly. Use a grounded wrist strap before handling computer components. Static electricity may damage the components.
2-2-1
User Guide - Page 20
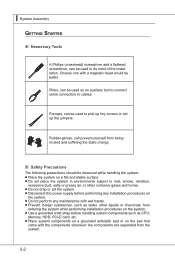
... power supply before performing any installation procedures on
the system. ■ Do not perform any maintenance with wet hands. ■ Prevent foreign substances, such as water, other liquids or chemicals, from
entering the system while performing installation procedures on the system. ■ Use a grounded wrist strap before handling system components such as CPU,
Memory, HDD, PCI-E card...
User Guide - Page 21

System Assembly
System Cover
Step 1. Press the release buttons and slide the chassis cover backwards.
Step 2. Lift the chassis cover up to remove it from the chassis.
MS-9297
Important Before you remove or install any components, make sure the system is not turned on or connected to the power supply.
2-3
User Guide - Page 23

Step 4. Open the load plate.
Step 5. The CPU socket has a plastic cap on it to protect the contact from damage. Before you install the CPU, always cover it to protect the socket pin. Remove the cap from the lever hinge side.
Step 6. After confirming the CPU direction for correct mating, put down the CPU in the socket...
User Guide - Page 25

MS-9297 Step 10. Follow the same procedures to install the second CPU & heat sink.
2-7
User Guide - Page 27

... the DIMM is properly seated.
Step 5. Follow the same procedures to install more DIMMs if necessary.
MS-9297
Step 6. Replace the fan duct on top of the CPU and DIMM.
Important • In Multi-Channel mode, make sure that you install memory modules of the
same type and density in different channel DIMM slots...
User Guide - Page 34
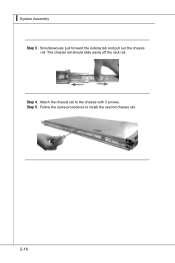
▍ System Assembly
Step 3. Simultaneously pull forward the locking tab and pull out the chassis rail. The chassis rail should slide easily off the rack rail.
Step 4. Attach the chassis rail to the chassis with 3 screws. Step 5. Follow the same procedures to install the second chassis rail.
2-16
User Guide - Page 35

... rack.
Step 2. Position the rack rail at the desired location in the rack. Make sure the sliding guide is facing inwards.
Step 3. Secure the rack rail to the rack with the cage nuts on the front... and rear brackets.
Step 4. Follow the above procedures to install the second rack rail.
Step 5. Align the chassis rails with the rack rails. Slide the system into...
User Guide - Page 40

▍ Mainboard Setup
CPU (Central Processing Unit)
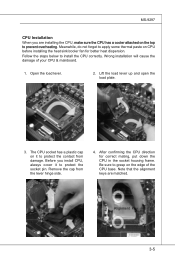
When you are installing the CPU, make sure that you install the cooler to prevent overheating. If you do not have the CPU cooler, consult your dealer before turning on the computer.
Important Overheating Overheating will seriously damage the CPU and system. Always make sure the cooling fan can work properly to...
User Guide - Page 41
... heat dispersion.
Follow the steps below to install the CPU correctly. Wrong installation will cause the damage of your CPU & mainboard.
1. Open the load lever.
2. Lift the load lever up and open the load plate.
3. The CPU socket has a plastic cap on it to protect the contact from damage. Before you install CPU, always cover it to protect the socket...
User Guide - Page 42
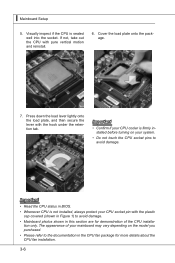
... the load plate, and then secure the lever with the hook under the retention tab.
Important
• Confirm if your CPU cooler is firmly installed before turning on your system.
• Do not touch the CPU socket pins to avoid damage.
Important • Read the CPU status in BIOS. • Whenever CPU is not installed, always protect your CPU...
User Guide - Page 43
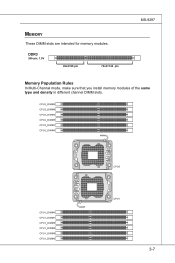
Memory
These DIMM slots are intended for memory modules.
DDR3
240-pin, 1.5V
48x2=96 pin
72x2=144 pin
MS-9297
Memory Population Rules
In Multi-Channel mode, make sure that you install memory modules of the same type and density in different channel DIMM slots.
3-7
User Guide - Page 45
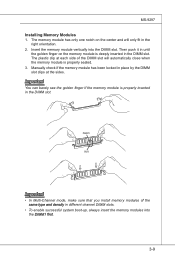
... close when the memory module is properly seated. 3. Manually check if the memory module has been ...locked in place by the DIMM slot clips at the sides. Important You can barely see the golden finger if the memory module is properly inserted in the DIMM slot.
Notch
Volt
Important • In Multi-Channel mode, make sure that you install memory...
User Guide - Page 51

... to clear the BIOS password. You can clear BIOS password byshorting 2-3 pin while the system is off. Then return to 1-2 pin position. Avoid clearing the password while the system is on; it will damage the mainboard.
1
JPASSWORD1
1
Normal (default)
1
Password clear
RAID Select Jumper: JRAID_SEL1 This jumper specifies the RAID solution.
1
JRAID_SEL1
1
Normal (default)
1
Software RAID
3-15
User Guide - Page 52
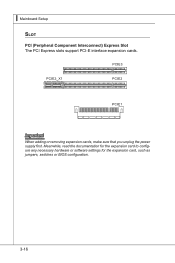
... Setup Slot
PCI (Peripheral Component Interconnect) Express Slot The PCI Express slots support PCI-E interface expansion cards.
Important When adding or removing expansion cards, make sure that you unplug the power supply first. Meanwhile, read the documentation for the expansion card to configure any necessary hardware or software settings for the expansion card, such as jumpers, switches or BIOS...
User Guide - Page 54
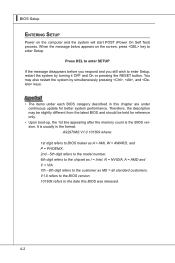
...; Upon boot-up, the 1st line appearing after the memory count is the BIOS version. It is usually in the format:
A9297IMS V1.0 101609 where:
1st digit refers to BIOS maker as A = AMI, W = AWARD, and P = PHOENIX. 2nd - 5th digit refers to the model number. 6th digit refers to the chipset as I = Intel, N = NVIDIA, A = AMD and V = VIA. 7th - 8th...
User Guide - Page 61
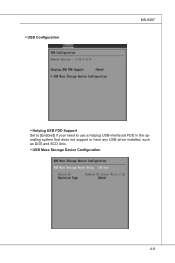
▶ USB Configuration
MS-9297
▶ Hotplug USB FDD Support Set to [Enabled] if your need to use a hotplug USB-interfaced FDD in the operating system that does not support or have any USB driver installed, such as DOS and SCO Unix.
▶ USB Mass Storage Device Configuration
4-9