MSI MSS0101 driver and firmware

Related MSI MSS0101 Manual Pages
Download the free PDF manual for MSI MSS0101 and other MSI manuals at ManualOwl.com
User Guide - Page 2
... no solution can be obtained from the user's manual, please contact your place of purchase or local distributor. Alternatively, please try the following help resources for further guidance.
◙ Visit the MSI website for technical guide, BIOS updates, driver updates
and other information via http://www.msi.com/service/download/
◙ Contact our technical staff via http://support.msi.com/
ii
User Guide - Page 5

... with the limits for a Class B digital device, pursuant to Part 15 of the FCC Rules. These limits are designed to provide reasonable protection against harmful interference in a residential installation. This equipment generates, uses and can radiate radio frequency energy and, if not installed and used in accordance with the instruction manual, may cause harmful interference to...
User Guide - Page 17

... chapter provides you with the information about hardware setup procedures. While doing the installation, be careful in holding the components and follow the installation procedures. For some components, if you install in the wrong orientation, the components will not work properly. Use a grounded wrist strap before handling computer components. Static electricity may damage the components...
User Guide - Page 19
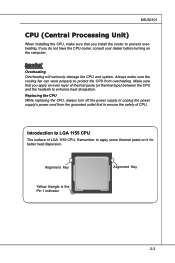
... Unit)
When installing the CPU, make sure that you install the cooler to prevent overheating. If you do not have the CPU cooler, consult your dealer before turning on the computer.
Important Overheating Overheating will seriously damage the CPU and system. Always make sure the cooling fan can work properly to protect the CPU from overheating. Make...
User Guide - Page 20
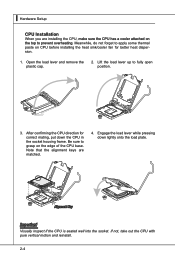
▍ Hardware Setup
CPU Installation
When you are installing the CPU, make sure the CPU has a cooler attached on
the top to prevent overheating. Meanwhile, do not forget to apply some thermal
paste on CPU before installing the heat sink/cooler fan for better heat disper-
sion.
1. Open the load lever and remove the plastic cap.
2. Lift the load lever up...
User Guide - Page 21

... are correctly inserted.
8. Finally, attach the CPU Fan cable to the CPU fan connector on the mainboard.
Important • Confirm if your CPU cooler is firmly installed before turning on your system. • Do not touch the CPU socket pins to avoid damage. • Whenever CPU is not installed, always protect your CPU socket pins with the plastic
cap...
User Guide - Page 22

▍ Hardware Setup
Memory
These DIMM slots are intended for memory modules.
DDR3
240-pin, 1.5V
48x2=96 pin
72x2=144 pin
Dual-Channel Mode
In Dual-Channel mode, make sure that you install memory modules of the same type and density in different channel DIMM slots.
DIMM4 (Channel B) DIMM3 (Channel A) DIMM2 (Channel B) DIMM1 (Channel A)
DIMM...
User Guide - Page 23

... close when the memory module is properly seated. 3. Manually check if the memory module has been ...locked in place by the DIMM slot clips at the sides. Important You can barely see the golden finger if the memory module is properly inserted in the DIMM slot.
Notch
Volt
Important • In Multi-Channel mode, make sure that you install memory...
User Guide - Page 32

▍ Hardware Setup IDE Connector: IDE1
This connector supports IDE hard disk drives, optical disk drives and other IDE devices.
Important If you install two IDE devices on the same cable, you must configure the drives separately to master / slave mode by setting jumpers. Refer to IDE device documentation supplied by the vendors for jumper setting instructions.
2-16
User Guide - Page 39

... PCIE x4 interface.
PCI (Peripheral Component Interconnect) Express Slot
The PCI Express slot supports PCI-E interface expansion cards. PCI Express x4 slot
Mini PCI (Peripheral Component Interconnect) Slot
Mini PCI devices were developed such as Wi-Fi, Fast Ethernet, Bluetooth, modems (often Winmodems), sound cards, cryptographic accelerators, SCSI, IDE- ATA, SATA controllers and combination cards...
User Guide - Page 40
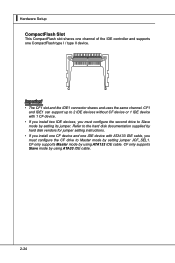
... IDE1 can support up to 2 IDE devices without CF device or 1 IDE device with 1 CF device. • If you install two IDE devices, you must configure the second drive to Slave mode by setting its jumper. Refer to the hard disk documentation supplied by hard disk vendors for jumper setting instructions. • If you install one CF device and one IDE device with ATA133 IDE cable, you...
User Guide - Page 42
...
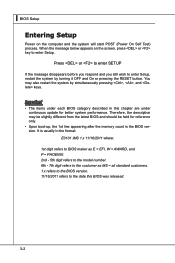
continuous update for better system performance. Therefore, the description may be slightly different from the latest BIOS and should be held for reference only. • Upon boot-up, the 1st line appearing after the memory count is the BIOS version. It is usually in the format:
E0101 IMS 1.x 11/16/2011 where:
1st digit refers to BIOS...
User Guide - Page 45

Main
MS-S0101
▶ BIOS Information, Memory Information, Access Level These items show the firmware and hardware specifications of your system. Read only. ▶ System Date This setting allows you to set the system date. The date format is , . ▶ System Time This setting allows you to set the system time. The time format is .
3-5
User Guide - Page 55

▶ OEM Software SMI Configuration
MS-S0101
▶ OEM Software SMI
This setting enables/disables the support for OEM software SMI (System Management Interrupt).
3-15
User Guide - Page 58

▍ BIOS Setup
▶ LAN Watch Dog Time Out Event This setting specifies the Watch Dog time out action when the Watch Dog Timer is timed out. ▶ LAN 2, 3 State at Power On/Off; LAN 4, 5 State at Power On/Off; LAN 6,
7 State at Power On/Off; LAN 8, 9 State at Power On/Off; LAN 1, 2 State at Power On/Off; LAN 3, 4 State at Power On/Off These settings control the LAN bypass...