Samsung SC-DC575 driver and firmware

Related Samsung SC-DC575 Manual Pages
Download the free PDF manual for Samsung SC-DC575 and other Samsung manuals at ManualOwl.com
User Manual (ENGLISH) - Page 30
... onto a disc. Before recording, La fecha y hora se graba automáticamente en un disco. Antes de grabar, ajuste
please set the date/time.
la fecha y la hora.
1. Coloque el interruptor [Mode] en [DISC] o [CARD].
1. Set the [Mode] switch to [DISC] or [CARD].
4
(SC-DC173(U)/DC175/DC575 only)
2. Set the [Power] switch to [ (Camera)] or
[ (Player)].
3. Press the [MENU] button...
User Manual (ENGLISH) - Page 30
...;glage de date/heure.
1. Set the [Mode] switch to [DISC] or [CARD].
4
(SC-DC173(U)/DC175/DC575 only)
2. Set the [Power] switch to [ (Camera)] or
[ (Player)].
3. Press the [MENU] ...set the year up to 2040. If the Lithium Battery is not installed, data inputted will not be backed up. Display illustrations in this manual OSD illustrations of SC-DC175 are used in this manual...
User Manual (ENGLISH) - Page 48
...Camera Mode and M.Cam Mode. page 26
Back lighting exists when the subject is darker than the background: - The subject is in front of a window. - The person to be recorded... devant un arrière-plan enneigé.
1. Set the [Mode] switch to [DISC] or [CARD].
6
(SC-DC173(U)/DC175/DC575 only)
2. Set the [Power] switch to [ (Camera)].
3. Press the [MENU] button. The...
User Manual (ENGLISH) - Page 61
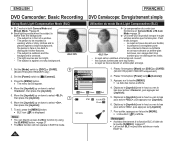
...pictures when: - Recording with the zoom (Digital Zoom is not
mode.) - Recording a small object close-up - Recording and walking at the same time - Recording through the window of a vehicle Set the [Mode] switch to [DISC]. (SC-DC173(U)/DC175/DC575 only) Set the [Power] switch to [ (Camera)].
available 4
in
the
DIS
Camera Mode ►Camera
Program AE White Balance Digital Effect
Elle...
User Manual (ENGLISH) - Page 2
... a Power Source 25 About the Operating Modes 26 Using the Joystick 26 Using the Q.MENU 27 OSD (On Screen Display) in Camera Mode/Player Mode ... 28 OSD (On Screen Display) in M.Cam Mode/M.Player Mode (SC-DC173(U)/DC175/DC575 only 29 Turning the OSD (On Screen Display) On/Off 29
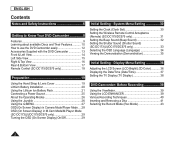
Initial Setting : System Menu Setting 30
Setting the Clock (Clock Set 30 Setting the Wireless Remote Control...
User Manual (ENGLISH) - Page 4
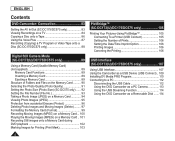
... 83
Setting the AV In/Out (SC-DC175/DC575 only 83 Viewing Recordings on a TV 84 Copying a Disc onto a Tape 86 Using the Voice Plus 87 Recording (Copying) a TV Program or Video Tape onto a Disc (SC-DC175/DC575 only 88
Digital Still Camera Mode (SC-DC173(U)/DC175/DC575 only 89
Using a Memory Card (Usable Memory Card) (not supplied 89
Memory Card Functions 89 Inserting a Memory Card 89...
User Manual (ENGLISH) - Page 13
...
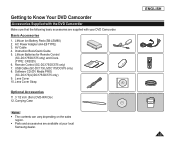
1. Lithium Ion Battery Pack (SB-LSM80) 2. AC Power Adapter (AA-E9 TYPE) 3. AV Cable 4. Instruction Book/Quick Guide 5. Lithium Batteries for Remote Control
(SC-DC175/DC575 only) and Clock. (TYPE: CR2025) 6. Remote Control (SC-DC175/DC575 only) 7. USB Cable (SC-DC173(U)/DC175/DC575 only) 8. Software CD (DV Media PRO) (SC-DC173(U)/DC175/DC575 only) 9. Lens Cover 10. Lens Cover Strap
Optional...
User Manual (ENGLISH) - Page 19
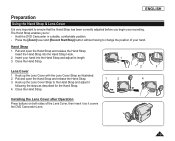
...Hold the DVD Camcorder in a stable, comfortable position. - Press the [Zoom] lever and [Record Start/Stop] button without having to change the position of your hand.
Hand Strap
1. Pull and...adjust it
following the steps as described for the Hand Strap.
4. Close the Hand Strap.
2
3
4
Installing the Lens Cover after Operation
Press buttons on both sides of the Lens Cover, then insert it so it ...
User Manual (ENGLISH) - Page 20
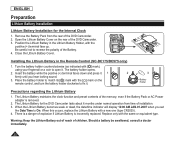
... Battery Cover.
Installing the Lithium Battery in the Remote Control (SC-DC175/DC575 only)
1. ...memory; even if the Battery Pack or AC Power adapter is removed.
2. The Lithium Battery for the DVD Camcorder lasts about 6 months under normal operation from time of installation. 3. When the Lithium Battery becomes weak or dead, the date/time indicator will display 12:00 AM JAN.01.2007 when you set...
User Manual (ENGLISH) - Page 30
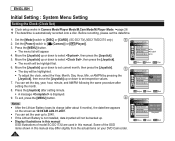
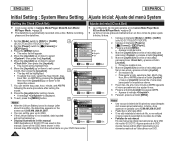
... Setting : System Menu Setting
Setting the Clock (Clock Set)
Clock setup works in Camera Mode/Player Mode/M.Cam Mode/M.Player Mode. page 26 The date/time is automatically recorded onto a disc. Before recording, please set the date/time.
1. Set the [Mode] switch to [DISC] or [CARD]. (SC-DC173(U)/DC175/DC575 only)
4
2. Set the [Power] switch to [ (Camera)] or [ (Player...
User Manual (ENGLISH) - Page 48
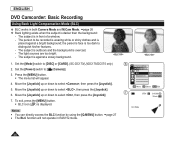
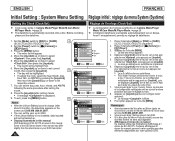
...Camera Mode and M.Cam Mode. page 26 Back lighting exists when the subject is darker than the background:
- The subject is in front of a window. - The person to be recorded...- The subject is against a snowy background.
1. Set the [Mode] switch to [DISC] or [CARD]. (SC-DC173(U)/DC175/DC575 only)
6
2. Set the [Power] switch to [ (Camera)].
3. Press the [MENU] button. The...
User Manual (ENGLISH) - Page 81
... owners. Video and audio may pause or skip when you play back a DVD disc on your PC. In this occurs, copy the data into your hard disk
drive. A DVD-RW disc recorded in VR mode can not play back on your PC.
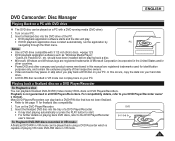
Playing back a finalized disc on a DVD Player/Recorder
To Playback a disc You...
User Manual (ENGLISH) - Page 101
... DVD Camcorder) should be installed.
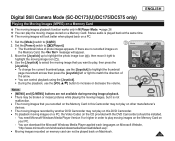
- You need Microsoft Windows Media Player Version 9 or higher in order to play moving images on the Memory Card on your PC.
- You can download the Microsoft Windows Media Player applied each languages on Microsoft Website, "http://www.microsoft.com/windows/windowsmedia/download/default.asp".
Moving images recorded on memory card can not be played back...
User Manual (ENGLISH) - Page 107
... (SC-DC173(U)/DC175/DC575 only)
Using USB Interface
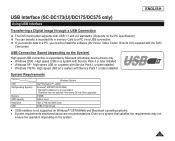
Transferring a Digital Image through a USB Connection
The DVD Camcorder supports both USB 1.1 and 2.0 standards. (Depends on the PC specification) You can transfer a recorded file in memory Card to a PC via a USB connection. If you transfer data to a PC, you need to install the software (DV Driver, Video...
User Manual (ENGLISH) - Page 108
ENGLISH
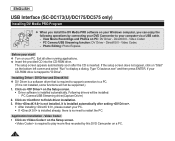
USB Interface (SC-DC173(U)/DC175/DC575 only)
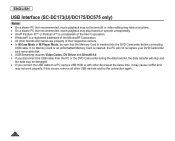
...Player Mode, be sure that the Memory Card is inserted into the DVD Camcorder before connecting
USB cable. If no Memory Card or an unformatted Memory Card is inserted, the PC will not recognize your DVD Camcorder as a removable disk. USB Streaming requires Video Codec, DV Driver and DirectX 9.0. If you disconnect the USB cable...
User Manual (ENGLISH) - Page 110
ENGLISH
USB Interface (SC-DC173(U)/DC175/DC575 only)
Installing DV Media PRO Program
When you install the DV Media PRO software on your Windows computer, you can enjoy the following operations by connecting your DVD Camcorder to your computer via a USB cable. - View Movie Recordings and Photos on PC: DV Driver - DirectX9.0 - Video Codec - PC Camera/USB Streaming function: DV Driver - ...
User Manual (ENGLISH) - Page 111
ENGLISH
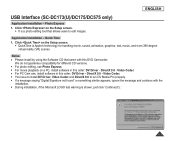
USB Interface (SC-DC173(U)/DC175/DC575 only)
Application Installation - Photo Express 1. Click on the Setup screen.
It is a photo editing tool that allows users to edit images. Application Installation - Quick Time 1. Click on the Setup screen.
QuickTime is Apple's technology for handling movie, sound, animation, graphics, text, music, and even 360-degree virtual ...
User Manual (ENGLISH) - Page 113
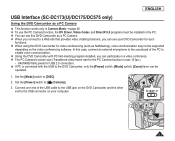
... is max 15 fps.) - 640X480(VGA) pixels for USB 2.0 connection. If PC is connected with the USB to the DVD Camcorder, only the [Power] switch, [Mode] switch, [Zoom] lever can be operated.
1. Set the [Mode] switch to [DISC].
1
2. Set the [Power] switch to [ (Camera)].
3. Connect one end of the USB cable to the USB jack on the DVD Camcorder and...
User Manual (ENGLISH) - Page 114
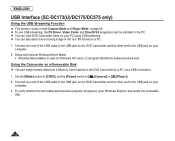
... your
computer. 2. Setup and execute Windows Movie Maker.
Windows Movie Maker is used for Windows XP users. (C:\program files\Movie maker\moviemk.exe) Using the Camcorder as a Removable Disk You can easily transfer data from a Memory Card inserted in the DVD Camcorder to a PC via a USB connection. 1. Set the [Mode] switch to [CARD], set the [Power] switch to [ (Camera)] or...
Win 2000/xp/vista (
0.76
) - Page 2
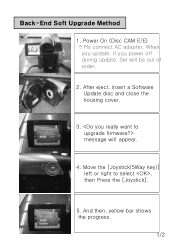
Back-End Soft Upgrade Method
1. Power On (Disc CAM E/E) ※Pls connect AC adapter, When
you update. If you power off during update, Set will be out of order.
2. After eject, insert a Software Update disc and close the housing cover.
3. message will appear.
4. Move the [Joystick(5Way key)] left or right to select , then Press the [Joystick].
5. And then, yellow bar shows the progress.
1/2