Sony CCD-TR30 driver and firmware

Related Sony CCD-TR30 Manual Pages
Download the free PDF manual for Sony CCD-TR30 and other Sony manuals at ManualOwl.com
Primary User Manual - Page 2
... Sony Service Center nearest you call 1-800-222-SONY (United States only) For the Factory Service Center nearest you call 4I6-499-SONY (Canada only)
Caution: Do not handle damaged or leaking nickel-cadmium batteries.
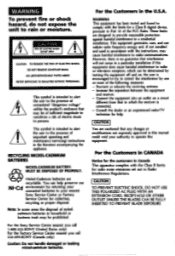
For the Customers in the U.S.A.
WARNING This equipment has been tested and found to comply with the limits for a Class B digital device...
Primary User Manual - Page 3
... This Manual 4 Checking Supplied Accessories 5
Getting Started Charging and Installing the Battery Pack 6 Tips for Using the Battery Pack 9 Inserting a Cassette 12 Adjusting the Viewfinder Lens 13 Hints for Better Shooting 14
Basic Operations Camera Recording 15
Using the Zoom Feature 17 Recording the Date or Time 18 Connections for Playback 19 Connecting to a TV without Audio...
Primary User Manual - Page 5
... Accessories
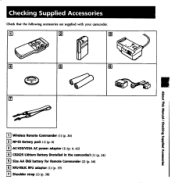
Check that the following accessories are supplied with your camcorder.
'cc
.44
El Wireless Remote Commander (I) (p. 36) NP-55 Battery pack (1) (p. 6) AC-V25/V25A AC power adaptor (1) (p. 6, 42)
E CR2025 Lithium Battery (Installed in the camcorder) (1) (p. 24)
El Size AA (R6) battery for Remote Commander (2) (p. 36)
E RFU-95UC RFU adaptor (1) (p. 19)
El Shoulder strap (1) (p. 38...
Primary User Manual - Page 6
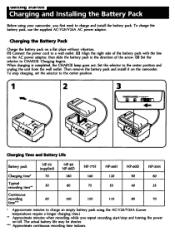
.... Then remove the battery pack and install it on the camcorder. To stop charging, set the selector to the center position.
...recording time**
60
160
I50
110
80
70
• Approximate minutes to charge an empty battery pack using the AC-V25/V25A (Lower temperatures require a longer charging time.)
" Approximate minutes when recording while you repeat recording start/stop and turning the power...
Primary User Manual - Page 7
... completely and charge it fully again. To use up the battery, remove the cassette and set the POWER switch to CAMERA with the battery attached, and leave the camcorder until the .Cci indicator and the red lamp flash in the viewfinder.
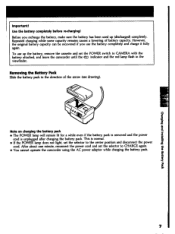
Removing the Battery Pack
Slide the battery pack in the direction of the...
Primary User Manual - Page 8
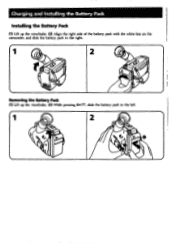
Charging and Installing the Battery Pack Installing the Battery Pack (1) Lift up the viewfinder. (2) Align the right side of the battery pack with the white line on the
camcorder, and slide the battery pack to the right.
0
4'
Removing the Battery Pack (1) Lift up the viewfinder. (2) While pressing BATT, slide the battery pack to the left.
2
t1
%r
O
CO
Primary User Manual - Page 11
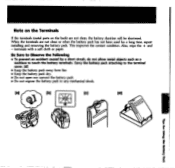
..., the battery duration will be shortened. When the terminals are not clean or when the battery pack has not been used for a long time, repeat installing and removing the battery pack. This improves the contact condition. Also, wipe the + and - terminals with a soft cloth or paper.
Be Sure to Observe the...
Primary User Manual - Page 12
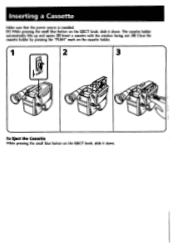
Inserting a Cassette
Make sure that the power source is installed.
(1) While pressing the small blue button on the EJECT knob, slide it down. The cassette holder automatically lifts up and opens. (2) Insert a cassette with the window facing out. (3) Close the cassette holder by pressing the "PUSH" mark on the cassette holder.
2
3
0:0
To Eject the...
Primary User Manual - Page 15

...
Camera Recording
Make sure that the power source is installed and a cassette is inserted. When you start recording, the date is automatically recorded for 10 seconds (AUTO DATE feature). This feature works only once a day. You can use the Remote Commander to record yourself with your friends or family. When you use the Remote Commander, make sure that the REMOTE...
Primary User Manual - Page 20

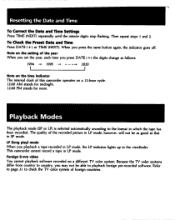
... to a TV or VCR (p. 19). You can use the supplied Remote Commander to control playback, if you want. Before using the Remote Commander, make sure that the REMOTE COMMANDER switch on the camcorder is set to ON (p. 37). (1) While pressing the green button of the POWER switch, turn it to PLAYER. (2) Insert the recorded tape with the window facing out...
Primary User Manual - Page 24
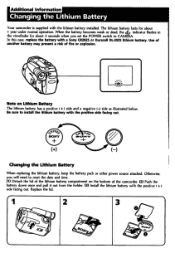
... camcorder is supplied with the lithium battery installed. The lithium battery lasts for about 1 year under normal operation. When the battery becomes weak or dead, thej indicator flashes in the viewfinder for about 5 seconds when you set the POWER switch to CAMERA. In this case, replace the battery with a Sony CR2025 or Duracell DL-2025 lithium...
Primary User Manual - Page 26
... SP mode. LP (long play) mode When you playback a tape recorded in LP mode, the LP indicator lights up in the viewfinder. This camcorder cannot record a tape in LP mode. Foreign 8 mm video You cannot playback software recorded on a different TV color system. Because the TV color systems differ from country to country, you may not...
Primary User Manual - Page 39
... scanning
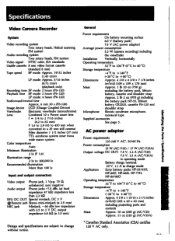
7.5 V (AC power adaptor) Average power consumption
FM system
5.3 W (camera recording) including
Audio recording system
the viewfinder
Two rotary heads, FM system
Installation Vertically, horizontally
Video signal NTSC color, EIA standards
Operating temperature
Usable cassette 8 mm video format cassette
32°F to I04°F (0°C to 40°C)
(standard 8 mm)
Storage...
Primary User Manual - Page 42
Trouble Check
AC power adaptor
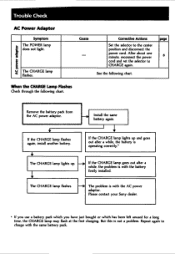
AC Power Adaptor
Symptom The POWER lamp does not light.
The CHARGE lamp flashes.
Cause
-
Corrective Actions
Page
Set the selector to the center
position and disconnect the
power cord. After about one minute, reconnect the power
8
cord and set the selector to
CHARGE again.
See the following chart.
When the CHARGE Lamp Flashes Check through...
Primary User Manual - Page 43
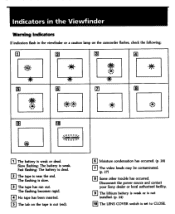
...weak or dead. Slow flashing: The battery is weak. Fast flashing: The battery is dead.
E The tape is near the end. The flashing is slow.
E The tape has run out. The flashing becomes rapid.
p No...other trouble has occurred. Disconnect the power source and contact your Sony dealer or local authorized facility.
E The lithium battery is weak or is not installed. (p. 24)
10 The LENS COVER switch is set to...