Sony DCR-IP1 - MicroMV Handycam Camcorder driver and firmware
Drivers and firmware downloads for this Sony item
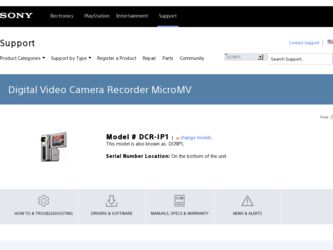
Related Sony DCR-IP1 Manual Pages
Download the free PDF manual for Sony DCR-IP1 and other Sony manuals at ManualOwl.com
MovieShaker v3.1 Operating Instructions - Page 3

... do with MovieShaker 5 Precautions for Use 6
About the MICROMV 6 Using MovieShaker 7 How to Use this Manual 9 How to Use this Help 9 Installing the software 11 To install MovieShaker 11 To Install QuickTime 5 16 To Install DirectX 8.0a 17 If you are running Windows 2000 17 If you are running Windows Me 17
Basic Operation
Starting MovieShaker 18 Workflow ...19...
MovieShaker v3.1 Operating Instructions - Page 6
..., English, French,
German, Italian, Spanish, and Portuguese
About the MICROMV
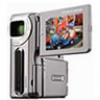
• The MICROMV device can record and play back about 60 minutes of video at the same high picture quality as the DV device (digital video camcorder).
• All MICROMV cassettes are provided with Micro Cassette Memory. The MICROMV device is provided with a function (called "Multi-picture search") which allows...
MovieShaker v3.1 Operating Instructions - Page 8
... not put your computer into System Suspend mode or the System
Hibernation mode. • Digital recording is not possible if the audio source is a CD disc. • Running MovieShaker with the hard disk drive connected using an i.LINK
or USB cable may cause the software to malfunction. In this case, exit MovieShaker and stop using the device, and then restart...
MovieShaker v3.1 Operating Instructions - Page 11
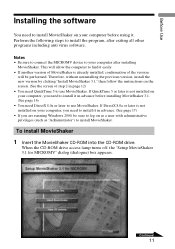
... your computer, you need to install it in advance. (See page 17) • If you are running Windows 2000, be sure to log on as a user with administrative privileges (such as "Administrator") to install MovieShaker.
To install MovieShaker 1 Insert the MovieShaker CD-ROM into the CD-ROM drive.
When the CD-ROM drive access lamp turns off, the "Setup MovieShaker 3.1 for MICROMV...
MovieShaker v3.1 Operating Instructions - Page 12
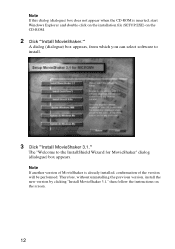
Note If this dialog (dialogue) box does not appear when the CD-ROM is inserted, start Windows Explorer and double-click on the installation file (SETUP.EXE) on the CD-ROM.
2 Click "Install MovieShaker."
A dialog (dialogue) box appears, from which you can select software to install.
3 Click "Install MovieShaker 3.1."
The "Welcome to the InstallShield Wizard for MovieShaker" dialog (dialogue) box...
MovieShaker v3.1 Operating Instructions - Page 17
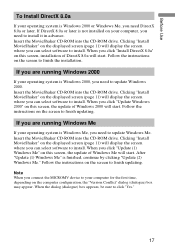
... select software to install. When you click "Update (1) Windows Me" on this screen, the update of Windows Me will start. After "Update (1) Windows Me" is finished, continue by clicking "Update (2) Windows Me." Follow the instructions on the screen to finish updating.
Note When you connect the MICROMV device to your computer for the first time, depending on the computer configuration, the "Version...
Computer Applications Guide - Page 2
... For camera operations, read the separate Camera Operations Guide supplied with your camcorder.
• If your camcorder is a MICROMV format model, read also the separate MovieShaker Application Guide supplied with your camcorder.
On image capture/editor software
You can edit pictures recorded on a tape or "Memory Stick" using the supplied CD-ROM (image capture/editor software). The software used...
Computer Applications Guide - Page 3
... is an iBook, a Power Mac G4, or an iMac with a slot loading type disc drive, with the Mac OS 8.6 standard installation.
• Application: QuickTime 3.0 or later (this must be installed to play back movies.)
• Others: USB port (this must be provided as standard), disc drive
About this manual
The screens shown in this manual are from a Windows 2000 computer. The screens may vary...
Computer Applications Guide - Page 4
...24 Copying and viewing pictures recorded on a "Memory Stick 26
Editing still images on your computer 28 Copying pictures edited on ImageMixer Ver.1.5 for Sony to a "Memory Stick" ......... 29
Connecting to a Macintosh computer ("Memory Stick" only)
Step 1: Installing the USB driver on a computer 31 Step 2: Connecting your camcorder to a computer 32 Copying pictures recorded on a "Memory Stick...
Computer Applications Guide - Page 7
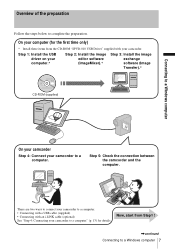
...these items from the CD-ROM "SPVD-010 USB Driver" supplied with your camcorder.
Step 1: Install the USB driver on your computer.*
Step 2: Install the image editor software (ImageMixer).*
Step 3: Install the image exchange software (Image Transfer).*
CD-ROM (supplied)
Connecting to a Windows computer
On your camcorder
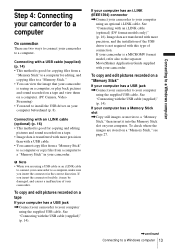
Step 4: Connect your camcorder to a computer.
Step 5: Check the connection...
Computer Applications Guide - Page 8
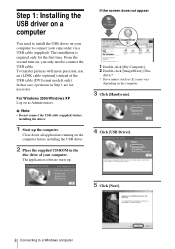
... computer before installing the USB driver.
2 Place the supplied CD-ROM in the
disc drive of your computer. The application software starts up.
If the screen does not appear
1 Double-click [My Computer]. 2 Double-click [ImageMixer] (Disc
drive)*. * Drive names (such as (E:)) may vary
depending on the computer.
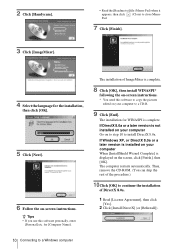
3 Click [Handycam].
4 Click [USB Driver].
5 Click [Next].
8 Connecting to a Windows...
Computer Applications Guide - Page 9
... (Restart).
8 Remove the CD-ROM from the disc
drive of your computer.
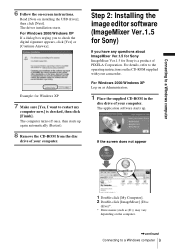
Step 2: Installing the image editor software (ImageMixer Ver.1.5 for Sony)
If you have any questions about ImageMixer Ver.1.5 for Sony ImageMixer Ver.1.5 for Sony is a product of PIXELA Corporation. For details, refer to the operating instructions on the CD-ROM supplied with your camcorder.
For Windows 2000/Windows XP Log on as...
Computer Applications Guide - Page 10
... instructions.
* You need this software to copy the pictures edited on your computer to a CD-R.
9 Click [End].
The installation for WINASPI is complete. If DirectX 8.0a or a later version is not installed on your computer Go on to step 10 to install DirectX 8.0a. If Windows XP, or DirectX 8.0a or a later version is installed on your computer When [InstallShield Wizard Complete] is displayed...
Computer Applications Guide - Page 11
... a short-cut icon for ImageMixer Ver.1.5 for Sony appears on the desktop.
11Remove the CD-ROM from the disc
drive of your computer.
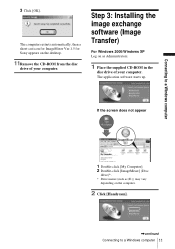
Step 3: Installing the image exchange software (Image Transfer)
For Windows 2000/Windows XP Log on as Administrators.
1 Place the supplied CD-ROM in the
disc drive of your computer. The application software starts up.
If the screen does not appear...
Computer Applications Guide - Page 13
... of the USB driver is not required with this type of connection. If your camcorder is a MICROMV format model, refer also to the separate MovieShaker Application Guide supplied with your camcorder.
To copy and edit pictures recorded on a "Memory Stick"
If your computer has a USB jack ,Connect your camcorder to your computer
using the supplied USB cable. See "Connecting with the USB cable (supplied...
Computer Applications Guide - Page 14
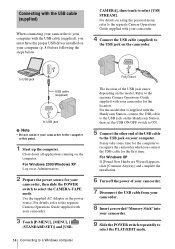
...], [MENU], [
(STANDARD SET)] and [USB-
14 Connecting to a Windows computer
Fully insert.
The location of the USB jack varies depending on the model. Refer to the separate Camera Operations Guide supplied with your camcorder for the location. For the model that is supplied with the Handycam Station, connect the USB cable to the USB jack on the Handycam Station, then set the USB ON/OFF...
Computer Applications Guide - Page 18

... camcorder, then disconnect
the cable.
Viewing pictures recorded on a "Memory Stick" on your computer
1 Insert the "Memory Stick" into your
camcorder.
2 Prepare the power source for your
camcorder, then slide the POWER switch repeatedly to select the PLAY/ EDIT mode.
3 Touch [P-MENU], [MENU], [
(STANDARD SET)] and [USB-PLY/ EDT], then touch to select [STD-USB].
18 Connecting to a Windows computer
Computer Applications Guide - Page 22
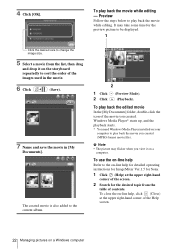
... starts. * You need Windows Media Player installed on your
computer to play back the movie you created (MPEG-format movie file).
b Note • The picture may flicker when you view it on a
computer.
To use the on-line help
Refer to the on-line help for detailed operating instructions for ImageMixer Ver.1.5 for Sony.
1 Click (Help) at...
Computer Applications Guide - Page 23
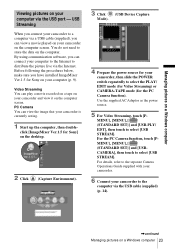
...a movie recorded on a tape on your camcorder and view it on the computer screen. PC Camera You can view the image that your camcorder is currently seeing.
1 Start up the computer, then double-
click [ImageMixer Ver.1.5 for Sony] on the desktop.
2 Click (Capture Environment).
3 Click
(USB Device Capture
Mode).
4 Prepare the power source for your
camcorder, then slide the POWER switch repeatedly...
Computer Applications Guide - Page 44
...does not start up. cDisplay pictures recorded on a "Memory Stick" with the following procedures.
1 Double-click [My Computer].
2 Double-click the icon for the newly recognized drive
[Removable Disk (F:)] (For Windows XP, [Sony MemoryStick]). It may take some time until the drive is recognized. If the computer does not recognize it, the USB driver may be installed incorrectly. For details, see "The...