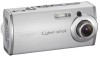
Sony DSC L1 - Cybershot 4MP Digital Camera driver and firmware
Drivers and firmware downloads for this Sony item
Related Sony DSC L1 Manual Pages
Download the free PDF manual for Sony DSC L1 and other Sony manuals at ManualOwl.com
Operating Instructions - Page 2
... (servicing) instructions in the literature accompanying the appliance.
2
If you have any questions about this product, you may call:
Sony Customer Information Services Center 1-800-222-SONY (7669) The number below is for the FCC related matters only.
Regulatory Information
Declaration of Conformity
Trade Name:
SONY
Model No.:
DSC-L1
Responsible Party: Sony Electronics Inc.
Address...
Operating Instructions - Page 4
... playback is not possible due to a malfunction of your camera or recording media, etc.
Back up recommendation To avoid the potential risk of data loss, always copy (back up) data to a disk.
Notes on image data compatibility • This camera conforms with the Design rule
for Camera File system universal standard established by the JEITA (Japan...
Operating Instructions - Page 7
... a trademark of Sony
Corporation.
• Microsoft, Windows, WindowsMedia, and
DirectX are either registered trademarks or
trademarks of Microsoft Corporation in the
United States and/or other countries.
• Macintosh, Mac OS, QuickTime, iMac, iBook, PowerBook, Power Mac and eMac are trademarks or registered trademarks of Apple Computer, Inc.
• Macromedia and Flash are trademarks...
Operating Instructions - Page 9
... single-image mode 77 In index mode 77 Cutting movies 78
Enjoying images on your computer
Copying images to your computer - For Windows users 80
Installing the USB driver 81 Connecting the camera to your
computer 82 Copying images 83 Viewing the images on your
computer 85 Image file storage destinations and file
names 85 Viewing image files once...
Operating Instructions - Page 13
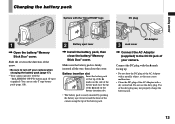
... charging the battery pack (page 17).
• Your camera operates with the "InfoLITHIUM" NP-FT1 battery pack (T type) (supplied). You can use only T type battery pack (page 118).
2
Battery eject lever
Install the battery pack, then close the battery/"Memory Stick Duo" cover.
Make sure the battery pack is firmly inserted...
Operating Instructions - Page 28
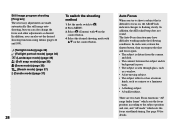
... the shooting method
1 Set the mode switch to . 2 Press MENU. 3 Select (Camera) with on the
control button. 4 Select the desired shooting mode with
/ on the control button.
28
Auto Focus... is distant from the camera
and dark. • The contrast between the subject and its
background is poor. • The subject is seen through glass, such
as a window. • A fast...
Operating Instructions - Page 63
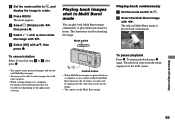
...rotate images shot with other cameras.
• When viewing images on a computer, the image rotation information may not be reflected depending on the application software.
Playing back images shot in....
Mode switch
Control button • When Multi Burst images are played back on
a computer or on a camera without the Multi Burst function, the 16 frames you shot will be displayed at the same...
Operating Instructions - Page 67
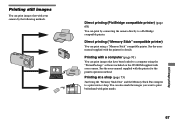
...)
You can print using a "Memory Stick" compatible printer. See the users manual supplied with the printer for details.
Printing with a computer (page 91)
You can print images that have been loaded to a computer using the "PicturePackage" software included on the CD-ROM supplied with your camera. See the users manual supplied with the printer for the printer operation method.
Printing at a shop...
Operating Instructions - Page 80
..., communication between your camera and your computer may not recover at the same time.
When a USB connector is not provided on your computer When neither a USB connector nor a "Memory Stick" slot is provided, you can copy images using an additional device. See the Sony Website for details. http://www.sony.net/
Contents of the CD-ROM
USB Driver This driver is needed in order...
Operating Instructions - Page 81
Enjoying images on your computer
Installing the USB driver
When using Windows XP, you need not install the USB driver. Once the USB driver is installed, you need not install the USB driver.
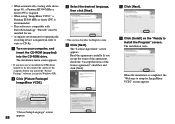
Turn on your computer, and insert the CD-ROM (supplied) into the CD-ROM drive.
Do not connect your camera to your computer at this time.
The install menu screen appears. If it does not appear, ...
Operating Instructions - Page 82
... the AC Adaptor.
82
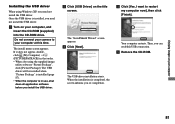
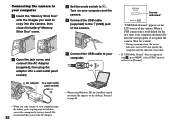
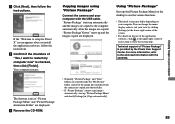
Set the mode switch to . Turn on your conputer and the camera.
Connect the USB cable (supplied) to the (USB) jack of the camera.
Connect the USB cable to your computer.
• When using Windows XP, the AutoPlay wizard automatically appears on the desktop. Proceed to page 84.
USB Mode Normal
Access indicators*
Switch on...
Operating Instructions - Page 83
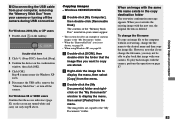
Disconnecting the USB cable from your computer, removing the "Memory Stick Duo" from your camera or turning off the camera during USB connection
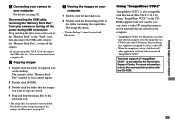
For Windows 2000, Me, or XP users 1 Double-click on the tasktray.
Double-click here 2 Click (Sony DSC), then click [Stop]. 3 Confirm the device on the confirmation
window, then click [OK]. 4 Click [OK].
Step 4 is...
Operating Instructions - Page 84
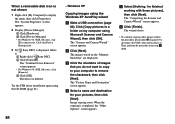
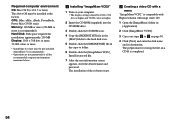
... the [Device Manager] tab. 3 If [ Sony DSC] is displayed, delete it. Right-click [ Sony DSC]. Click [Uninstall].
The "Confirm Device Removal" screen appears. • For Windows 98, 98SE, Me users, click [Remove]. Click [OK]. The device is deleted.
Try the USB driver installation again using the CD-ROM (page 81).
84
- Windows XP
Copying images using the Windows XP...
Operating Instructions - Page 87
... as follows.
Software: Macromedia Flash Player 6.0 or later, Windows Media Player 7.0 or later, DirectX 9.0b or later Sound card: 16-bit stereo sound card with speakers Memory: 64 MB or more (128 MB or more is recommended.) Hard Disk: Disk space required for installation: approximately 500 MB Display: Video card (Direct Draw driver compliant) with 4 MB of VRAM
87
Enjoying images on your computer
Operating Instructions - Page 88
... operating the recording device is required in order to write to CD-Rs.
Turn on your computer, and insert the CD-ROM (supplied) into the CD-ROM drive. The installation menu screen appears.
• If you have not yet installed the USB driver (page 81), do not connect the camera to the computer before you install the "Picture Package" software (except for Windows XP...
Operating Instructions - Page 89
... software, follow the instructions. Confirm if the checkbox of "Yes, I want to restart my computer now" is checked, then click [Finish]. Your computer restarts.
The shortcut icons of "Picture Package Menu" and "Picture Package destination Folder" are displayed. Remove the CD-ROM.
Copying images using "Picture Package"
Connect the camera and your computer with the USB cable...
Operating Instructions - Page 93
... turning off the power during USB connection Drag and drop the drive icon or the icon of the "Memory Stick" to the "Trash" icon, then disconnect the USB cable, remove the "Memory Stick Duo", or turn off the camera.
• If you are using Mac OS X v10.0, disconnect the USB cable etc., after you have turned your computer off.
Copying images
1 Double...
Operating Instructions - Page 94
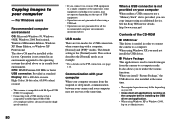
Required computer environment OS: Mac OS X (v10.1.5 or later) The above OS must be installed at the factory. CPU: iMac, eMac, iBook, PowerBook, Power Mac G3/G4 series Memory: 128 MB or more (256 MB or more is recommended.) Hard Disk: Disk space required for installation: approximately 250 MB Display: 1024 × 768 dots or more, 32,000 colors or more
•...
Operating Instructions - Page 100
... you installed the "USB Driver" from the supplied CD-ROM. Delete the erroneously recognized device from your computer (page 84), then install the USB driver (page 81).
• Make a correct USB connection between the camera and your computer (pages 82 and 93). • Follow the designated copy procedure for your OS (pages 83, 84, 89 and 92). • You attempted to shoot using a "Memory...
Operating Instructions - Page 126
... and time 34, 112
T
Travel converter 16 Twilight mode 36 Twilight portrait mode 36
U
USB cable 82 USB connection 82, 93 USB driver 81 USB jack 82 USB mode 80 Using your camera abroad 16
V
VGA 23 Video CD 90, 94 Viewing images on your computer 85, 93 Viewing movies on the LCD screen 76 Viewing still image on the...