Sony DSR 250 - PRO DVCAM Digital Camcorder driver and firmware
Drivers and firmware downloads for this Sony item
Related Sony DSR 250 Manual Pages
Download the free PDF manual for Sony DSR 250 and other Sony manuals at ManualOwl.com
Operating Instructions - Page 2
... for a Class A digital device, pursuant to Part 15 of the FCC Rules. These limits are designed to provide reasonable protection against harmful interference when the equipment is operated in a commercial environment. This equipment generates, uses, and can radiate radio frequency energy and, if not installed and used in accordance with the instruction manual, may cause...
Operating Instructions - Page 3
... unit and a PC
- Signal convert function 94 Recording video or TV programs 96 Audio dubbing 100 Setting time values 105 Superimposing a title 110 Making your own titles 114 Labeling a cassette 116 Erasing the cassette memory data 118
Customizing Your Camcorder
Advanced Recording Operations
Changing the menu settings 120
Shooting with manual adjustment 36 Resetting the date and time...
Operating Instructions - Page 6
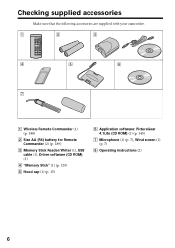
...accessories are supplied with your camcorder.
1
2
3
4
5
6
7
1 Wireless Remote Commander (1) (p. 188)
2 Size AA (R6) battery for Remote Commander (2) (p. 189)
3 Memory Stick Reader/Writer (1), USB cable (1), Driver software (CD ROM) (1)
4 "Memory Stick" (1) (p. 129)
5 Hood cap (1) (p. 15)
6 Application software: PictureGear 4.1Lite (CD ROM) (1) (p. 145)
7 Microphone (1) (p. 7), Wind screen...
Operating Instructions - Page 7

... started
Step 1 Installing the microphone
Install the supplied microphone....Set the AUDIO INPUT switches to FRONT, and the AUDIO SELECT switches
to AUTO, for both channels 1 and 2. When you manually adjust the audio level, see "Adjusting the recording level manually - Sound recording level" on page 54.
1
2
3
4
5
AUDIO INPUT
AUDIO SELECT
FRONT REAR
AUTO MANUAL
CH-1
FRONT REAR
AUTO MANUAL...
Operating Instructions - Page 9

Getting started
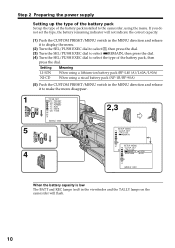
Step 2 Preparing the power supply
Installing the battery pack (1) Attach the battery pack against the rear of the camcorder, aligning the side line
of the battery pack with the line on the camcorder. (2) Slide the battery pack down until its "bLOCK" arrow points at the matching
line on the camcorder.
1
2
Matching line on the...
Operating Instructions - Page 10
... power supply
Setting up the type of the battery pack
Set up the type of the battery pack installed to the camcorder, using the menu. If you do not set the type, the battery remaining indicator will not indicate the correct capacity.
(1) Push the CUSTOM PRESET/MENU switch in the MENU direction and release it to display...
Operating Instructions - Page 12
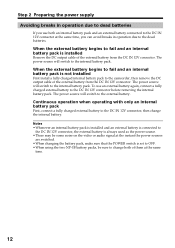
... is not installed
First install a fully charged internal battery pack to the camcorder, then remove the DC output cable of the external battery from the DC IN 12V connector. The power source will switch...power source. •There may be some noise on the video or audio signal at the instant the power sources
are switched. •When changing the battery pack, make sure that the POWER switch is set...
Operating Instructions - Page 13
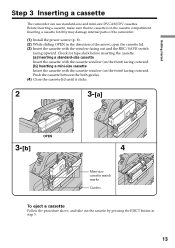
... and mini-size DVCAM/DV cassettes. Before inserting a cassette, make sure that no cassette is in the cassette compartment. Inserting a cassette forcibly may damage internal parts of the camcorder.
(1) Install the power source (p. 8). (2) While sliding OPEN in the direction of the arrow, open the cassette lid. (3) Insert the cassette with the window facing out and...
Operating Instructions - Page 14
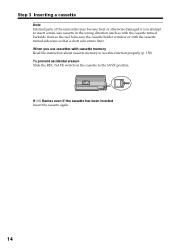
...the cassette holder window or with the cassette turned sideways so that a short side enters first). When you use cassettes with cassette memory Read the instruction about cassette memory to use this... function properly (p. 158). To prevent accidental erasure Slide the REC/SAVE switch on the cassette to the SAVE position.
If Q flashes ...
Operating Instructions - Page 15
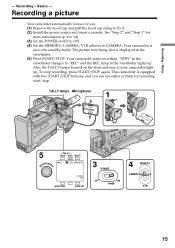
... string to fix it. (2) Install the power source and insert a cassette. See "Step 2" and "Step 3" for
more information (p. 8 to 14). (3) Set the POWER switch to ON. (4) Set the MEMORY/CAMERA/VTR selector to CAMERA. Your camcorder is
set to the standby mode. The picture now being shot is displayed in the viewfinder. (5) Press START/STOP. Your camcorder starts recording. "STBY" in the viewfinder...
Operating Instructions - Page 30
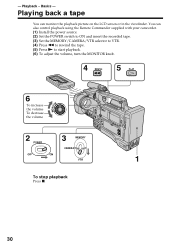
... can monitor the playback picture on the LCD screen or in the viewfinder. You can also control playback using the Remote Commander supplied with your camcorder. (1) Install the power source. (2) Set the POWER switch to ON and insert the recorded tape. (3) Set the MEMORY/CAMERA/VTR selector to VTR. (4) Press m to rewind the tape. (5) Press N to start playback. (6) To adjust the...
Operating Instructions - Page 56
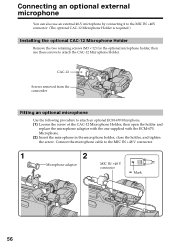
... it to the MIC IN +48V connector. (The optional CAC-12 Microphone Holder is required.)
Installing the optional CAC-12 Microphone Holder
Remove the two retaining screws (M3 × 12) for...then use these screws to attach the CAC-12 Microphone Holder.
CAC-12
Screws removed from the camcorder
Fitting an optional microphone
Use the following procedure to attach an optional ECM-670 Microphone. (1) ...
Operating Instructions - Page 94
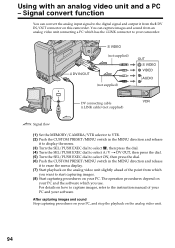
... which has the i.LINK connector to your camcorder.
S VIDEO (not supplied)
DV IN/OUT (not supplied)
OUT S VIDEO VIDEO
AUDIO
DV connecting cable (i.LINK cable) (not supplied)
: Signal flow
(1) Set the MEMORY/CAMERA/VTR selector to VTR. (2) Push the CUSTOM PRESET/MENU switch in the MENU direction and release
it to display the menu. (3) Turn the SEL/PUSH...
Operating Instructions - Page 95
...from the analog video unit by a PC, you
need to install an appropriate software which can exchange video signals between the camcorder and a PC. •Depending on the condition of the analog...video signals into digital video signals via your camcorder. Depending on the analog video unit, the image may contain noise or incorrect colors. •The camcorder cannot output the digital signal when you...
Operating Instructions - Page 105

..., or on the display window. The user bits are convenient when using multiple cameras at the same event. When you record the picture, time code data will be recorded automatically.
Setting the time code value
This section describes the steps for setting time code recording methods for particular shooting conditions and setting initial values. (1) Set the MEMORY/CAMERA/VTR selector to VTR...
Operating Instructions - Page 128
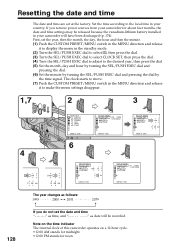
... time according to the local time in your country. If you remove power sources from your camcorder for about four months, the date and time settings may be released because the vanadium-lithium battery installed in your camcorder will have been discharged (p. 174). First, set the year, then the month, the day, the hour and then...
Operating Instructions - Page 129
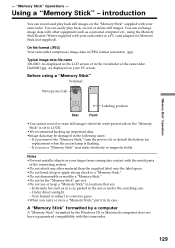
... play back still images on the "Memory Stick" supplied with your camcorder. You can easily play back, record or delete still images. You can exchange image data with other equipment such as a personal computer etc., using the Memory Stick Reader/Writer supplied with your camcorder or a PC card adaptor for Memory Stick (not supplied).
On file format (JPEG) Your...
Operating Instructions - Page 130
... other equipment, format it with this camcorder (p. 124). However, formatting erases all information on the "Memory Stick."
"Memory Stick" and are trademarks of Sony Corporation. •Windows is a registered trademark licensed to Microsoft Corporation, registered in
the U.S.A. and other countries. •Macintosh and Mac OS are trademarks of Apple Computer, Inc. •All other product names...
Operating Instructions - Page 145
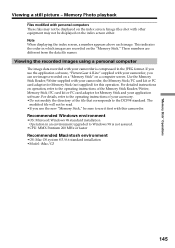
... software, "PictureGear 4.1Lite" supplied with your camcorder, you can see images recorded on a "Memory Stick" on a computer screen. Use the Memory Stick Reader/Writer supplied with your camcorder, the Memory Stick/PC card kit or PC card adaptor for Memory Stick (not supplied) for this operation. For detailed instructions on operation, refer to the operating instructions of the Memory Stick Reader...
Operating Instructions - Page 159
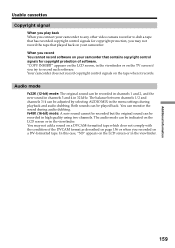
... played back on your camcorder. When you record You cannot record software on your camcorder that contains copyright control signals for copyright protection of software. "COPY INHIBIT" appears on the LCD screen, in the viewfinder or on the TV screen if you try to record such software. Your camcorder does not record copyright control signals on the tape when it records.
Audio mode
Fs32K (12-bit...