Sony CCD-TRV70 driver and firmware

Related Sony CCD-TRV70 Manual Pages
Download the free PDF manual for Sony CCD-TRV70 and other Sony manuals at ManualOwl.com
Primary User Manual - Page 2
... the U.S.A.
WARNING This equipment has been tested and found to comply with the limits for a Class B digital device, pursuant to Part 15 of the FCC Rules. These limits are designed to provide reasonable protection against harmful interference in a residential installation. This equipment generates, uses, and can radiate radio frequency energy and, if not...
Primary User Manual - Page 3
... Using Alternate Power Sources 22
Using House Current 22 Recording with the Date or Time 24 Fade-in and Fade-out 25 Using the PROGRAM AE Function 26 Enjoying Picture Effect 28 Focusing Manually 30 Shooting with Backlighting 32 Releasing the STEADY SHOT Function 33 Changing the Mode Settings 34 Watching on a TV Screen 36...
Primary User Manual - Page 5
...8226;s>cC>(p4),
4
5
6
Ec:D=
7
8
9
10
ant=33
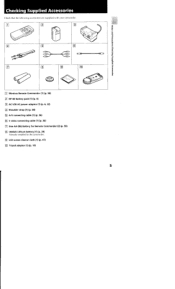
▪ Wireless Remote Commander (1) (p. 58) • NP-66 Battery pack (1) (p. 6) • AC-V26 AC power adaptor (1) (p. 6, 22) LI Shoulder strap (1) (p. 58) • A/V connecting cable (1) (p. 36) • S video connecting cable (1) (p. 36) El Size AA (R6) Battery for Remote Commander (2) (p. 59) • CR2025 Lithium battery (1) (p. 39...
Primary User Manual - Page 6
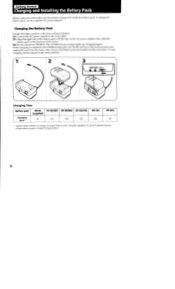
...right side of the battery pack with the line on the AC power adaptor, then slide the
battery pack in the direction of the arrow. (3) Set the selector to CHARGE. The CHARGE lamp (orange) lights up... and unplug the unit from the mains. Then remove the battery pack and install it on the camcorder. To stop charging, set the selector to the center position.
KMER
•••
G.
Charging Time...
Primary User Manual - Page 7
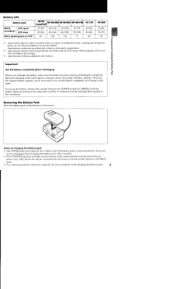
Charging and Installing the Battery Pack
Battery Life
Battery pack
NP-66 NP-98198D NP-80/80D NP-66H/68 NP-C65 (supplied)
While
LCD open2
recording') LCD close
30 (60) 40 (80)
60 (115) 85 (165)
..., remove the cassette and turn the POWER switch to CAMERA with the battery attached, and leave the camcorder until the 'W indicator and the red lamp flash rapidly in the viewfinder.
Removing the ...
Primary User Manual - Page 8
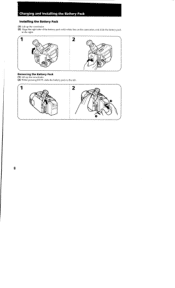
Charging and Installing the Battery Pack Installing the Battery Pack
(1) Lift up the viewfinder. (2) Align the right side of the battery pack with white line on the camcorder, and slide the battery pack
to the right.
1 2
0
Removing the Battery Pack (1) Lift up the viewfinder. (2) While pressing BATT, slide the battery pack to the left.
/-1
0
8
Primary User Manual - Page 9
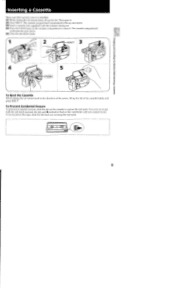
... power source is installed. (1) While sliding the lid release knob, lift up the lid. Then open it. (2) Press EJECT. The cassette compartment automatically lifts up and opens. (3) Insert a cassette (not supplied) with the window ...red mark. If you try to record with the red mark exposed, the a, \r7 and indicators flash in the viewfinder, and you cannot record. To re-record on this tape, slide the tab...
Primary User Manual - Page 10
...
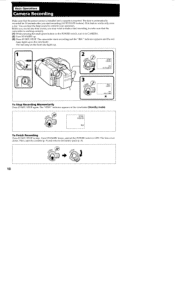
Camera Recording
Make sure that the power source is installed and a cassette is inserted. The date is automatically recorded for 10 seconds after you start recording (AUTO DATE feature). This feature works only once a day. You can hear the beep sound to confirm your operation. Before you record one-time events, you may want to make a trial recording...
Primary User Manual - Page 16
...surface of suitable height. If you have a tripod for a still camera, you can also use it with the camcorder. If the camcorder... camcorder is not mounted on a tripod. When attaching a non-Sony tripod, make sure that the length of the tripod screw is...stand on the bottom to place the camcorder on a table when recording in a low position. [d]
[c]
[d]
Cautions on the viewfinder...window. [f]
[e]
[f]
16
Primary User Manual - Page 18
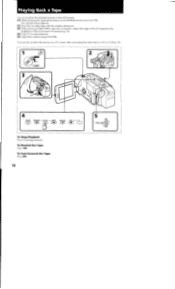
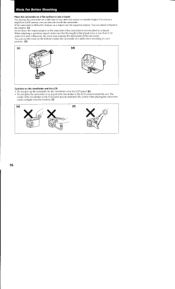
...the small green button on the POWER switch, turn it to VTR.
The operation keys light on. (2) Insert the recorded tape with the window facing out. (3) While pressing PUSH... playback. (5) Adjust the volume using VOLUME.
You can also monitor the picture on a TV screen, after connecting the camcorder to a TV or VCR (p. 36).
OFF • (CAMERA)
2
O
0
00
I1
00 0
STOP RENI - PLAY - eFF PAUSE REC
O...
Primary User Manual - Page 39
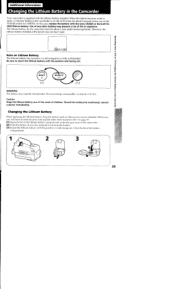
... Camcorder
Your camcorder is supplied with the lithium battery installed. When the battery becomes weak or dead, indicator flashes in the viewfinder or on the LCD screen for about 5 seconds when you set the POWER switch to CAMERA. In this case, replace the battery with the Sony CR2025 or Duracell DL2025 lithium battery. Use of any...
Primary User Manual - Page 41
...setting of the year When you set the year, each time you press t or 4,, the digits... 8 mm video recorder/player, you should record in the standard 8 mm tape.
To play back in Recording using cassette type
Hi8...recorded in LP mode, the LP indicator lights up in the viewfinder or on the LCD screen.
Foreign 8 mm video You cannot play software recorded on a different TV color system. Because the TV...
Primary User Manual - Page 44

... remove the tape, turn the POWER switch to CAMERA, turn STANDBY up, and leave the camcorder until the battery indicator flashes rapidly. • Charging the usable battery causes a lowering of battery capacity. Battery capacity can be recovered if you fully discharge and charge the battery pack again. After Long Storage Recharge the battery pack after...
Primary User Manual - Page 52
... operating correctly.*
If the CHARGE lamp goes out after a while, the problem is with the battery pack firstly installed.
The CHARGE lamp flashes.
The problem is with the AC power adaptor. Please contact your nearest Sony dealer.
" If you use a battery pack which you have just bought or which has been left unused for...
Primary User Manual - Page 53
... CCD (Charge Coupled Device) Viewfinder Electronic viewfinder (monochrome) Lens 24 x (digital) 12 x (optical) Combined power zoom lens, Filter diameter 1'/z inches (37 mm), TTL autofocus system inner focus wide macro system Focal distance 'Az- 2 '/8 inches (5.4 - 64.8 mm) Y.32 - 3 '/s inches (6.5 - 78 mm) when recording 1 7/s - 22 14/ inches (47 -564 mm) when converted into a 35 mm still camera...
Primary User Manual - Page 62
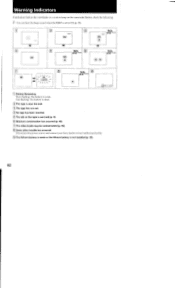
Warning Indicators
If indicators flash in the viewfinder or a caution lamp on the camcorder flashes, check the following:
: You can hear the beep sound when the BEEP is set to ON (p. 35).
1
2
- . ==
131
5min
PP. ••
Omin
4
eAl • I s
5
PP. •• 161