Brother International PC-6500 driver and firmware
Drivers and firmware downloads for this Brother International item

Related Brother International PC-6500 Manual Pages
Download the free PDF manual for Brother International PC-6500 and other Brother International manuals at ManualOwl.com
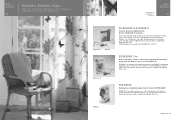
Accessory Catalog - Page 5
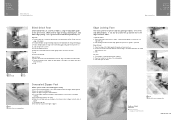
...guide screw, adjust the fabric guide to the edge of the fabric, and lower
the presser foot. 3. Sew.
SA133 ABCDEFJKMN
SA134 GHILOP
SA128 All Brother home-use sewing machines
Concealed Zipper Foot
Allows you to install.... 2. Place the fold at the left side of the center guide. 3. Sew and open the fabric.
SA184 All Brother home-use sewing machines
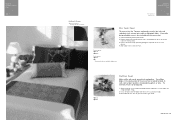
Ring Bearer Pillow & Hankerchief
Innov-is Project...
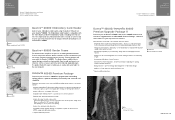
Accessory Catalog - Page 7
... be used with all Brother presser feet. Can be used for stitching heavy fabrics together.
1. Attach the seam guide on the needle plate with the thumbscrew of the seam guide. 2. Adjust the distance...stitching especially on thin fabrics or small pieces of patchworks. Installing the Straight Stitch Needle Plate automatically sets the needle position to the center straight stitching position on selected...
Accessory Catalog - Page 13
....)
Brother Embellishment
Feet
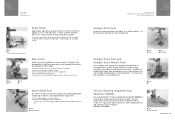
Pin Tuck Foot
24
Ruffler Foot
Pin Tuck Foot
This presser foot has 7 grooves and produces perfect pin tucks and corded pin tucks using a twin needle on lightweight fabric. A specially designed bobbin cover is also included with this presser foot.
1. Install and manually thread a twin needle. 2. Draw a reference line to guide...
Accessory Catalog - Page 16
... own unique embroidery patterns in the easy steps. Comes with USB card writer, 4M blank memory card and software compatible with Windows 2000 or later. SAVR8.0 Upgrade kit is compatible with PE-DESIGN 5.0, 6.0 & 7.0.
PE-DESIGN® Lite
New to embroidery software? Master basic digitizing and embroidery design work with Brother's easy to use PE-DESIGN® Lite.
PE-DESIGN®...
Accessory Catalog - Page 17
... QuattroTM 6000D
SAVR4000D Innov-is 4000D
QuattroTM 6000D Embroider y Card Reader
Connect your embroidery card reader using the built-in USB port on your QuattroTM 6000D. This Embroidery Card Reader is compatible with the entire library of Brother Embroidery Cards, including licensed content. The simple and easy USB attachment takes seconds to connect and ensures your treasured collection...
Users Manual - English - Page 3
... supplied with this equipment, the plug should be cut off and the cable should be fitted with an appropriate three-pin plug. With alternative plugs, an approved fuse must be installed in the plug.
Note The plug severed from the power supply cord must be destroyed, as a plug with bare flexible wires is...
Users Manual - English - Page 4
THANK YOU FOR PURCHASING THE PC-6500 COMPUTERIZED SEWING MACHINE
Your machine is the most advanced, computerized home-use sewing machine available. To fully enjoy all the features incorporated into it, we suggest that you study this manual.
PLEASE READ BEFORE USING THIS MACHINE
For safe operation:
1. Be sure to keep your eye on...
Users Manual - English - Page 5
... 6 OPTIONAL ACCESSORIES 7 POWER SUPPLY 8 CONTROLS 9 Selection keys 9 Operation buttons 9 LCD screen 10 LCD DENSITY 11 Adjusting the density with the main power switch 11 Adjusting the density with the Operation Guide 12 DISPLAY LANGUAGE 13 PRESSER FEET / FEED DOGS 14 Changing the presser foot 14 Installing the presser foot adapter & the walking foot 15 Installing the optional side...
Users Manual - English - Page 6
... BEEN SAVED 85
CHAPTER 5
EMBROIDERING
86
SETUP 86 Installing embroidery foot Q 86 Installing the embroidery unit 87 Initializing the embroidery...patterns 101 Displaying the thread color names 102 Selecting patterns from a memory card.......102
CHANGING THE PATTERN SETTING 104 ...the shuttle 122
CHANGING THE LIGHT BULB 124
ERROR MESSAGES
125
Warning messages 125 Operation messages 128...
Users Manual - English - Page 9
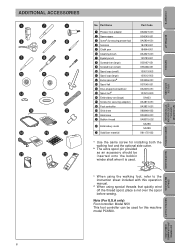
...) 9 Screwdriver (small) 0 Spool cap (small) A Spool cap (large) B Extra spool pinb C Spool felt D Disc-shaped screwdriver E Spool netd F Embroidery set (large) G Screw (for securing adapter) H Foot controller I Grid sheet J Hard case K Bobbin thread
L Embroidery cards
M Stabilizer material
Part Code
XA6027-001 X54243-001 XA5904-051 184783-001 184944-001 XA4527-001 135793-001 X55467...
Users Manual - English - Page 11
... way.
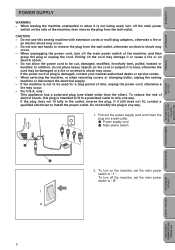
1. Pull out the power supply cord and insert the plug into a wall outlet. 1 Power supply cord 2 Main power switch
2 1
2. To turn on the machine, set the main power switch to " I ". To turn off the machine, set the main power switch to " O ".
MY CUSTOM STITCHTM
(CREATE YOUR OWN STITCH DESIGNS)
EMBROIDERING
MAINTENANCE
ERROR MESSAGES
SEWING CHART
PATTERNS (PROGRAMMED...
Users Manual - English - Page 12
.... (Refer to page 95 for details.)
4 MEMORY key When the embroidery unit is installed, press this key to display a screen that allows you to store or retrieve embroidery pattern combinations. (Refer to pages 110 and 111 for details.)
5 OPERATION GUIDE key When the embroidery unit is not installed, press this key to see information on...
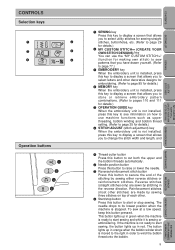
Users Manual - English - Page 13
... by the code that is displayed.
2 Press this key before sewing with the optional side cutter installed.
3 Press this key before...guide, which will help you select the best stitch for your specific
need.
6 Press this key to display the previous page.
7 Press this key to display the next page.
Other basic LCD keys END key
Press this key to stop using the current function. CHECK key
If an error...
Users Manual - English - Page 18

... used to sew the straight stitches ( and ) and the zigzag stitch ( ).
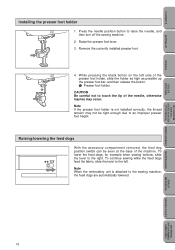
1. Remove the installed presser foot and the presser foot holder.
3
5
UTILITY STITCHES
MY CUSTOM STITCHTM
(CREATE YOUR OWN STITCH DESIGNS)
EMBROIDERING
MAINTENANCE
ERROR MESSAGES
1
1 2
2. Slide the presser foot adapter as high as possible up the presser foot bar, and then fasten it...
Users Manual - English - Page 19
...SETTING UP
SEWING
UTILITY STITCHES
MY CUSTOM STITCHTM
(CREATE YOUR OWN STITCH DESIGNS)
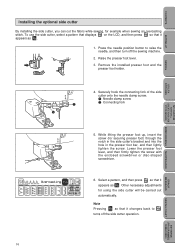
Installing the optional side cutter
By installing the side cutter, you can cut the fabric while sewing, for example when sewing an overcasting stitch. To use the side cutter, select a pattern that displays....
EMBROIDERING
MAINTENANCE
ERROR MESSAGES
SEWING CHART
PATTERNS (PROGRAMMED
IN MACHINE)
16
Users Manual - English - Page 21
CONTENTS
SETTING UP
SEWING
UTILITY STITCHES
Installing the presser foot holder
5
1. Press the needle position button to raise the needle, and
then turn off the sewing machine.
2. Raise the presser foot lever.
3. Remove the currently installed presser foot....
(CREATE YOUR OWN STITCH DESIGNS)
EMBROIDERING
MAINTENANCE
ERROR MESSAGES
SEWING CHART
PATTERNS (PROGRAMMED
IN MACHINE)
18
Users Manual - English - Page 23
CONTENTS
SETTING UP
SEWING
UTILITY STITCHES
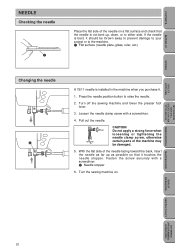
NEEDLE
... surface (needle plate, glass, ruler, etc.)
Changing the needle
6
1
6
A 75/11 needle is installed in the machine when you purchase it.
1. Press the needle position button to raise the needle.
2. Turn... STITCHTM
(CREATE YOUR OWN STITCH DESIGNS)
EMBROIDERING
MAINTENANCE
ERROR MESSAGES
SEWING CHART
PATTERNS (PROGRAMMED
IN MACHINE)
20
Users Manual - English - Page 26
...SETTING UP
SEWING
UTILITY STITCHES
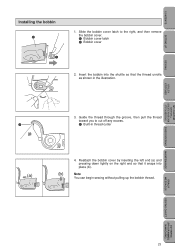
Installing the bobbin
2 1
1. Slide the bobbin cover latch to the right, and then remove the bobbin cover. 1 Bobbin cover latch 2 Bobbin cover
2. Insert the bobbin into the shuttle so that the thread unrolls as shown in the illustration.
3. Guide...OWN STITCH DESIGNS)
EMBROIDERING
MAINTENANCE
ERROR MESSAGES
SEWING CHART
PATTERNS (PROGRAMMED
IN MACHINE)
23
Users Manual - English - Page 38
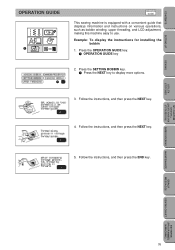
..., and LCD adjustment, making this machine easy to use.
Example: To display the instructions for installing the bobbin
1. Press the OPERATION GUIDE key. 1 OPERATION GUIDE key
2. Press the SETTING BOBBIN key. 1 Press the NEXT key to display more options.
3. Follow the instructions, and then press the NEXT key.
4. Follow the instructions, and then press the NEXT key.
5. Follow the...
Users Manual - English - Page 41

...
SETTING ... indicated by the code that is
1
displayed.
5
2 Press this key before sewing with the optional side cutter
installed.
67
3 Press this key before you...display a stitch guide, which will help
you select the best stitch for your specific need.
6 Press this key to display the previous page.
7 Press this key to display ...ERROR MESSAGES
SEWING CHART
PATTERNS (PROGRAMMED
IN MACHINE)
38