Brother International PS-3100 driver and firmware
Drivers and firmware downloads for this Brother International item
Related Brother International PS-3100 Manual Pages
Download the free PDF manual for Brother International PS-3100 and other Brother International manuals at ManualOwl.com
Accessory Catalog - Page 5
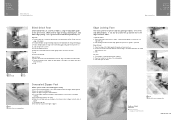
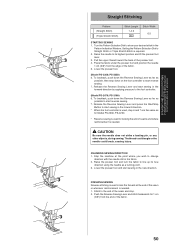
...guide screw, adjust the fabric guide to the edge of the fabric, and lower
the presser foot. 3. Sew.
SA133 ABCDEFJKMN
SA134 GHILOP
SA128 All Brother home-use sewing machines
Concealed Zipper Foot
Allows you to install.... 2. Place the fold at the left side of the center guide. 3. Sew and open the fabric.
SA184 All Brother home-use sewing machines
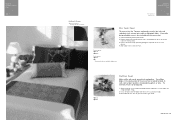
Ring Bearer Pillow & Hankerchief
Innov-is Project...
Accessory Catalog - Page 7
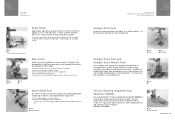
... be used with all Brother presser feet. Can be used for stitching heavy fabrics together.
1. Attach the seam guide on the needle plate with the thumbscrew of the seam guide. 2. Adjust the distance...stitching especially on thin fabrics or small pieces of patchworks. Installing the Straight Stitch Needle Plate automatically sets the needle position to the center straight stitching position on selected...
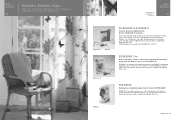
Accessory Catalog - Page 13
....)
Brother Embellishment
Feet
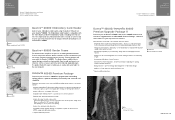
Pin Tuck Foot
24
Ruffler Foot
Pin Tuck Foot
This presser foot has 7 grooves and produces perfect pin tucks and corded pin tucks using a twin needle on lightweight fabric. A specially designed bobbin cover is also included with this presser foot.
1. Install and manually thread a twin needle. 2. Draw a reference line to guide...
Accessory Catalog - Page 16
... own unique embroidery patterns in the easy steps. Comes with USB card writer, 4M blank memory card and software compatible with Windows 2000 or later. SAVR8.0 Upgrade kit is compatible with PE-DESIGN 5.0, 6.0 & 7.0.
PE-DESIGN® Lite
New to embroidery software? Master basic digitizing and embroidery design work with Brother's easy to use PE-DESIGN® Lite.
PE-DESIGN®...
Accessory Catalog - Page 17
... QuattroTM 6000D
SAVR4000D Innov-is 4000D
QuattroTM 6000D Embroider y Card Reader
Connect your embroidery card reader using the built-in USB port on your QuattroTM 6000D. This Embroidery Card Reader is compatible with the entire library of Brother Embroidery Cards, including licensed content. The simple and easy USB attachment takes seconds to connect and ensures your treasured collection...
Users Manual - Multi - Page 7
...power failure occurs during use • Maintaining the machine • Leaving the machine unattended. 3. Do not store anything on the foot controller. 4. Plug the machine directly into the wall. Do not use extension cords.
For a longer service... the operation manual when replacing or installing any assemblies, the presser feet, needle, or other parts
to assure correct installation.
For repair...
Users Manual - Multi - Page 13
... MACHINE A COUDRE CONOZCA SU MÁQUINA DE COSER
5 43
2 1
6 7
8 90A
E F
C
D
B
G
H
K
L
I
J
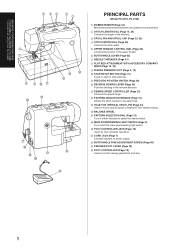
PRINCIPAL PARTS
(Model PS-2470, PS-3100)
1 BOBBIN WINDER (Page 33) Winds the thread onto the bobbin to be used for the lower thread.
2 STITCH LENGTH DIAL (Page 15, 26) Controls the length of the stitches.
3 SPOOL PIN AND SPOOL CAP (Page 33, 39...
Users Manual - Multi - Page 15
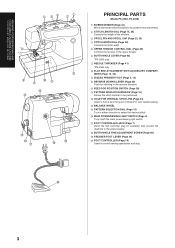
... (Page 15)
Turn in either direction to select the desired stitch. F MAIN POWER/SEWING LIGHT SWITCH (Page 9)
Turn on/off the main power/sewing light switch.
G FOOT CONTROLLER JACK (Page 7) Insert the foot controller plug for operation and connect the machine to the power supply.
H BUTTONHOLE FINE ADJUSTMENT SCREW (Page 69) I PRESSER FOOT LEVER (Page...
Users Manual - Multi - Page 19
..., PS-3100) (Model PS-2360, PS-2250)
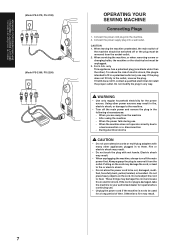
OPERATING YOUR SEWING MACHINE
Connecting Plugs
1. Connect the power cord plug into the machine. 2. Connect the power supply plug into a wall outlet.
CAUTION 1. When leaving the machine unattended, the main switch of
the machine should be switched off or the plug must be removed from the socket-outlet. 2. When servicing...
Users Manual - Multi - Page 23
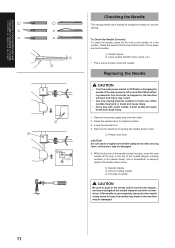
...Needle
CAUTION
• Turn the main power switch to OFF before changing the needle. If the main power is left on and Start/Stop button is pressed or foot controller is stepped on, the machine will ... top of the needle stopper (viewing window) in the needle clamp. Use a screwdriver to securely tighten the needle clamp screw.
2 Needle stopper 3 Hole for setting needle 4 Flat side of needle
CAUTION...
Users Manual - Multi - Page 62
... SEWING 1. Turn the Pattern Selection Dial to show your desired stitch in the
Pattern Indication Window. Setting the Pattern Selection Dial to Straight Stitch or Triple Stretch Stitch is required. 2. Raise the... Lever and start sewing in the forward direction by applying pressure to the foot controller.
(Model PS-2470, PS-3100) 6. To backtack, push down the Reverse Sewing Lever as far as
possible ...
Users Manual - Multi - Page 85
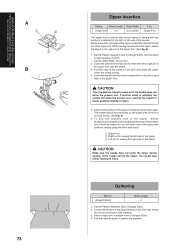
... the zipper, release the foot by pressing the button located at the back of the presser foot, install the zipper foot on the other side of the zipper and continue sewing using the other side notch..., the needle may break, leading to injury.
Gathering
Pattern (Straight Stitch)
Stitch Length 4
1. Set the Pattern Selection Dial to Straight Stitch. 2. Loosen the tension of the upper thread so that ...
Users Manual - Multi - Page 91
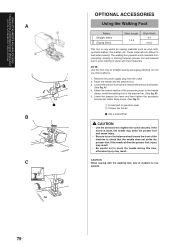
... this foot only for straight sewing and zigzag stitching. Do not use other patterns.
1. Remove the power supply plug from the outlet. 2. Raise the needle and the presser foot. 3. Loosen the presser ...foot holder.
(See fig. A) 4. Attach the forked section of the connecting lever to the needle
clamp, install the walking foot to the presser bar. (See fig. B) 5. Lower the presser foot lever and then ...
Users Manual - Multi - Page 99
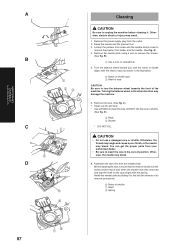
...Be sure to unplug the machine before cleaning it. Otherwise, electric shock or injury may result.
1. Remove the power supply plug from the outlet. 2. Raise the needle and the presser foot. 3. Loosen the presser foot screw ... Otherwise, the needle may break.
8. Assemble the race first then the needle plate. When installing the race, be sure that the notch of shuttle is in the same position that it ...
Users Manual - Multi - Page 101
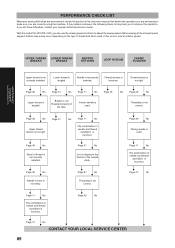
... section in this instruction manual that details the operation you are performing to make sure you are correctly using the machine. If the problem continues, the following check list may help you to improve the operation. If you still have difficulties, contact your nearest authorized service center.
With the model PS-2470/PS-3100, you can...
Users Manual - Multi - Page 108
... Foot Controller Jack 7, 10
G
Gathering 73
H
Hole for Vertical Spool Pin 44
L
Lower Threading 37
M
Main Power/Sewing Light Switch 9 Manually Drawing Up Lower Thread 43 Monogramming 77
N
Needle Threader 41
Page
O
Overedge Stitching 61
P
Parallelogram Stitch 59 Patchwork 60 Pattern Indication Window 15 Pattern Selection Dial 15 Performance Check List 89 Presser Foot...