Dell 5310n - Workgroup Laser Printer B/W driver and firmware
Drivers and firmware downloads for this Dell item
Related Dell 5310n Manual Pages
Download the free PDF manual for Dell 5310n and other Dell manuals at ManualOwl.com
Service Manual - Page 9
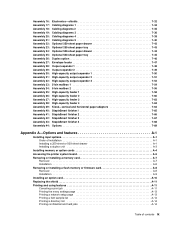
... cards A-4
Accessing the printer system board A-5
Removing or installing a memory card A-7 Removal A-7 Installation A-8
Removing or installing a flash memory or firmware card A-8 Removal A-8 Installation A-9
Installing an option card A-10
Replacing the shield A-11
Printing and using features A-11 Canceling a print job A-11 Printing the menu settings page A-13 Printing a network setup...
Service Manual - Page 20
....
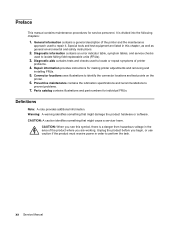
2. Diagnostic information contains an error indicator table, symptom tables, and service checks
used to isolate failing field replaceable units (FRUs).
3. Diagnostic aids contains tests and checks used to locate or repeat symptoms of printer
problems.
4. Repair information provides instructions for making printer adjustments and removing and
installing FRUs.
5. Connector locations uses...
Service Manual - Page 31
...software application.
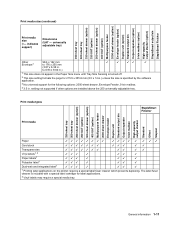
3 No universal support for the following options: 2000-sheet drawer, Envelope Feeder, 5-bin mailbox.
4 3.5 in. setting not supported if other options are installed... output stacker Standard Offset Stapled
Paper
Card stock
✓ ✓ ✓...
✓
1 Printing label applications on the printer requires a special label fuser cleaner which prevents ...
Service Manual - Page 38
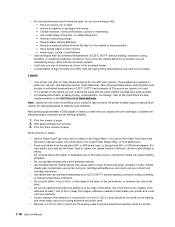
... printer driver, the Local Printer Setup Utility, or from MarkVision.
• Feed vinyl labels from the standard 250- or 500-sheet trays, or the optional 250- or 500-sheet drawers. For
vinyl labels, you must set the Paper Type to Labels, the Labels Texture to Smooth, and the Label Weight to Heavy.
• Do not load...
Service Manual - Page 50
... removal" on page 4-77.
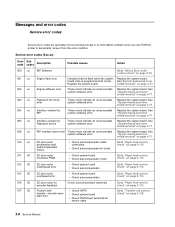
RIP interface driver error These errors indicate an unrecoverable system software error.
Replace the system board. See "System board and inner shield removal" on page 4-77.
DC pick motor acceleration stall (autocompensator motor).
• Check autocompensator cable connectors
• Check autocompensator for binds
Go to "Paper feed service check" on page 2-113.
DC...
Service Manual - Page 68
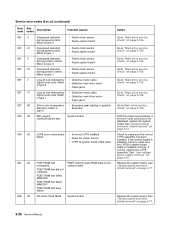
... drive service check" on page 2-106. POR the printer several times, if the error code continues to be displayed, replace the system board. See "System board and inner shield removal" on page 4-77. Check to make sure the correct LVPS assembly has been installed. If the correct supply is installed, check to make sure the LVPS to system board cable is installed...
Service Manual - Page 82
...
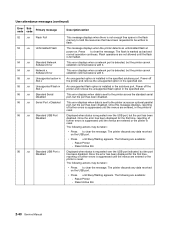
54 .xx Standard Network Software Error
54 .xx Network x Software Error
55 .xx Unsupported option in Slot x
55 .xx Unsupported Flash in Slot x
56 .xx Standard Serial Disabled
56 .xx Serial Port x Disabled
56 .xx Standard USB Port Disabled
56 .xx Standard USB Port x Disabled
Description/action
This message displays when there is not enough free space in the flash memory to hold the resources...
Service Manual - Page 84
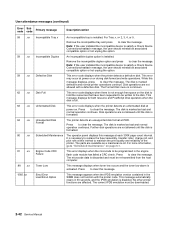
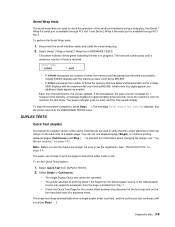
.... Press to clear this message.
Emul Error Load Emul Option
This message appears when the IPDS emulation version contained in the SIMM does not function with the printer code. This message automatically clears in 30 seconds, and the IPDS emulation is disabled. No other printer functions are affected. The correct IPDS emulation must be downloaded.
2-42 Service Manual
Service Manual - Page 151
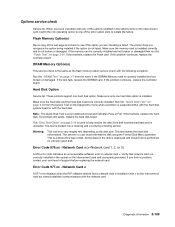
... the test fails, replace the SDRAM card. If the problem continues, replace the controller board.
Hard Disk Option
Service tip: These printers support one hard disk option. Make sure only one hard disk option is installed.
Make sure the fixed disk and the fixed disk board are correctly installed. Run the "Quick Disk Test" on page 3-18 from the Device Test on the Diagnostics menu when...
Service Manual - Page 159
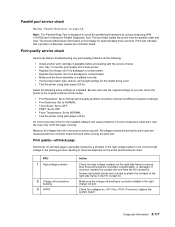
... Temperature: Set to NORMAL. • Test the printer using plain paper (20 lb).
An incorrect printer driver for the installed software can cause problems. Incorrect characters could print, and the copy may not fit the page correctly.
Measure all voltages from the connector to printer ground. All voltages measured during the print cycle are measured with the controller board removed...
Service Manual - Page 180
... 1 Wrap if a parallel port is available by PCI slot 1, or Parallel 2 Wrap if a parallel port is available by PCI slot 2.
To run the Parallel Wrap tests:
1. Disconnect the parallel interface cable, and install the wrap plug (P/N 1319128). 2. Select Parallel Wrap, Parallel 1 Wrap, or Parallel 2 Wrap from the HARDWARE TESTS menu.
The power indicator blinks green indicating the...
Service Manual - Page 181
...operation of the serial port hardware using a wrap plug. Use Serial 1 Wrap if a serial port is available through PCI slot 1 and Serial 2 Wrap if the serial port is available through PCI slot 2.
To perform the Serial Wrap tests:
1. Disconnect the serial interface cable, and install the serial wrap plug. 2. Select Serial 1 Wrap or Serial 2 Wrap from HARDWARE TESTS.
The power indicator blinks green...
Service Manual - Page 197
... page increments the counter by one and a duplex page by two. At 300,000, the customer is reminded that the printer requires scheduled maintenance. This counter is reset by the servicer after a 80 Scheduled Maintenance message displays and a maintenance kit is installed. See "Maintenance kit" on page 6-1 for the part number.
Diagnostic aids 3-25
Service Manual - Page 199
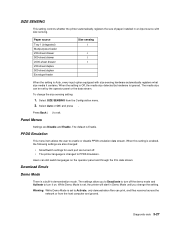
SIZE SENSING
This setting controls whether the printer automatically registers the size of paper installed in an input source with size sensing.
Paper source
Tray 1 (integrated) Multipurpose feeder 250-sheet drawer 500-sheet drawer 2000-sheet drawer 250-sheet duplex 500-sheet duplex Envelope feeder
Size sensing 3
3 3 3
When the setting is Auto, every input option equipped...
Service Manual - Page 204
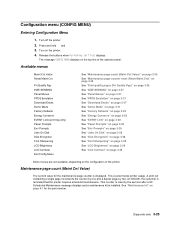
... the left frame assembly.
Option microcode
The options are "Smart Options" or options that have a system board. The option system board has a microprocessor that controls the option mechanism. A software architecture is provided that controls the option and communicates information such as paper path status, sensor status, motor status, and so on to the base printer.
3-32 Service Manual
Service Manual - Page 206
...°F).
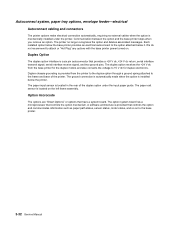
Printing is too dark.
• Change the Toner Darkness setting in the Quality menu. • Change the Brightness setting in the Quality menu. • Change the Contrast setting in the Quality menu. Note: Macintosh computer users should make sure the job lines per inch (lpi) setting is not set too high in the software application.
3-34 Service Manual
Service Manual - Page 207
... using downloaded fonts, verify the fonts are supported by the printer, the host computer, and the software application.
• Verify the print media type and print tray type settings match. • Verify you are using the correct printer drivers.
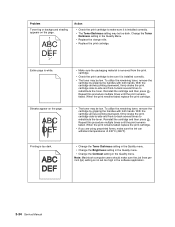
Part or all of the page is printed in black.
Check the print cartridge to see if it is installed...
Service Manual - Page 225
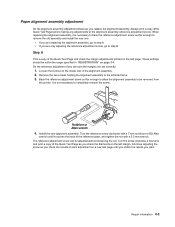
... screw, go to step B. Step A
Print a copy of the Quick Test Page and check the margin adjustments printed on the test page. These settings should be within the range specified in "REGISTRATION" on...be removed from
the printer. It is not necessary to completely remove the screw.
4. Install the new alignment assembly. Turn the reference screw clockwise with a 7 mm nut driver or M3 Allen
wrench ...
Service Manual - Page 392
...this section help you install any of the following options:
• Memory cards - Printer memory - Flash memory
• Firmware cards - Bar Code - IPDS and SCS/TNe - PrintCryption
• Other options - Printer hard disk - RS-232 serial interface card - Parallel 1284-C interface card - MarkNet N8000 series internal print servers (also called internal network adapters or INAs)
A-4 Service Manual
Service Manual - Page 409
...40 CACHE Test 3-8 canceling a print job 8-11 Card Stock & Label Guide 1-9 card stock, guidelines 1-19 cartridge duct, removal 4-24 characteristics, print media 1-16 code update 3-1 confidential jobs A-14
entering a PIN A-14 sending A-14 Configuration ID 3-21 configuration menu accessing 3-1, 3-25 available menus 3-25 Demo Mode 3-27 Disk Encryption 3-28 Download Emuls 3-27 Energy Conserve 3-28 Env...