Epson EMP-503C - PowerLite 503C SVGA LCD Projector driver and firmware


Related Epson EMP-503C Manual Pages
Download the free PDF manual for Epson EMP-503C and other Epson manuals at ManualOwl.com
Technical Brief (Multimedia Projectors) - Page 1
... technology
Versatility
M Flexible controls M ELP Link IV software M Flexible installation M EasyMP and EasyMP.net
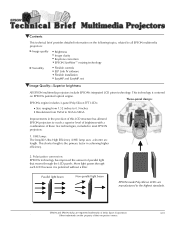
Image Quality-Superior brightness
All EPSON multimedia projectors include EPSON's integrated LCD prism technology. This technology is centered
on EPSON's patented optical engine.
Three-panel design:
EPSON's engine includes 3-panel Poly-Silicon TFT LCD's:
LL
Size ranging from...
Technical Brief (Multimedia Projectors) - Page 5
...Change projector settings Change the test pattern Specify an image gamma Create a user logo
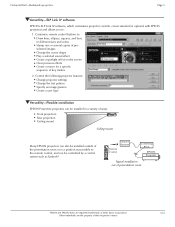
Versatility-Flexible installation
EPSON PowerLite projectors can be installed in a variety of ways:
Front projection Rear projection Ceiling mount
Ceiling mount
LL L L
LLL
Many EPSON projectors can also be installed outside of the presentation room or in a position inaccessible to the remote control, and...
Technical Brief (Multimedia Projectors) - Page 6
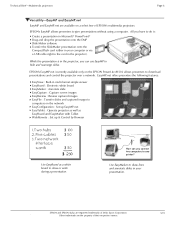
... the EMP Slide Maker software Transfer the SlideMaker presentation onto the CompactFlash card (either in your computer or via a USB cable right to the card in the projector.)
While the presentation is in the projector, you can use EasyMP to hide and rearrange slides.
EPSON's EasyMP.net (currently available only on the EPSON PowerLite 8150i) allows presenters to download presentations and control...
Installation Guide - ELPMBUNI Universal Mount Assembly - Page 2
... TO THE IMPLIED WARRANTIES OF MERCHANTABILITY AND FITNESS FOR A PARTICULAR PURPOSE.
Contact Premier Mounts
In the event of missing and/or damage equipment, or technical questions, the following information can help in the completion of the installation.
Customer Service - (800) 368-9700 Technical Support - [email protected]
Installation Instructions
Page - 3 -
Installation Guide - ELPMBUNI Universal Mount Assembly - Page 3
.... KEEP THESE INSTALLATION
INSTRUCTIONS IN AN EASILY ACCESSIBLE LOCATION FOR FUTURE
REFERENCE.
Indicates that the power plug is to be disconnected from the power outlet.
Contact Premier Mounts with any questions - (800) 368-9700.
Safety precautions must be taken at all times.
Warning and Caution statements.
A secure structure must support the weight, or load, of the projector. When...
Installation Guide - ELPMBUNI Universal Mount Assembly - Page 4

... 4)
Installation Tools
Phillips Head Screw Driver Soft Material...installation.
M5 x 12mm Security Head Screws (Qty 4) M6 x 12mm Security Head Screws (Qty 4)
Portable Drill Pencil Level (Supplied) Stud Finder (Commercially Available) M5 Allen Wrench
NOTE: Mounting screws will vary by projector. Please see the following pages for model specific hardware: Pages 10, 11, 12, and 13.
Installation Manual...
Installation Guide - ELPMBUNI Universal Mount Assembly - Page 5
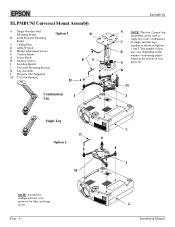
... Adjustment Screws F Tension Knobs G Safety Knob H Security Screws I Leveling Barrels J Universal Mounting Bracket K Leg Assembly L Projector (Not Supplied) M Tri-Lock Opening
Option 1 H
B D F
Combination
I
Leg
Single Leg
D Option 2
M
NOTE: See the best configuration...depending on the
number of mounting points
found on the bottom of your
G
projector.
K
M J
L
J
L
Installation Manual
Installation Guide - ELPMBUNI Universal Mount Assembly - Page 6
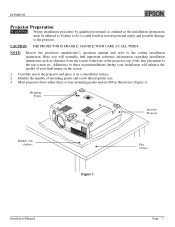
... could result in serious personal injury and possible damage to the projector.
CAUTION: THE PROJECTOR IS FRAGILE; HANDLE WITH CARE AT ALL TIMES.
NOTE:
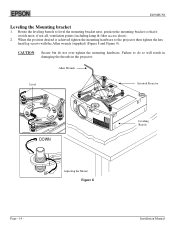
Review the projectors manufacture's operation manual and refer to the ceiling installation instruction. Here you will normally find important reference information regarding installation dimensions such as (distance from the screen to the lens...
Installation Guide - ELPMBUNI Universal Mount Assembly - Page 7
ELPMBUNI
4. Separate the upper assembly from the projector mounting bracket by slightly loosening the two tension knurl knobs to create free play between the bracket tri-lock assembly and the upper section tri... be rotated 180° apart and separate.
Figure 2
Tri-Lock Opening Rotate 180° To Unlock
Tension Knobs
Upper Assembly
Safety Knob
Figure 3
Figure 4
Page - 8 -
Installation Manual
Installation Guide - ELPMBUNI Universal Mount Assembly - Page 8
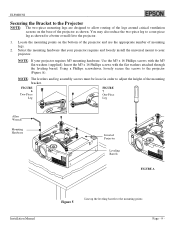
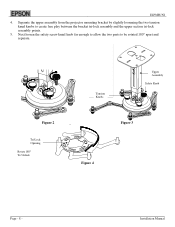
... screwdriver, loosely secure the screws to the projector (Figure A).
NOTE: The levelers and leg assembly screws must be loose in order to adjust the height of the mounting bracket.
FIGURE 6
Two-Piece Leg
FIGURE 7 One-Piece Leg
Allen Wrench
Mounting Hardware
Inverted Projector
Leveling Barrels
FIGURE A
Installation Manual
Figure 5
Line up the leveling barrels...
Installation Guide - ELPMBUNI Universal Mount Assembly - Page 9
ELPMBUNI
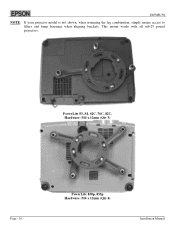
NOTE: If your projector model is not shown, when arranging the leg combination, simply ensure access to filters and lamp housings when aligning brackets. This mount works with all sub-25 pound projectors.
PowerLite S3, S4, 62C, 76C, 82C, Hardware: M4 x 12mm (Qty 3)
Page - 10 -
PowerLite 830p, 835p Hardware: M4 x 12mm (Qty 4)
Installation Manual
Installation Guide - ELPMBUNI Universal Mount Assembly - Page 10
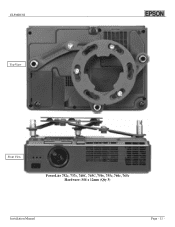
ELPMBUNI Top View
Front View
PowerLite 732c, 737c, 740C, 745C, 750c, 755c, 760c, 765c Hardware: M4 x 12mm (Qty 3)
Installation Manual
Page - 11 -
Installation Guide - ELPMBUNI Universal Mount Assembly - Page 13
... lamp & filter access doors).
2. When the position desired is achieved tighten the mounting hardware to the projector then tighten the hex head leg screws with the Allen wrench (supplied) (Figure 8 and Figure 9).... will result in damaging the threads in the projector.
Allen Wrench
Level
Inverted Projector
DOWN
UP
Adjusting the Mount
Figure 8
Leveling Barrels
Page - 14 -
Installation Manual
Quick Start - Page 1

... two cables:
EPSON® PowerLite® 503c/713c
Quick Setup
power cord
computer cable
You won't need to install any software.
Connect the projector to your laptop
1 Make sure your projector and laptop are turned off. 2 Connect one end of the computer cable to
the Computer port on the projector.
Follow these instructions to connect your laptop to the projector. To connect other devices...
User Manual - Page 10

...all the instructions you need to get your projector set up and connected to a laptop or PowerBook computer.
I Built-in help system Provides assistance for common problems. Available from the Help button on the projector or the remote control. See page 58 for details.
I support.epson.com Download FAQs and e-mail your questions to EPSON support.
I CD-ROM The EPSON PowerLite 503c/713c CD-ROM lets you...
User Manual - Page 70
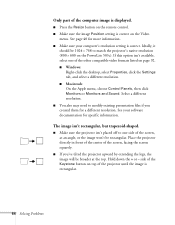
... of the computer image is displayed.
I Press the Resize button on the remote control. I Make sure the image Position setting is correct on the Video
menu. See page 40 for more information. I Make sure your computer's resolution setting is correct. Ideally, it
should be 1024 × 768 to match the projector's native resolution (800 × 600 on the PowerLite 503c). If this...
User Manual - Page 74
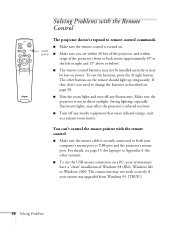
... mouse pointer with the remote control.
I Make sure the mouse cable is securely connected to both your computer's mouse port or USB port and the projector's mouse port. For details, see page 13 (for laptops) or Appendix A (for other systems).
I To use the USB mouse connection on a PC, your system must have a "clean" installation of Windows 98 (SR2), Windows Me, or Windows 2000. The connection...
User Manual - Page 92
... serial number be removed or should the product fail to be properly maintained or fail to function properly as a result of misuse, abuse, improper installation, neglect, improper shipping, damage caused by disasters such as fire, flood, and lightning, improper electrical current, software problems, interaction with non-EPSON products, or service other than by an EPSON Authorized Servicer...
User Manual - Page 103
... Presenters Online, 4, 69 PrivateLine Support, 5, 69 Problems
color, 66 image, 62 to 66 remote control, 68, 83 sound, 67 Projection lamp See Lamp Projector carrying case, 8, 56 cleaning, 52 distance from screen, 10, 89 feet, adjusting height with, 23 installing, 72 to 73 lamp specifications, 90 options, 8 positioning, 10 to 11 resolution, 1, 89 shutting off, 25...
Warranty Statement - Page 1

... serial number be removed or should the product fail to be properly maintained or fail to function properly as a result of misuse, abuse, improper installation, neglect, improper shipping, damage caused by disasters such as fire, flood, and lightning, improper electrical current, software problems, interaction with non-EPSON products, or service other than by an EPSON Authorized Servicer...