HP Indigo WS6600p driver and firmware
Drivers and firmware downloads for this Hewlett-Packard item
Related HP Indigo WS6600p Manual Pages
Download the free PDF manual for HP Indigo WS6600p and other HP manuals at ManualOwl.com
Deinstalling Indigo 6X00 Series Digital Presses - Page 26
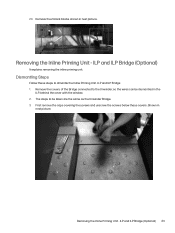
... Bridge 1. Remove the covers of the Bridge connected to the Unwinder, so the wires can be dismantled in the
ILP, behind the cover with the window. 2. The steps to be taken are the same as the Unwinder Bridge. 3. First remove the caps covering the screws and unscrew the screws below these...
Deinstalling Indigo 6X00 Series Digital Presses - Page 77
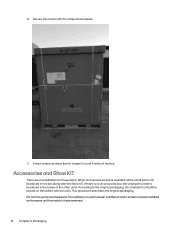
..., the small parts should be placed on the pallets with the units. This procedure describes the original packaging. Do not mix up the touchscreens. The software on each screen is different and a screen must be installed on the same unit from which it was removed. 74 Chapter 6 Packaging
Deinstalling Indigo 6X00 Series Digital Presses - Page 84
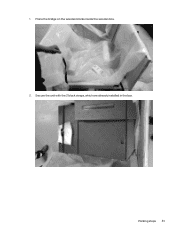
1. Place the bridge on the wooden blocks inside the wooden box. 2. Secure the unit with the 2 black straps, which are already installed in the box.
Packing steps 81
IR Sensors Reading and Calibration -- CA393-09500 Rev 03 - Page 5
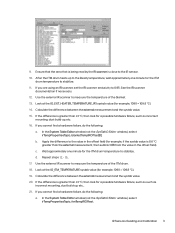
...the ITM
drum temperature to stabilize. 11. If you are using an IR scanner, set the IR scanner emissivity to 0.95. See the IR scanner
documentation if necessary. ... you cannot find a hardware failure, do the following:
a. In the System Table Editor window (not the SysTabIO Editor window), select irTempPropertiesTopic, blanketTempIROffset[0].
b. Apply the difference to the value in the offset field (...
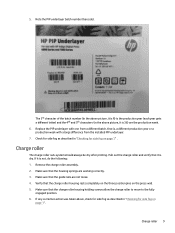
Side Fog Troubleshooting - Page 11

...Do not hold the PIP underlayer while inching as this might cause it to stretch.
2. When installing the PIP foil, make sure that the PIP underlayer is made partially wet with imaging oil on a lint-free ...wipe.
3. When installing the PIP foil, use only imaging oil on the PIP foil trailing edge to prevent it from loosening...
Side Fog Troubleshooting - Page 12
... batch, that is, a different production year or a production week with a large difference from the installed PIP underlayer. 7. Check for side fog as described in "Checking for side fog on page 1" ... assembly. 2. Make sure that the housing springs are working correctly. 3. Make sure that the guide rails are not loose. 4. Verify that the charge roller housing rests completely on the three position...
Side Fog Troubleshooting - Page 14
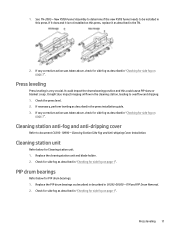
.... 1. Check the press level. 2. If necessary, perform leveling as described in the press installation guide. 3. If any corrective action was taken above, check for side fog as described in "...-dripping cover
Refer to document CA393-10990 - Cleaning Station Side Fog and Anti-dripping Cover Installation.
Cleaning station unit
Refer below for Cleaning station unit. 1. Replace the cleaning station unit...
Dripping Prevention and ITM Heating Hood Service -- CA393-10100 Rev 00 - Page 2

... hood...14 Removing and installing the catch tray fan assembly...16 Removing and installing the IHH controller unit (for presses with external IHH controller 17 Wiring the dripping ... rate...33 IHH controller unit troubleshooting ...34 Baselining the dripping prevention kit ...36
Appendix A More theory ...63 Software settings ...63 Theory for presses without external IHH controller...63
Appendix B ...
Dripping Prevention and ITM Heating Hood Service -- CA393-10100 Rev 00 - Page 10
... before you begin the procedures. 1. Check the following SysTab parameter:
engineConfigTopic > ihhInstalled is set to HT_VER1, and bypassTableTopic > Ihh is set to FALSE, and engineConfigTopic > feedSuctionNautilairInstalled is set to TRUE. 2. Shut down the press software. 3. Shut down the power to the press.
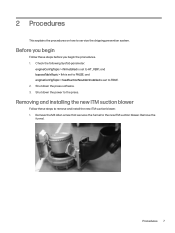
Removing and installing the new ITM suction blower
Follow these steps to remove and...
Dripping Prevention and ITM Heating Hood Service -- CA393-10100 Rev 00 - Page 11
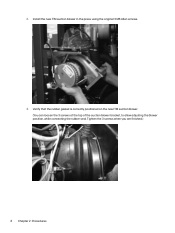
2. Install the new ITM suction blower in the press using the original 3 M6 Allen screws.
3. Verify that the rubber gasket is correctly positioned on the new ITM suction blower. (You can loosen the 3 screws at the top of the suction blower bracket, to allow adjusting the blower position, while connecting the rubber seal. Tighten the 3 screws when you are finished.)
8 Chapter 2 Procedures
Dripping Prevention and ITM Heating Hood Service -- CA393-10100 Rev 00 - Page 12
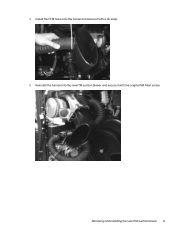
4. Install the FFM hose onto the funnel and secure it with a tie-wrap. 5. Reinstall the funnel onto the new ITM suction blower and secure it with the original M4 Allen screw.
Removing and installing the new ITM suction blower 9
Dripping Prevention and ITM Heating Hood Service -- CA393-10100 Rev 00 - Page 13
... hump shaped hood unit with the new one provided in the kit.
For wiring connection instructions, see Wiring the Nautilair suction blower on page 27.
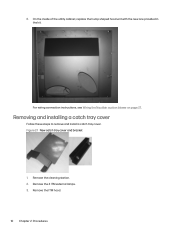
Removing and installing a catch tray cover
Follow these steps to remove and install a catch tray cover. Figure 2-1 New catch tray cover and bracket
1. Remove the cleaning station. 2. Remove...
Dripping Prevention and ITM Heating Hood Service -- CA393-10100 Rev 00 - Page 14
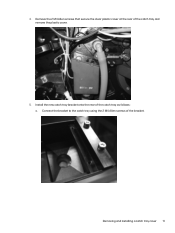
4. Remove the 2 M4 Allen screws that secure the clear plastic cover at the rear of the catch tray and remove the plastic cover.
5. Install the new catch tray bracket onto the rear of the catch tray as follows: a. Connect the bracket to the catch tray using the 2 M4 Allen screws of the bracket.
Removing and installing a catch tray cover 11
Dripping Prevention and ITM Heating Hood Service -- CA393-10100 Rev 00 - Page 16

d. Make sure the 2 slots of the new catch tray cover fit under the 2 screws of the bracket. Tighten the 2 screws.
Removing and installing the ITM Hood Heater blower
Follow these steps to remove and install the ITM hood heater blower. 1. Open the writing head cover. 2. Loosen the 2 x M6 screws on the rear wall (shown below).
Removing and installing the ITM Hood Heater blower 13
Dripping Prevention and ITM Heating Hood Service -- CA393-10100 Rev 00 - Page 18
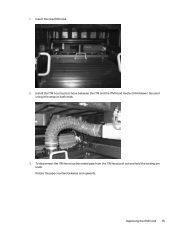
1. Insert the new ITM hood.
2. Install the ITM hood suction hose between the ITM and the ITM Hood Heater (IHH) blower. Secure it using a tie wrap on both ends.
3. To disconnect the ITM hood suction metal pipe from the ITM hood, pull out and hold the locking-pin knob. Rotate the pipe counterclockwise and upwards. Replacing the ITM hood 15
Dripping Prevention and ITM Heating Hood Service -- CA393-10100 Rev 00 - Page 19
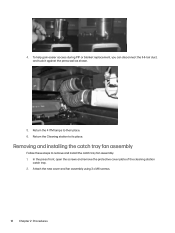
... wall as shown.
5. Return the 4 ITM lamps to their place. 6. Return the Cleaning station to its place.
Removing and installing the catch tray fan assembly
Follow these steps to remove and install the catch tray fan assembly. 1. In the press front, open the screws and remove the protective cover plate of the...
Dripping Prevention and ITM Heating Hood Service -- CA393-10100 Rev 00 - Page 40
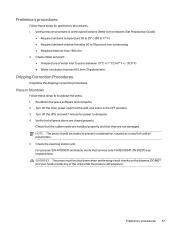
...Guide):
● Required ambient temperature 20 to 25° C (68 to 77° F) ● Required ambient relative humidity 50 to 70 percent non-condensing ● Required fresh air flow +150 cfm 2. Check chiller set...
Follow these steps to shutdown the press. 1. Shutdown the press software and computer. 2. Turn off the main power switch at the wall, and lock it in the OFF position. 3. ...
Dripping Prevention and ITM Heating Hood Service -- CA393-10100 Rev 00 - Page 66

A More theory
Software settings
The following software settings can be configured in the SysTab editor to support changes in the hardware configuration of your press. When installing the dripping reduction kit, set the following SysTab parameters: ● Set the parameter engineConfigTopic > ihhInstalled to HT_VER1. ● Set the parameter engineConfigTopic > feedSuctionNautilairInstalled to ...
Rewinder Calibration - Page 5
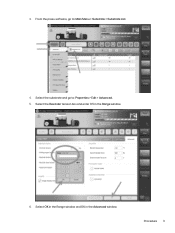
3. From the press software, go to: Main Menu > Substrate > Substrate List.
4. Select the substrate and go to: Properties > Edit > Advanced. 5. Select the Rewinder tension box and enter 0.5 in the Range window.
6. Select OK in the Range window and OK in the Advanced window.
Procedure 3
Long Term Shutdown for Indigo WS6000 Series Digital Presses and Indigo W7200 Series Digital Presses -- CA393-09200 Rev 01 - Page 7

... Digitax 9. Turn on the press and ILP (if installed). 10. Load a substrate roll on the unwinder. Load an empty core on the rewinder. 11. Replace all... Validate the ink conductivity. 14. Check that the writing head window and the IR sensors are clean. 15. Change the press ...Make sure that the press software is up-to-date. 19. Check with the Technical Group for any service notes that need to be implemented....