Konica Minolta ScanDIVA driver and firmware
Drivers and firmware downloads for this Konica Minolta item
Related Konica Minolta ScanDIVA Manual Pages
Download the free PDF manual for Konica Minolta ScanDIVA and other Konica Minolta manuals at ManualOwl.com
ScanDIVA User Guide - Page 12
... for a Class A digital device, pursuant to Part 15 of the FCC Rules. These limits are designed to provide reasonable protection against harmful interference when the equipment is operated in a commercial environment. This equipment generates, uses, and can radiate radio frequency energy and, if not installed and used in accordance with the instruction manual, may cause...
ScanDIVA User Guide - Page 16
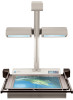
..., functions and part names of the Scanner.
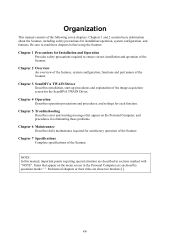
Chapter 3 ScanDIVA TWAIN Driver
Describes installation, start-up procedures and explanation of the image acquisition screen for the ScanDIVA TWAIN Driver.
Chapter 4 Operation
Describes operation precautions and procedures, and settings for each function.
Chapter 5 Troubleshooting
Describes error and warning messages that appear on the Personal...
ScanDIVA User Guide - Page 17
... 2-1
1 Features 2-2 2 Part Identification and Functions 2-3
Chapter 3 ScanDIVA TWAIN Driver 3-1
1 ScanDIVA TWAIN Driver Setup 3-2
1.1 Trademark Acknowledgments 3-2 1.2 System Environment 3-2 1.3 Installation Procedure 3-3
2 Setup of the Scanner 3-7
2.1 Installation of Stitching Labels 3-7 2.2 Disabling User Account Control 3-8 2.3 Aging - 10min 3-10 2.4 CCD Gain 3-12 2.5 Exposure...
ScanDIVA User Guide - Page 32
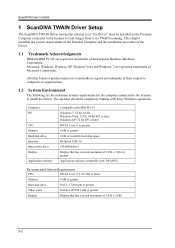
... basic Windows operations.
Computer OS
CPU Memory Hard disk drive Interface Optical disc drive Display
Application software
Compatible with IBM PC/AT
Windows 7: 32 bit, 64 bit Windows Vista: 32 bit, 64 bit SP2 or later Windows XP: 32 bit SP3 or later
INTEL Core i7 or greater
4 GB or greater
2 GB of available hard disk space
Hi-Speed USB 2.0
CD-ROM drive
Display that has a screen resolution of...
ScanDIVA User Guide - Page 33
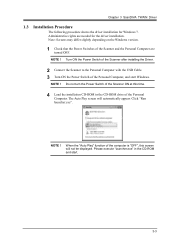
... ! Turn ON the Power Switch of the Scanner after installing the Driver.
2 Connect the Scanner to the Personal Computer with the USB Cable. 3 Turn ON the Power Switch of the Personal Computer, and start Windows.
NOTE ! Do not turn the Power Switch of the Scanner ON at this time.
4 Load the installation CD-ROM in the CD-ROM drive of the Personal
Computer. The Auto Play...
ScanDIVA User Guide - Page 34
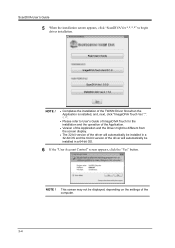
... from the screen display.
The 32-bit version of the driver will automatically be installed in a 32-bit OS and the 64-bit version of the driver will automatically be installed in a 64-bit OS.
6 If the "User Account Control" screen appears, click the "Yes" button.
NOTE ! This screen may not be displayed, depending on the settings of the computer.
3-4
ScanDIVA User Guide - Page 35
Chapter 3 ScanDIVA TWAIN Driver
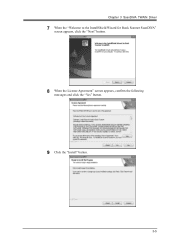
7 When the "Welcome to the InstallShield Wizard for Book Scanner ScanDIVA"
screen appears, click the "Next" button.
8 When the License Agreement" screen appears, confirm the following
messages and click the "Yes" button.
9 Click the "Install" button.
3-5
ScanDIVA User Guide - Page 36
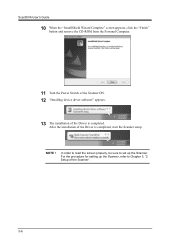
..."
button and remove the CD-ROM from the Personal Computer.
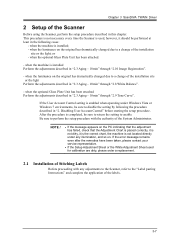
11 Turn the Power Switch of the Scanner ON. 12 "Installing device driver software" appears.
13 The installation of the Driver is completed.
After the installation of the Driver is completed, start the Scanner setup.
NOTE !
In order to read the screen properly, be sure to set up the Scanner. For the procedure...
ScanDIVA User Guide - Page 37
... Perform the adjustments described in "2.3 Aging - 10min" through "2.9 Tone Curve".
If the User Account Control setting is enabled when operating under Windows Vista or Windows 7 environments, be sure to disable the setting by following the procedure described in "2. Disabling User Account Control" before starting the setup procedure. After the procedure is completed, be sure to return the...
ScanDIVA User Guide - Page 39
Chapter 3 ScanDIVA TWAIN Driver
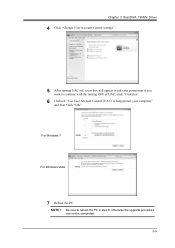
4 Click "Change User Account Control settings".
5 After turning UAC off, a text box will appear to ask your permission if you
want to continue with the turning OFF of UAC, click "Continue".
6 Uncheck "Use User Account Control (UAC) to help protect your computer"
and then Click "OK".
For Windows 7
For Windows Vista
7 Reboot the PC.
NOTE...
ScanDIVA User Guide - Page 41

Chapter 3 ScanDIVA TWAIN Driver
5 The window indicating that adjustment is underway will appear. When the
window disappears, the adjustment is completed. Proceed to the next adjustment, "2.4 CCD Gain".
3-11
ScanDIVA User Guide - Page 45
...ScanDIVA TWAIN Driver
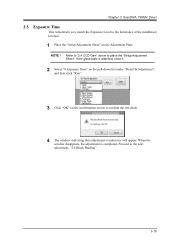
2.5 Exposure Time
This Adjustment is to match the Exposure Level to the luminance of the installation location.
1 Place the "Setup Adjustment Sheet" on the Adjustment Plate.
NOTE ! Refer to "2.4 CCD Gain" above to place the "Setup...test chart.
4 The window indicating that adjustment is underway will appear. When the
window disappears, the adjustment is completed. Proceed to the ...
ScanDIVA User Guide - Page 49
...ScanDIVA TWAIN Driver
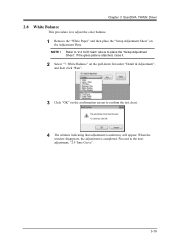
2.8 White Balance
This procedure is to adjust the color balance.
1 Remove the "White Paper" and then place the "Setup Adjustment Sheet" on
the Adjustment Plate. NOTE ! Refer to "2.4 CCD Gain" above to place the "Setup... the test chart.
4 The window indicating that adjustment is underway will appear. When the
window disappears, the adjustment is completed. Proceed to the next adjustment...
ScanDIVA User Guide - Page 56
ScanDIVA User's Guide
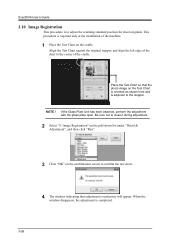
2.10 Image Registration
This procedure is to adjust the scanning standard position for sheet originals. This procedure is required only at the installation of the machine.
1 Place the Test Chart on the cradle.
Align the Test... click "Run".
3 Click "OK" on the confirmation screen to confirm the test chart.
4 The window indicating that adjustment is underway will appear. When the...
ScanDIVA User Guide - Page 57
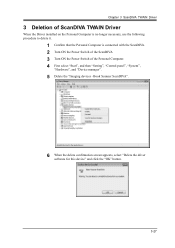
... connected with the ScanDIVA. 2 Turn ON the Power Switch of the ScanDIVA. 3 Turn ON the Power Switch of the Personal Computer. 4 First select "Start", and then "Setting", "Control panel", "System",
"Hardware", and "Device manager".
5 Delete the "Imaging devices -Book Scanner ScanDIVA".
6 When the delete confirmation screen appears, select "Delete the driver
software for this device" and click the...
ScanDIVA User Guide - Page 99
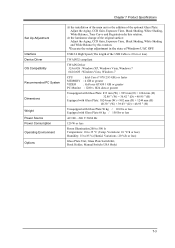
... White Balance by this rotation.
*Execute the setup adjustment in the state of Windows UAC OFF.
USB 2.0 High Speed (The length of the USB Cable is 2.0 m or less)
TWAIN32 compliant
TWAIN Driver 32-bit OS : Windows XP, Windows Vista, Windows 7 64-bit OS : Windows Vista, Windows 7
CPU
: Intel Core i7 870 2.93 GHz or faster
MEMORY : 4 GB or greater
VIDEO
: GeForce GT430 1 GB...
ImageDIVA Touch User Guide - Page 2
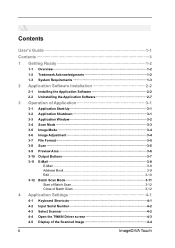
... 3-6 3-9 Preview Area 3-6 3-10 Output Buttons 3-7 3-11 E-Mail 3-8
E-Mail ...3-8 Address Book 3-9 Edit ...3-10 3-12 Batch Scan Mode 3-11 Start of Batch Scan 3-12 Close of Batch Scan 3-12
4 Application Settings 4-1
4-1 Keyboard Shortcuts 4-1 4-2 Input Serial Number 4-2 4-3 Select Scanner 4-2 4-4 Open the TWAIN Driver screen 4-3 4-5 Display of the Scanned Image 4-4
ii
ImageDIVA Touch
ImageDIVA Touch User Guide - Page 5
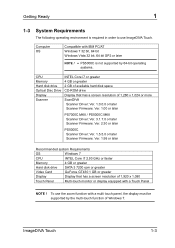
... bit Windows Vista 32 bit, 64 bit SP2 or later
NOTE ! PS5000C is not supported by 64-bit operating systems.
CPU Memory Hard disk drive Optical Disc Drive Display Scanner
INTEL Core i7 or greater 4 GB or greater 2 GB of available hard disk space CD-ROM drive Display that has a screen resolution of 1,280 x 1,024 or more ScanDIVA
Scanner Driver: Ver. 1.0.0.0 or later Scanner Firmware: Ver...
ImageDIVA Touch User Guide - Page 6
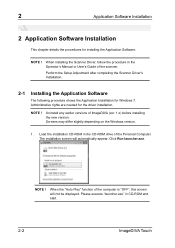
...Application Software
The following procedure shows the Application Installation for Windows 7. Administrative rights are needed for the driver installation.
NOTE !
Uninstall any earlier versions of ImageDIVA (ver. 1.x) before installing the new version. Screens may differ slightly depending on the Windows version.
1. Load the installation CD-ROM in the CD-ROM drive of the Personal Computer. The...
ImageDIVA Touch User Guide - Page 7
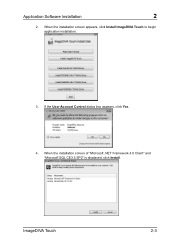
Application Software Installation
2
2. When the installation screen appears, click Install ImageDIVA Touch to begin application installation.
3. If the User Account Control dialog box appears, click Yes.
4. When the installation screen of "Microsoft .NET Framework 4.0 Client" and "Microsoft SQL CE3.5 SP2" is displayed, click Install.
ImageDIVA Touch
2-3