Sony DSC-P93 - Cyber-shot Digital Still Camera driver and firmware
Related Sony DSC-P93 Manual Pages
Download the free PDF manual for Sony DSC-P93 and other Sony manuals at ManualOwl.com
Operating Instructions - Page 3
... contact your nearest Sony service station.
For the Customers in Europe
This product has been tested and found compliant with the limits sets out in the EMC Directive for using connection cables shorter than 3 meters (9.8 feet).
Attention The electromagnetic fields at the specific frequencies may influence the picture and sound of this digital camera.
Notice If...
Operating Instructions - Page 4
... playback is not possible due to a malfunction of your camera or recording medium, etc.
Back up recommendation To avoid the potential risk of data loss, always copy (back up) data to a disk.
Notes on image data compatibility • This camera conforms with the Design rule
for Camera File system universal standard established by the JEITA (Japan...
Operating Instructions - Page 5
... may not be able to record or play back properly.
The pictures used in this manual
The photographs used as examples of pictures in this manual are reproduced images, and are not actual images shot using this camera.
Trademarks
•
is a trademark of Sony
Corporation. • "Memory Stick,"
, "Memory Stick
PRO,"
, "Memory Stick
Duo,"
, "Memory Stick
PRO Duo,"
,
"MagicGate,"
are...
Operating Instructions - Page 7
...82
Enjoying images on your computer
Copying images to your computer - For Windows users 84
Installing the USB driver 85 Connecting the camera to your computer
86 Copying images 87 Viewing the images on your computer
89 Image file storage destinations and file
names 90 Viewing an image previously copied to a
computer 92 Installing "Picture Package 92 Copying images using "Picture Package...
Operating Instructions - Page 8
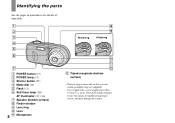
Identifying the parts
See the pages in parentheses for details of operation.
Removing
Attaching
A POWER button (17) B POWER lamp (17) C Shutter button (25) D Mode dial (10) E Flash (31) F Self-timer lamp (30)/
AF illuminator (32, 116) G Speaker (bottom surface) H Finder window I Lens ring J Lens
8 K Microphone
L Tripod receptacle (bottom surface)
• The lens ring is removable...
Operating Instructions - Page 25
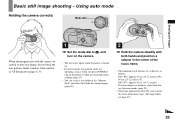
... auto mode
Holding the camera correctly
Mode dial
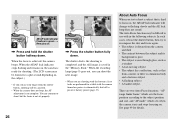
Shooting still images
When shooting pictures with the camera, be careful so that your fingers do not block the lens portion, finder window, flash emitter, or AF illuminator (pages 8, 9).
1
, Set the mode dial to , and turn on the camera.
• The lens cover opens when the power is turned on...
Operating Instructions - Page 26
...; When the camera does not beep, the AF adjustment is not complete. You can continue to shoot, but the focus is not set properly.
26
VGA
101
97
SAF
4
, Press the shutter button fully down.
The shutter clicks, the shooting is completed, and the still image is saved in the "Memory Stick." When the recording lamp...
Operating Instructions - Page 51
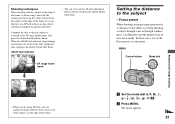
...using Center AF, the camera may focus on the ... recompose the picture and shoot.
Compose the shot so that the subject is centered in the...AF lock indicator stops flashing and remains on, return to the fully composed shot, and press the...window glass, it is difficult to get the proper focus in auto focus mode. In these cases, use of the Focus preset is convenient.
MENU
Control button
Mode dial
a Set...
Operating Instructions - Page 66
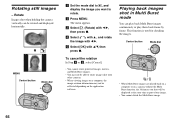
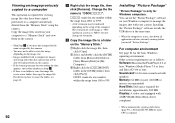
Rotating still images
- Rotate
Images shot when holding the camera vertically can be rotated and displayed horizontally.
MENU Control button
Mode dial
a Set the mode dial to , and display the image you want to ...shot with other cameras.
• When viewing images on a computer, the image rotation information may not be reflected depending on the application software.
Playing back images shot...
Operating Instructions - Page 84
... on your computer
When neither a USB connector nor a "Memory Stick" slot is provided, you can
Enjoying images on your computer
copy images using an additional device. See the Sony Website for details. http://www.sony.net/
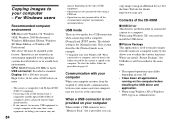
Contents of the CD-ROM
x USB Driver This driver is needed in order to connect the camera to a computer. When using Windows XP, you need not install the USB driver.
x Picture...
Operating Instructions - Page 85
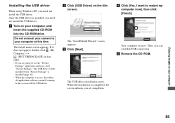
Installing the USB driver
When using Windows XP, you need not install the USB driver. Once the USB driver is installed, you need not install the USB driver.
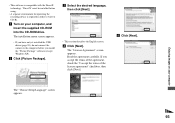
a Turn on your computer, and insert the supplied CD-ROM into the CD-ROM drive.
Do not connect your camera to your computer at this time.
The install menu screen appears. If it does not appear, double-click (My Computer) t
(PICTUREPACKAGE) in ...
Operating Instructions - Page 86
... be corrupted if the camera shuts off due to weak batteries.
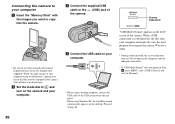
b Set the mode dial to and turn on the camera and your computer.
c Connect the supplied USB cable to the (USB) jack of the camera.
d Connect the USB cable to your computer.
• When using a desktop computer, connect the USB cable to the USB connector on the rear panel.
• When using Windows XP, the AutoPlay...
Operating Instructions - Page 88
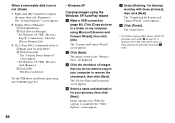
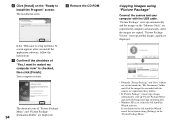
... Sony DSC] is displayed, delete it. 1 Right-click [ Sony DSC]. 2 Click [Uninstall]. The "Confirm Device Removal" screen appears. • For Windows 98, 98SE, Me users, click [Remove]. 3 Click [OK]. The device is deleted.
Try the USB driver installation again using the CD-ROM (page 85).
- Windows XP
Copying images using the Windows XP AutoPlay wizard a Make a USB connection
(page 86). Click [Copy...
Operating Instructions - Page 92
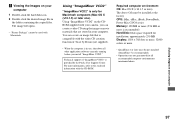
... are as follows. Software: Macromedia Flash Player 6.0 or later, Windows Media Player 7.0 or later, and DirectX 9.0b or later. Sound card: 16-bit stereo sound card with speakers Memory: 64 MB or more (128 MB or more is recommended) Hard Disk: Disk space required for installation: approximately 200 MB Display: A video card equipped with 4 MB VRAM (DirectDraw driver compliant)
• When...
Operating Instructions - Page 93
...recording device is required in order to write to CD-Rs.
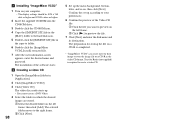
a Turn on your computer, and insert the supplied CD-ROM into the CD-ROM drive.
The installation menu screen appears.
• If you have not yet installed the USB driver (page 85), do not connect the camera to the computer before you install the "Picture Package" software (except Windows...Next].
The "Choose Setup Language" screen appears.
93
Operating Instructions - Page 94
... to setup for Direct X" screen appears after you install the application software, follow the instructions.
g Confirm if the checkbox of "Yes, I want to restart my computer now" is checked, then click [Finish].
Your computer restarts.
The shortcut icons of "Picture Package Menu" and "Picture Package destination Folder" are displayed.
94
Copying images using "Picture Package"
Connect the camera...
Operating Instructions - Page 97
... the enclosed information with the CD-ROM.
Required computer environment OS: Mac OS X (v10.1.5 or later) The above OS must be installed at the factory CPU: iMac, eMac, iBook, PowerBook, Power Mac G3/G4 series Memory: 128 MB or more (256 MB or more is recomended) Hard Disk: Disk space required for installation: approximately 250 MB Display: 1024 × 768 dots or...
Operating Instructions - Page 98
... on your computer. • The display settings should be 1024 × 768 dots or higher and 32000 colors or higher.
2 Insert the supplied CD-ROM into the CD-ROM drive.
3 Double-click the CD-ROM icon.
4 Copy the [IMXINST.SIT] file in the [MAC] folder to the hard disk icon.
5 Double-click the [IMXINST.SIT] file in the copy-to folder...
Operating Instructions - Page 104
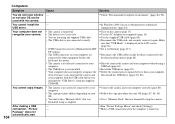
... computer.
• The USB driver is not installed. • Your computer does not properly recognize the
device because you connected the camera and your computer with the USB cable before you installed the "USB Driver" from the supplied CD-ROM.
• The camera is not correctly connected to your computer.
• The copy procedure differs depending on your OS.
• You shot with a "Memory...
Marketing Specifications - Page 2
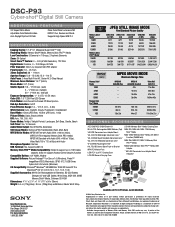
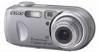
DSC-P93
Cyber-shot® Digital Still Camera
ADDITIONAL FEATURES
3:2 Aspect Ratio Mode Adjustable Color/Saturation/Hue Auto Daylight Sychro Fill Flash
Clear Color/Clear Luminance NR MPEG1 Cue, Review and Divide Supports High Speed USB 2.0
S P E C I F I C AT I O N S
Imaging Device: 1/1.8" 5.1 Megapixel Super HAD™ CCD Recording Media: Memory Stick® Media, Memory Stick PRO™ ...