Sony DSC-W7/B - Cyber-shot Digital Still Camera driver and firmware
Related Sony DSC-W7/B Manual Pages
Download the free PDF manual for Sony DSC-W7/B and other Sony manuals at ManualOwl.com
Operating Instructions - Page 3
... with the limits for a Class B digital device, pursuant to Part 15 of the FCC Rules. These limits are designed to provide reasonable protection against harmful interference in a residential installation. This equipment generates, uses, and can radiate radio frequency energy and, if not installed and used in accordance with the instructions, may cause harmful interference to...
Operating Instructions - Page 5
....
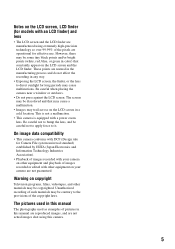
Warning on copyright
Television programs, films, videotapes, and other materials may be copyrighted. Unauthorized recording of such materials may be contrary to the provisions of the copyright laws.
The pictures used in this manual
The photographs used as examples of pictures in this manual are reproduced images, and are not actual images shot using this camera.
5
Operating Instructions - Page 9
... your Windows computer 55 Copying images to your computer 57 Viewing image files stored on a computer with your camera (using a "Memory Stick 63 Using the supplied software 64 Using your Macintosh computer 66
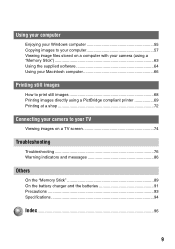
Printing still images
How to print still images 68 Printing images directly using a PictBridge compliant printer 69 Printing at a shop 72
Connecting your camera to your TV
Viewing...
Operating Instructions - Page 15
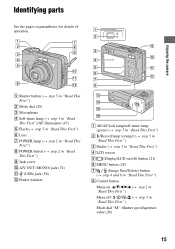
...") H POWER button (t step 2 in "Read
This First") I Jack cover J A/V OUT (MONO) jack (74) K (USB) jack (58) L Finder window
1 2
9 3
q; 4
5
qa
6
qs 7
8
qd qf qg qh
A AE/AF lock lamp/self-timer lamp (green) (t step 5 in "Read This First")
B /Record lamp (orange) (t step 5 in "Read This First")
C Finder (t step 5 in "Read This First")
D LCD screen
E (Display/LCD...
Operating Instructions - Page 31
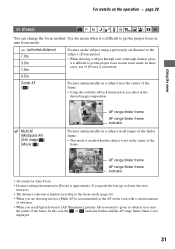
...set distance to the subject. (Focus preset)
• When shooting a subject through a net or through window...(Still...setting information in [Focus] is approximate. If you point the lens up or down, the error...Digital Zoom] or [AF Illuminator], priority AF movement is given to subjects in or near
the center of the frame. In this case the or indicator flashes and the AF range finder frame is not displayed...
Operating Instructions - Page 41
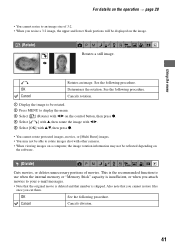
... to display the menu. 3 Select [ ] (Rotate) with b/B on the control button, then press z. 4 Select [ ] with v, then rotate the image with b/B. 5 Select [OK] with v/V, then press z.
• You cannot rotate protected images, movies, or [Multi Burst] images. • You may not be able to rotate images shot with other cameras. • When viewing images on a computer...
Operating Instructions - Page 53
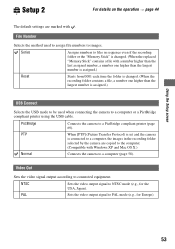
...using the USB cable.
PictBridge
Connects the camera to a PictBridge compliant printer (page 69).
PTP
When [PTP] (Picture Transfer Protocol) is set and the camera
is connected to a computer, the images in the recording folder
selected by the camera are copied to the computer.
(Compatible with Windows XP and Mac OS X.)
Normal
Connects the camera to a computer (page 58).
Video Out
Sets the...
Operating Instructions - Page 55
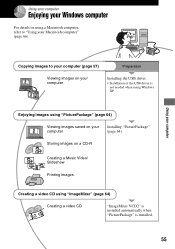
Using your computer
Enjoying your Windows computer
For details on using a Macintosh computer, refer to "Using your Macintosh computer" (page 66).
Using your computer
Copying images to your computer (page 57)
Preparation
Viewing images on your computer
Installing the USB driver.
• Installation of the USB driver is not needed when using Windows XP.
Enjoying images using "PicturePackage" ...
Operating Instructions - Page 56
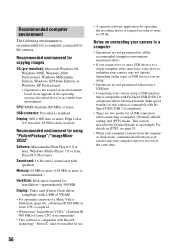
... for using "PicturePackage"/"ImageMixer VCD2"
Software: Macromedia Flash Player 6.0 or later, Windows Media Player 7.0 or later, DirectX 9.0b or later
Sound card: 16-bit stereo sound card with speakers
Memory: 64 MB or more (128 MB or more is recommended.)
Hard Disk: Disk space required for installation-approximately 500 MB
Display: Video card (Direct Draw driver compliant) with 4 MB of VRAM...
Operating Instructions - Page 57
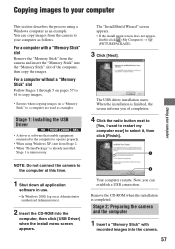
...
software in use. • In Windows 2000, log on as Administrator
(authorized Administrators).
2 Insert the CD-ROM into the
computer, then click [USB Driver] when the install menu screen appears.
2
Your computer restarts. Now, you can establish a USB connection.
Remove the CD-ROM when the installation is completed.
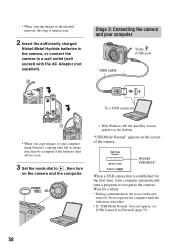
Stage 2: Preparing the camera and the computer
1 Insert a "Memory Stick...
Operating Instructions - Page 58
... to your computer using batteries, copying may fail or image data may be corrupted if the batteries shut off too soon.
3 Set the mode dial to , then turn
on the camera and the computer.
• With Windows XP, the AutoPlay wizard appears on the desktop.
"USB Mode Normal" appears on the screen of the camera.
USB Mode Normal
Memory Stick Switch...
Operating Instructions - Page 64
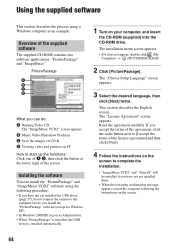
... yet installed the USB driver
(page 57), do not connect the camera to the computer before you install the "PicturePackage" software (except for Windows XP). • In Windows 2000/XP, log on as Administrator. • When "PicturePackage" is installed, the USB driver is installed automatically.
1 Turn on your computer, and insert
the CD-ROM (supplied) into the CD-ROM drive.
The installation menu...
Operating Instructions - Page 65
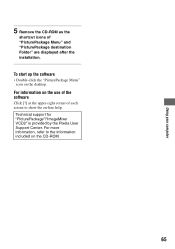
Using your computer
5 Remove the CD-ROM as the
shortcut icons of "PicturePackage Menu" and "PicturePackage destination Folder" are displayed after the installation.
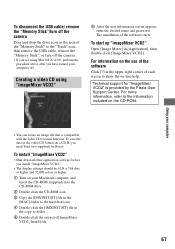
To start up the software
• Double-click the "PicturePackage Menu" icon on the desktop.
For information on the use of the software
Click [?] at the upper-right corner of each screen to show the...
Operating Instructions - Page 66
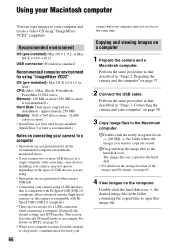
...-installed): Mac OS 9.1, 9.2, or Mac OS X (v10.0-v10.3)
USB connector: Provided as standard
Recommended computer environment for using "ImageMixer VCD2"
OS (pre-installed): Mac OS X (v10.1.5 or later)
CPU: iMac, eMac, iBook, PowerBook, PowerMac G3/G4 series
Memory: 128 MB or more (256 MB or more is recommended.)
Hard Disk: Disk space required for installation - approximately 250 MB
Display: 1024...
Operating Instructions - Page 67
..., then remove the USB cable, remove the "Memory Stick", or turn off the camera. • If you are using Mac OS X v10.0, perform the
procedure above after you have turned your computer off.
Creating a video CD using "ImageMixer VCD2"
6 After the user information screen appears, enter the desired name and password. The installation of the software starts.
To start...
Operating Instructions - Page 81
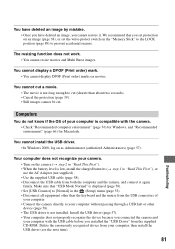
...Normal" is displayed (page 58). • Set [USB Connect] to [Normal] in the (Setup) menu (page 53). • Disconnect all equipment other than the keyboard and the mouse from the USB connectors of your computer. • Connect the camera directly to your computer without passing through a USB hub or other device (page 58). • The USB driver is not installed. Install the USB driver (page 57...
Operating Instructions - Page 82
...[My Computer] to display the menu, then click [Properties]. The "System Properties" screen appears. 2 Click [Hardware] t [Device Manager]. • For Windows 98/98SE/Me, click the [Device Manager] tab. The "Device Manager" appears. 3 Right-click [ Sony DSC], then click [Uninstall] t [OK]. The device is deleted. 4 Install the USB driver (page 57).
You cannot copy images. • Connect the camera...
Operating Instructions - Page 96
...Set 54 Cloudy 33 Color 12 Compression ratio 14 Computer Copying images 57 Macintosh 66 Recommended environment 56, 66 Software 64 Viewing image stored on a computer with your camera 63 Windows 55 Connecting Computer 58 Printer 70 TV 74 Contrast 36 Copy 51 Copying images to your computer... destination ....... 62 Fine 33 Flash 33 Flash Level 35 Flash mode
t step 5 in "Read This...
Operating Instructions - Page 98
... LCD Backlight 52 Self-diagnosis display...........86 Self-timer t step 5 in "Read This First" Sepia 36 Setting the clock t step 2 in "Read This First" Setup 36, 43, 44 Camera 1 45 Camera 2 48 Internal Memory Tool ...49 Memory Stick Tool .......50 Setup 1 52 Setup 2 53 Setup 1 52 Setup 2 53 Sharpness 36 Shooting Movie t step 5 in "Read This First" Still image
98
t step 5 in...
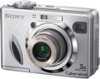
Marketing Specifications - Page 2
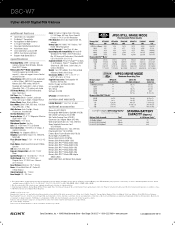
DSC-W7
Cyber-shot® Digital Still Camera
additional features
s Conversion Lens Compatible s PictBridge™ Compatibility s Rechargeable AA NiMH Batteries s 3:2 Aspect Ratio Mode s Adjustable Color Saturation/Contrast s Audio/Video Output s Clear Color/Clear Luminance NR s MPEG1 Cue, Review and Divide s Supports High Speed USB 2.02
specifications
Recording Media: 32MB1 internal flash memory...