TRENDnet TIM-128 driver and firmware

Related TRENDnet TIM-128 Manual Pages
Download the free PDF manual for TRENDnet TIM-128 and other TRENDnet manuals at ManualOwl.com
Manual - Page 2
... supports, mobile experts may enjoy the mobile communication across the world and the high speed digital service.
System Requirements
ƒ Pentium 75 or above
ƒ At least 30MB free hard disk space
ƒ At least 16MB RAM
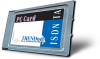
ƒ PCMCIA Type II/III slot
ƒ PCMCIA Card Services and Socket Services v.2.1 or higher pre-installed
ƒ Windows 95/98/2000 or Windows NT pre-installed...
Manual - Page 3
... 1 B-channel 128/112 Kbps on 2 B-channel (PPP/MP) 64/56Kbps on 1 B-channel 16Kbps on D-channel
ISDN Network & Switch Compatibility National ISDN-1 (NI-1) AT&T 5ESS Custom Northen Telecom DMS-100 Custom DSS1 (Euro-ISDN) INS-Net 64 Application Program Interface Supported VCOMM WinISDN CAPI 2.0 NDIS WAN Operating System Supported Windows 95 and OSR2 Windows 98 Windows 2000 Windows NT...
Manual - Page 5
... the software installation is completed.
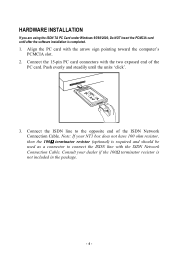
1. Align the PC card with the arrow sign pointing toward the computer's PCMCIA slot.
2. Connect the 15-pin PC card connectors with the two exposed end of the PC card. Push evenly and steadily until the units 'click'.
3. Connect the ISDN line to the opposite end of the ISDN Network Connection Cable. Note...
Manual - Page 7
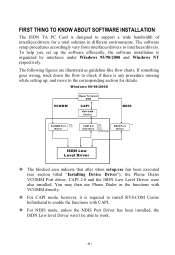
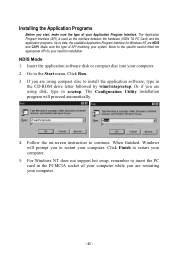
FIRST THING TO KNOW ABOUT SOFTWARE INSTALLATION
The ISDN TA PC Card is designed to support a wide bandwidth of interfaces/drivers for a total solution in different environments. The software setup procedures accordingly vary from interfaces/drivers to interfaces/drivers. To help you set up the software efficiently, the software installation is organized by interfaces under Windows 95/98/2000 and ...
Manual - Page 8
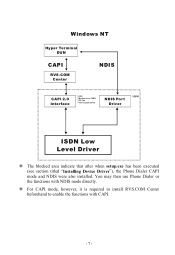
Windows NT
Hyper Terminal DUN
CAPI
RVS-COM Center
NDIS
CAPI 2.0 Interface
* PPP * Modem over ISDN * G3 Fax * Voice application
NDIS Por t Driver
* PPP
ISDN Low Level Driver
™ The blocked area indicate that after when setup.exe has been executed (see section titled "Installing Device Driver"), the Phone Dialer CAPI mode and NDIS were also installed. You may then use Phone Dialer...
Manual - Page 9
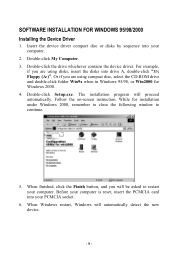
...-click My Computer. 3. Double-click the drive whichever contains the device driver. For example,
if you are using disks, insert the disks into drive A, double-click "3½ Floppy (A:)". Or if you are using compact disc, select the CD-ROM drive and double-click folder Win9x when in Windows 95/98, or Win2000 for Windows 2000. 4. Double-click Setup.exe. The installation program will...
Manual - Page 10
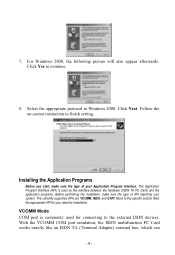
.... The currently supported APIs are VCOMM, NDIS, and CAPI. Move to the specific section titled the appropriate API for your need for installation.
VCOMM Mode COM port is commonly used for connecting to the external ISDN devices. With the VCOMM COM port emulation, the ISDN multifunction PC Card works exactly like an ISDN TA (Terminal Adapter) external...
Manual - Page 11
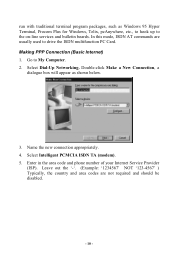
... program packages, such as Windows 95 Hyper Terminal, Procom Plus for Windows, Telix, pcAnywhere, etc., to hook up to the on-line services and bulletin boards. In this mode, ISDN AT commands are usually used to drive the ISDN multifunction PC Card. Making PPP Connection (Basic Internet) 1. Go to My Computer. 2. Select Dial-Up Networking. Double-click Make a New...
Manual - Page 12
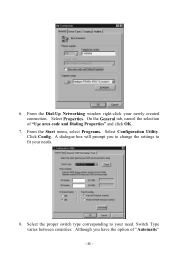
6. From the Dial-Up Networking window right-click your newly created connection. Select Properties. On the General tab, cancel the selection of "Use area code and Dialing Properties" and click OK.
7. From the Start menu, select Programs. Select Configuration Utility. Click Config. A dialogue box will prompt you to change the settings to fit your...
Manual - Page 13
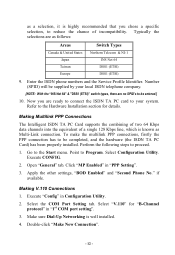
..." tab. Click "MP Enabled" in "PPP Setting".
3. Apply the other settings, "BOD Enabled" and "Second Phone No." if available.
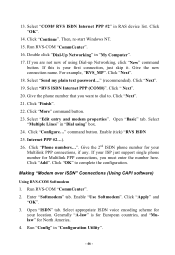
Making V.110 Connections 1. Execute "Config" in Configuration Utility. 2. Select the COM Port Setting tab. Select "V.110" for "B-Channel
protocol" in "1st COM port setting". 3. Make sure Dial-Up Networking is well installed. 4. Double-click "Make New Connection".
- 12...
Manual - Page 14
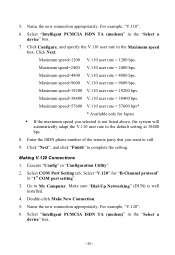
... "Config" in "Configuration Utility". 2. Select COM Port Setting tab. Select "V.120" for "B-Channel protocol"
in "1st COM port setting". 3. Go to My Computer. Make sure "Dial-Up Networking" (DUN) is well
installed. 4. Double-click Make New Connection. 5. Name the new connection appropriately. For example, "V.120". 6. Select "Intelligent PCMCIA ISDN TA (modem)" in the "Select a
device" box.
- 13 -
Manual - Page 34
... installed when the device driver is installed onto your system, your may just skip the following procedures. 1. Make sure ISDN Accelerator Pack is pre-installed, and the PC Card is
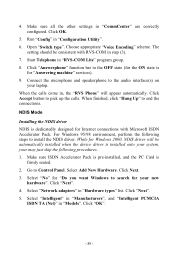
firmly seated. 2. Go to Control Panel. Select Add New Hardware. Click Next. 3. Select "No" for "Do you want Windows to search for your new
hardware". Click "Next". 4. Select "Network adapters...
Manual - Page 35
... ISDN "Switch protocol". Click "Next". (The
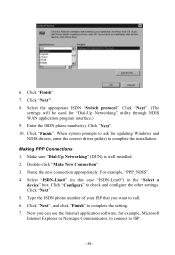
settings will be used for "Dial-Up Networking" utility through NDIS WAN application program interface.) 9. Enter the ISDN phone number(s). Click "Next". 10. Click "Finish". When system prompts to ask for updating Windows and NDIS drivers, enter the correct driver path(s) to complete the installation.
Making PPP Connections 1. Make sure "Dial-Up...
Manual - Page 38

SOFTWARE INSTALLATION FOR WINDOWS NT4.X Installing the Device Driver
1. Go to Control Panel. (You may go to the Start menu, select Setting to open the Control Panel folder.)
2. Select Network. A Network dialog box will appear as illustrated below.
3. Select Adapter tab. Click Add.... 4. The following dialog box will appear. Click Have Disk... and click OK
to continue.
- 37 -
Manual - Page 39
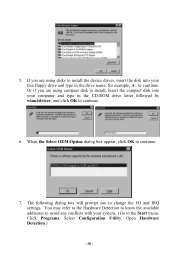
5. If you are using disks to install the device driver, insert the disk into your free floppy drive and type in the drive name, for example, A:, to continue. Or if you are using compact disk to install, insert the compact disk into your computer and type in the CD-ROM drive letter followed by winnt\driver, and click OK to continue.
6. When the Select OEM...
Manual - Page 42
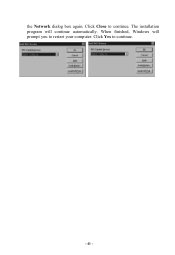
the Network dialog box again. Click Close to continue. The installation program will continue automatically. When finished, Windows will prompt you to restart your computer. Click Yes to continue.
- 41 -
Manual - Page 43
... the application software, type in
the CD-ROM drive letter followed by winnt\ntap\setup. Or if you are using disk, type in a:setup. The Configuration Utility installation program will proceed automatically.
4. Follow the on-screen instruction to continue. When finished. Windows will prompt you to restart your computer. Click Finish to restart your computer.
5. For Windows NT does not support hot...
Manual - Page 45
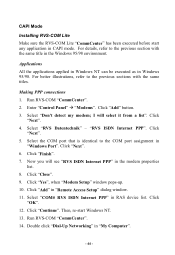
... ISDN Internet PPP" in the modem properties
list. 8. Click "Close". 9. Click "Yes", when "Modem Setup" window pops-up. 10. Click "Add" in "Remote Access Setup" dialog window. 11. Select "COM# RVS ISDN Internet PPP" in RAS device list. Click
"OK". 12. Click "Continue". Then, re-start Windows NT. 13. Run RVS-COM "CommCenter". 14. Double click "Dial-Up Networking" in "My Computer".
- 44...
Manual - Page 47
13. Select "COM# RVS ISDN Internet PPP #2" in RAS device list. Click "OK".
14. Click "Continue". Then, re-start Windows NT. 15. Run RVS-COM "CommCenter". 16. Double click "Dial-Up Networking" in "My Computer". 17. If you are not new of using Dial-up Networking, click "New" command
button. If this is your first connection, just...
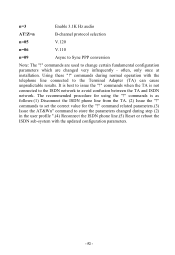
Manual - Page 53
...infrequently - often, only once at installation. Using these "!" commands during normal operation with the telephone line connected to the Terminal Adapter (TA) can cause unpredictable results...network to avoid confusion between the TA and ISDN network. The recommended procedure for using the "!" commands is as follows:(1) Disconnect the ISDN phone line from the TA. (2) Issue the "!" commands to set...