ZyXEL P-304 driver and firmware


Related ZyXEL P-304 Manual Pages
Download the free PDF manual for ZyXEL P-304 and other ZyXEL manuals at ManualOwl.com
User Guide - Page 2
... 304 Broadband Sharing Gateway with 4-Port Switch
Copyright
Copyright © 2001 by ZyXEL Communications Corporation.
The contents of this publication may not be reproduced in any part or as a whole, transcribed, stored in a retrieval system, translated into any language, or transmitted in any form or by any means, electronic, mechanical, magnetic, optical, chemical, photocopying, manual...
User Guide - Page 3

... environment. This equipment generates, uses, and can radiate radio frequency energy, and if not installed and used in accordance with the instructions, may cause harmful interference to radio communications. If this equipment does cause harmful interference to radio/television reception, which can be determined by turning the equipment off and on, the user...
User Guide - Page 4
Prestige 304 Broadband Sharing Gateway with 4-Port Switch
Information for Canadian Users
The Industry Canada label identifies certified equipment. This certification means that the equipment meets certain telecommunications network protective operation and safety requirements. The Industry Canada label does not guarantee that the equipment will operate to a user's satisfaction.
Before installing ...
User Guide - Page 9

... Route Setup ...5-8 5.6 The Parental Control Screen...5-8 5.6.1 Tabs in the Parental Control Screen 5-9 5.6.2 E-mail...5-9 5.6.3 Keyword...5-9 5.6.4 Schedule ...5-9 5.6.5 Trusted ...5-9 5.6.6 Logs...5-9 CHAPTER 6 THE MAINTENANCE SCREENS 6-1 6.1 Introduction ...6-1 6.2 The System Status Screen...6-1 6.2.1 System Status ...6-1 6.3 The DHCP Table Screen ...6-1 6.4 The F/W (Firmware) Upgrade Screen...
User Guide - Page 14

... with cable/xDSL modems using an Ethernet port to access the Internet.
Your Prestige 304 is easy to install and to configure. The embedded web configurator is a convenient platform-independent GUI (Graphical User Interface) that allows you to access the Prestige's management settings. Use the web configurator for actual configuration of your Prestige.
About This User's Guide
This user's guide...
User Guide - Page 19

... FTP and TFTP servers enable fast firmware upgrades as well as configuration file backups and restoration.
1.3 Broadband Internet Access via Cable or DSL Modem
A cable modem or DSL modem can be connected to the Prestige WAN 10M Ethernet port and up to four computers can be connected to the Prestige LAN 10/100M Ethernet ports for super-fast broadband Internet access. The Prestige provides not...
User Guide - Page 25
... configurations. The following are Prestige factory defaults. • IP address: 192.168.1.1 • Password: 1234
2.5.1 Procedure To Use The RESET Button
Step 1. Use a pen or pointed object to press the RESET button for 5-10 seconds, then release it. Step 2. If the LAN LEDs flash within 30 seconds, the factory defaults have been restored and...
User Guide - Page 30
... 304 Broadband Sharing Gateway with 4-Port Switch
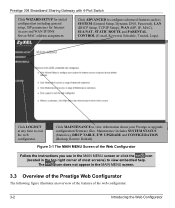
Click WIZARD SETUP for initial configuration including general setup, ISP parameters for Internet Access and WAN IP/DNS Server/MAC address assignment.
Click ADVANCED to configure advanced features such as SYSTEM (General Setup, Dynamic DNS, Password), LAN (DHCP Setup, TCP/IP Setup), WAN (ISP, IP, MAC), SUA/NAT, STATIC ROUTE and PARENTAL CONTROL...
User Guide - Page 34

... computers), the computers on the LAN do not need PPPoE software installed, since the Prestige does that part of the task. Furthermore, with NAT, all of the LAN's computers will have access. For more information on PPPoE, please refer to the PPPoE Appendix.
4.3 Wizard Setup - Screen 3
4.3.1 WAN IP Address Assignment
Every computer on the Internet must have a unique IP address. If your networks...
User Guide - Page 47

... here relates to your DHCP status. The DHCP table shows current DHCP Client information (including IP Address, Host name and MAC Address) of all network clients using the DHCP server.
6.4 The F/W (Firmware) Upgrade Screen
Follow the instructions in this screen to upload firmware to your Prestige.
6.5 The Configuration Screen
Backup, Restore and Default are tabs located in the...
User Guide - Page 52
... Gateway with 4-Port Switch
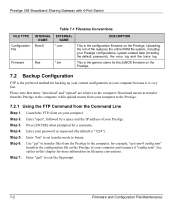
Table 7-1 Filename Conventions
FILE TYPE Configuration File
Firmware
INTERNAL NAME
Rom-0
EXTERNAL NAME
*.rom
Ras
*.bin
DESCRIPTION
This is the configuration filename on the Prestige. Uploading the rom-0 file replaces the entire ROM file system, including your Prestige configurations, system-related data (including the default password), the error log and the...
User Guide - Page 53
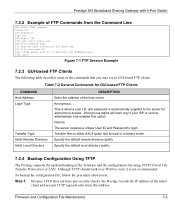
... supports the up/downloading of the firmware and the configuration file using TFTP (Trivial File Transfer Protocol) over LAN. Although TFTP should work over WAN as well, it is not recommended.
To backup the configuration file, follow the procedure shown next.
Step 1. Because TFTP does not have any security checks, the Prestige records the IP address...
User Guide - Page 76

Prestige 304 Broadband Sharing Gateway with 4-Port Switch
PSTN
Q R ras RFC
RIP Rom-0 Router
S SNMP Static Routing
STP
Public Switched Telephone Network was put into place many years ago as a voice telephone call-switching system. The system transmits voice calls as analog signals across copper twisted cables from homes and businesses to neighborhood COs (central offices); this...
User Guide - Page 80

... with 4-Port Switch
DSL Modem 1-3 Dynamic DNS 5-1
Limitations 5-1 Dynamic DNS Support 1-2 Dynamic Service Selection 4-2 DYNDNS Wildcard 5-1 E Embedded FTP and TFTP Servers 1-3 Embedded Help (web configurator 3-2 Encapsulation Choices 4-1 Ethernet 4-1 Example of FTP Commands from the Command
Line 7-3 External Hub 2-3 F Factory Defaults 2-5, 6-2
Password 3-1 Factory LAN Defaults...
User Guide - Page 83

... Uploading a Firmware File 7-6 Using CI Commands 2-6 Using FTP/TFTP 2-5 Using the FTP Command from the Command
Line 7-2 Using the Web Configurator 2-5 W WAN 10M Port 2-3 WAN IP Address Assignment 4-2 WAN Parameters 5-3
WAN Setup 4-4 Warranty v web configuratorxiv, 1-1, 1-3, 2-5, III, 3-1, 5-3, 6-
1, 7-1 Accessing the 3-1 Advanced Screens in the 5-1 Backup 6-2 Default 6-2 F/W Upgrade...
Quick Start Guide - Page 6
... your computer, if you do, you will not be able to access the
Internet.
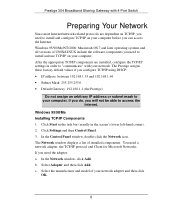
Windows 95/98/Me Installing TCP/IP Components 1. Click Start in the task bar (usually in the screen's lower left-hand corner). 2. Click Settings and then Control Panel. 3. In the Control Panel window, double-click the Network icon. The Network window displays a list of installed components. You need a network adapter, the...
Quick Start Guide - Page 7

... WINS Resolution. 4. Click the Gateway tab. Highlight any installed gateways and click the
Remove button until there are none listed. 5. Click the DNS Configuration tab and select Disable DNS. 6. Click OK to save and close the TCP/IP Properties window. 7. Click OK to close the Network window. Insert the Windows CD if
prompted. 8. When the drivers are updated...
Quick Start Guide - Page 8

... OK. The IP Configuration window opens and lists information such as your computer's IP address, subnet mask and default gateway. 3. Select your network adapter. 4. When using DHCP, the default TCP/IP values assigned by the Prestige (shown earlier) are now displayed. Windows NT/2000 Installing TCP/IP Components TCP/IP should already be installed on Windows NT and 2000 systems...
Quick Start Guide - Page 9

... DNS addresses. Click Remove until there
are none listed. 10. Click OK to save and close the Advanced TCP/IP Settings window. 11. Click OK to close the Internet Protocol (TCP/IP) Properties window.
Restart your computer if prompted, making sure that your Prestige is turned on first. Configuring Static TCP/IP Properties 1. In the Network and...
Quick Start Guide - Page 12

...) for online HTML help.
Click WIZARD SETUP for initial configuration.
Click ADVANCED for further configuration and setting up advanced features.
Click MAINTENANCE to view information about your Prestige or upgrade configuration or firmware files.
Click LOGOUT at any time to exit the web configurator.
If you forget your password, refer to the previous RESET Button...