Brother International 3034D driver and firmware
Drivers and firmware downloads for this Brother International item

Related Brother International 3034D Manual Pages
Download the free PDF manual for Brother International 3034D and other Brother International manuals at ManualOwl.com
Users Manual - English and Spanish - Page 2
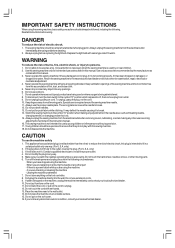
...when making any other user servicing adjustments mentioned in the instruction manual. 16. This sewing machine ... still does not fit. Contact a qualified electrician to install the proper outlet. 4. Do not modify the plug ... any other part - If there is a power failure while you are using the machine - ... 7. Do not store anything on the foot controller. 8. Fully plug the machine directly into the...
Users Manual - English and Spanish - Page 5

...
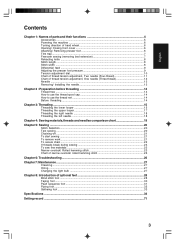
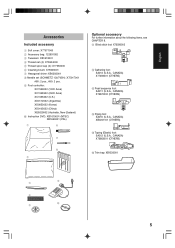
Chapter 1: Names of parts and their functions 4 Accessories ...5 Powering the machine ...6 Turning direction of hand wheel 6 Opening/ Closing... 11 Chart of thread tension adjustment, One needle (Three-thread 12 Needle ...13 Removing/ Installing the needle 13
Chapter 2 : Preparation before threading 14 Thread tree ...14 How to use...Gatheing foot ...33
Specifications ...34
Setting record ...71
3
Users Manual - English and Spanish - Page 6

... 2 Thread plate 3 Presser foot pressure adjustment screw 4 Spool pin 5 Spool support 6 Thread take-up cover 7 Needles 8 Bed extension 9 Presser foot 0... G Main power and light switch H Stitch... front cover L Thread guide M Lower looper threading ...set, : Stitch finger (when removed, see CHAPTER 5 "Narrow overlock/ Rolled hemming stitch"), : Tweezers, : Hexagonal driver
* Air openings (on the side and ...
Users Manual - English and Spanish - Page 7

...brush: X75906001 7 Hexagonal driver: XB0393001 8 Needle set (SCHMETZ 130/705H): X75917001
#80: 2 pcs., #90: 2 pcs. 9 Foot controller:
XC7359022 (120V Area)... XC7438322 (230V Area) XC7456322 (U.K.) XD0112022 (Argentina) XD0852022 (Korea) XD0105022 (China) XE0629002 (Australia, New Zealand) 0 Instruction...
Users Manual - English and Spanish - Page 9

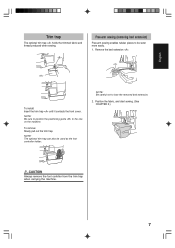
...more easily. 1. Remove the bed extension .
To install: Insert the trim trap until it contacts the front cover.
NOTE: Be sure to position the positioning guide to the one on the machine.
To remove: Slowly... pull out the trim trap.
NOTE: The optional trim trap can also be used as the foot controller holder.
NOTE: Be ...
Users Manual - English and Spanish - Page 15

... the line on the machine. (See CHAPTER 1 "Turning direction of hand wheel".)
3. Loosen the corresponding needle set screw with turning the included hexagonal driver toward 2 in the figure, and remove the needle.
To install: 1. Turn the main power and light switch to the
OFF position.
2. Turn the hand wheel so that the line on...
Users Manual - English and Spanish - Page 25

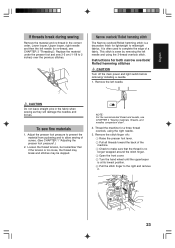
... of a fabric. This stitch is sewn by removing the left needle and using the 3-thread overlock stitch.
Instructions for both narrow overlock/ Rolled hemming stitches
CAUTION
Turn off the main power and light switch before removing/ installing a needle.
1. Remove the left needle.
CAUTION Do not leave straight pins in the fabric when sewing...
Users Manual - English and Spanish - Page 26

Storage for the stitch finger is provided on the inside of the front cover.
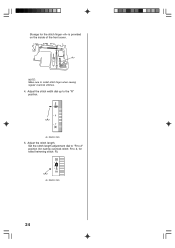
NOTE: Make sure to install stitch finger when sewing regular overlock stitches. 4. Adjust the stitch width dial up to the "R" position.
Selection mark
5. Adjust the stitch length. Set the stitch length adjustment dial to "R to 2" position (for narrow overlock stitch...
Users Manual - English and Spanish - Page 28

...Trouble 1. Does not feed
Cause Presser foot pressure too loose
Remedy
Turn the pressure adjustment screw clockwise to increase the presser foot pressure. (See page 9.)
2. Needles break
1. Needles bent, or needle tip blunt Replace with new needle. (See page 13.)
2. Needles incorrectly installed
Install... (See page 13.)
2. Needle incorrectly installed
Install needle correctly. (See page 13.)
...
User Manual - French - Page 2

...when making any other user servicing adjustments mentioned in the instruction manual. 16. This sewing machine ... still does not fit. Contact a qualified electrician to install the proper outlet. 4. Do not modify the plug ... any other part - If there is a power failure while you are using the machine - ... 7. Do not store anything on the foot controller. 8. Fully plug the machine directly into the...
User Manual - French - Page 5
...
Chapter 1: Names of parts and their functions 4 Accessories ...5 Powering the machine ...6 Turning direction of hand wheel 6 Opening/ Closing... 11 Chart of thread tension adjustment, One needle (Three-thread 12 Needle ...13 Removing/ Installing the needle 13
Chapter 2 : Preparation before threading 14 Thread tree ...14 How to use...Gatheing foot ...33
Specifications ...34
Setting record ...71
3
User Manual - French - Page 6
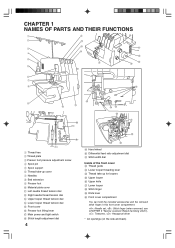
... 2 Thread plate 3 Presser foot pressure adjustment screw 4 Spool pin 5 Spool support 6 Thread take-up cover 7 Needles 8 Bed extension 9 Presser foot 0... G Main power and light switch H Stitch... front cover L Thread guide M Lower looper threading ...set, : Stitch finger (when removed, see CHAPTER 5 "Narrow overlock/ Rolled hemming stitch"), : Tweezers, : Hexagonal driver
* Air openings (on the side and ...
User Manual - French - Page 7
...brush: X75906001 7 Hexagonal driver: XB0393001 8 Needle set (SCHMETZ 130/705H): X75917001
#80: 2 pcs., #90: 2 pcs. 9 Foot controller:
XC7359022 (120V Area)... XC7438322 (230V Area) XC7456322 (U.K.) XD0112022 (Argentina) XD0852022 (Korea) XD0105022 (China) XE0629002 (Australia, New Zealand) 0 Instruction...
User Manual - French - Page 9
...more easily. 1. Remove the bed extension .
To install: Insert the trim trap until it contacts the front cover.
NOTE: Be sure to position the positioning guide to the one on the machine.
To remove: Slowly... pull out the trim trap.
NOTE: The optional trim trap can also be used as the foot controller holder.
NOTE: Be ...
User Manual - French - Page 15

... the line on the machine. (See CHAPTER 1 "Turning direction of hand wheel".)
3. Loosen the corresponding needle set screw with turning the included hexagonal driver toward 2 in the figure, and remove the needle.
To install: 1. Turn the main power and light switch to the
OFF position.
2. Turn the hand wheel so that the line on...
User Manual - French - Page 25
... of a fabric. This stitch is sewn by removing the left needle and using the 3-thread overlock stitch.
Instructions for both narrow overlock/ Rolled hemming stitches
CAUTION
Turn off the main power and light switch before removing/ installing a needle.
1. Remove the left needle.
CAUTION Do not leave straight pins in the fabric when sewing...
User Manual - French - Page 26
Storage for the stitch finger is provided on the inside of the front cover.
NOTE: Make sure to install stitch finger when sewing regular overlock stitches. 4. Adjust the stitch width dial up to the "R" position.
Selection mark
5. Adjust the stitch length. Set the stitch length adjustment dial to "R to 2" position (for narrow overlock stitch...
User Manual - French - Page 28

...Trouble 1. Does not feed
Cause Presser foot pressure too loose
Remedy
Turn the pressure adjustment screw clockwise to increase the presser foot pressure. (See page 9.)
2. Needles break
1. Needles bent, or needle tip blunt Replace with new needle. (See page 13.)
2. Needles incorrectly installed
Install... (See page 13.)
2. Needle incorrectly installed
Install needle correctly. (See page 13.)
...