Epson MX-80 - Impact Printer driver and firmware

Related Epson MX-80 Manual Pages
Download the free PDF manual for Epson MX-80 and other Epson manuals at ManualOwl.com
Operation Manual - Page 2
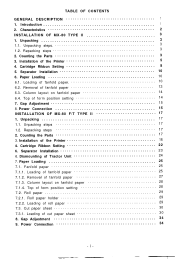
... steps 3 2. Counting the Parts 3 3. Installation of the Printer 5 4. Cartridge Ribbon Setting 8 5. Separator Installation 10 6. Paper Loading 10 6.1. Loading of fanfold paper 10 6.2. Removal of fanfold paper 13 6.3. Column layout on fanfold paper 14 6.4. Top of form position setting 14 7. Gap Adjustment 15 8. Power Connection 15 INSTALLATION OF MX-80 F/T TYPE II 17 1. Unpacking 17...
Operation Manual - Page 4
LIST OF FIGURES
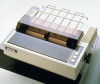
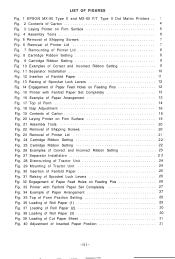
Fig. 1 EPSON MX-80 Type II and MX-80 F/T Type II Dot Matrix Printers ... 1 Fig. 2 Contents of Carton 4 Fig. 3 Laying Printer on Firm Surface 5 Fig. 4 Assembly Tools 6 Fig. 5 Removal of Shipping Screws 7 Fig. 6 Removal of Printer Lid 7 Fig. 7 Remounting of Printer Lid 8 Fig. 8 Cartridge Ribbon Setting 8 Fig. 9 Cartridge Ribbon Setting 9 Fig. 10 Examples of Correct and ...
Operation Manual - Page 5

...Manual Paper Feed Knob 41 Fig. 51 Loosening All 4 Screws 41 Fig. 52 Pulling Out Wires Hooked to Control Panel 42 Fig. 53 Construction of Type II Printer 43 Fig. 54 Location of DIP Switches 4 4 Fig. 55 Setting DIP Switches 4 4 Fig. 56 Setting...Print Head 79
Fig. A1-1 Control Circuit Diagram Fig. A1-2 Driver Circuit Diagram ..... Fig. A2-1 Parallel Interface Timing ........
84 85 89
-iv-
Operation Manual - Page 7
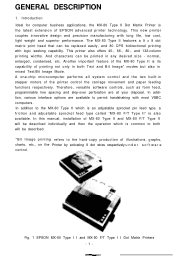
.... In this manual, installation of MX-80 Type II and MX-80 F/T Type II will be described individually and then the operation which is common to both will be described.
*Bit Image printing refers to the hard-copy production of illustrations, graphs, charts, etc., on the Printer by activating 8 dot wires respectively u n d e r s o f t w a r e control.
Fig. 1 EPSON MX-80 Type I I and MX-80 F/T Type...
Operation Manual - Page 8
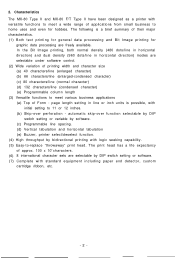
...MX-80 Type II and MX-80 F/T Type II have been designed as a printer...direction) modes are selectable under software control. (2) Wide variation of printing width and character size (a) 40 ...function selectable by DIP
switch setting or variable by software. (c) Programmable line spacing. (d) Vertical tabulation and horizontal tabulation (e) Buzzer, printer select/deselect function. (4) ...
Operation Manual - Page 9
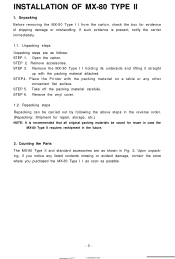
... 2. Remove accessories. STEP 3. Remove the MX-80 Type I I holding its underside and lifting it straight
up with the packing material attached. STEP4. Place the Printer with the packing material on a table or... storage, etc.) NOTE: It is recommended that all original packing materials be saved for reuse in case the
MX-80 Type II requires reshipment in the future.
2. Counting the Parts The MX-80 Type...
Operation Manual - Page 11
...
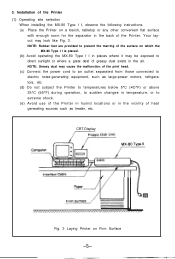
When installing the MX-80 Type I I, observe the following instructions. (a) Place the Printer on a bench, tabletop or any other convenient flat surface
with enough room for the separator in the back of the Printer. Your layout may look like Fig. 3. NOTE: Rubber feet are provided to prevent the marring of the surface on which the
MX-80 Type...
Operation Manual - Page 16
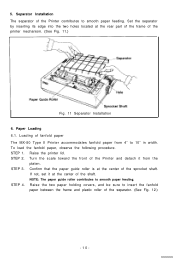
... the Printer contributes to smooth paper feeding. Set the separator by inserting its edge into the two holes located at the rear part of the frame of the printer mechanism. (See Fig. 11.)
Fig. 11 Separator Installation 6. Paper Loading 6.1. Loading of fanfold paper The MX-80 Type II Printer accommodates fanfold paper from 4" to 10" in width. To load the...
Operation Manual - Page 23
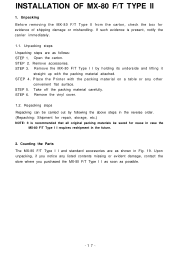
...Remove accessories. STEP 3. Remove the MX-80 F/T Type I I by holding its underside and lifting it
straight up with the packing material attached. STEP 4. Place the Printer with the packing material on a..., storage, etc.) NOTE: It is recommended that all original packing materials be saved for reuse in case the
MX-80 F/T Type I I requires reshipment in the future.
2. Counting the Parts The MX-80 F/T...
Operation Manual - Page 24
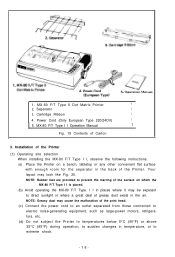
... Type II Dot Matrix Printer
1
2. Separator
1
3. Cartridge Ribbon
1
4. Power Cord (Only European Type 220/24OV)
1
5. MX-80 F/T Type I I Operation Manual
1
Fig. 19 Contents of Carton
3. Installation of the Printer
(1) Operating site selection When installing the MX-80 F/T Type I I, observe the following instructions. (a) Place the Printer on a bench, tabletop or any other convenient flat...
Operation Manual - Page 29
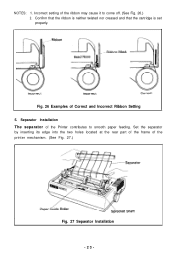
.... 26.) 2. Confirm that the ribbon is neither twisted nor creased and that the cartridge is set properly.
Fig. 26 Examples of Correct and Incorrect Ribbon Setting 5. Separator Installation The separator of the Printer contributes to smooth paper feeding. Set the separator by inserting its edge into the two holes located at the rear part of...
Operation Manual - Page 30
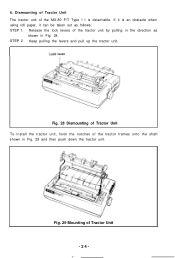
6. Dismounting of Tractor Unit The tractor unit of the MX-80 F/T Type I I is detachable. If it is an obstacle when using roll paper, it can be taken out as follows;... Fig. 28. STEP 2. Keep pulling the levers and pull up the tractor unit.
Fig. 28 Dismounting of Tractor Unit To install the tractor unit, hook the notches of the tractor frames onto the shaft shown in Fig. 29 and then push down the ...
Operation Manual - Page 36
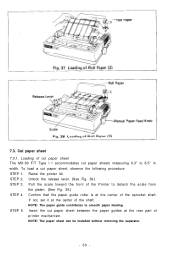
7.3. Cut paper sheet 7.3.1. Loading of cut paper sheet The MX-80 F/T Type I I accommodates cut paper sheets measuring 8.3" to 8.5" in width. To load a cut paper sheet, observe the following procedure. STEP 1. Raise the printer lid. STEP 2. Unlock the release lever. (See Fig. 39.) STEP 3. Pull the scale toward the front of the Printer to detach the scale from...
Operation Manual - Page 38
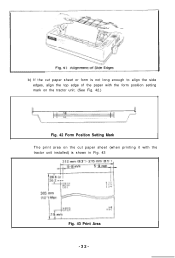
b) If the cut paper sheet or form is not long enough to align the side edges, align the top edge of the paper with the form position setting mark on the tractor unit. (See Fig. 42.)
Fig. 42 Form Position Setting Mark The print area on the cut paper sheet (when printing it with the tractor unit installed) is shown in Fig. 43
Fig. 43 Print Area -32-
Operation Manual - Page 39
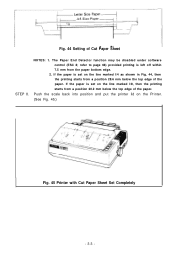
... End Detector function may be disabled under software control (ESC 8; refer to page 66) provided printing is left off within 7.5 mm from the paper bottom edge.
2. If the paper is set on the line marked l/4 as shown ...printing starts from a position 28.6 mm below the top edge of the paper. If the paper is set on the line marked l/8, then the printing starts from a position 30.2 mm below the top edge...
Operation Manual - Page 46
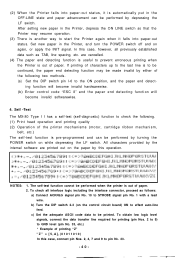
... invalid by either of the following two methods. (a) Set the DIP switch pin l-6 to the ON position, and the paper end detecting function will become invalid hardwarewise. (b) Enter control code "ESC 8" and the paper end detecting function will become invalid softwarewise.
4. Self -Test
The MX-80 Type I I has a self-test (self-diagnostic) function to...
Operation Manual - Page 54
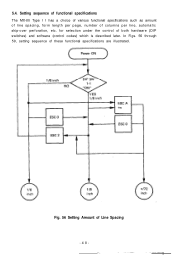
... specifications The MX-80 Type I I has a choice of various functional specifications such as amount of line spacing, form length per page, number of columns per line, automatic skip-over perforation, etc. for selection under the control of both hardware (DIP switches) and software (control codes) which is described later. In Figs. 56 through 59, setting sequence...
Operation Manual - Page 58
...and so on.
•Broadly speaking, the EPSON MX-80 Type I I belongs to the following categories. Impact printer l Dot Matrix printer
•l Serial printer with one line buffer Receive only printer (This printer might be sorted to another category.) The impact printer means that it impacts ribbon with carbon and forms the characters you want. The serial printer means that it cannot print data at...
Operation Manual - Page 62
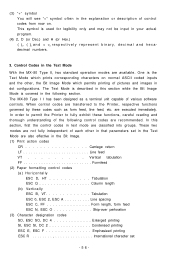
...in the following section. The MX-80 Type I I has been designed as a terminal unit capable of various software controls. When control codes are transferred to the Printer, respective functions governed by ...parameters set in the Text Mode are also effective in the Bit Image. (1) Print action codes
CR Carriage return LF Line feed VT Vertical tabulation FF Formfeed (2) Paper formatting control ...
Operation Manual - Page 88
... 1
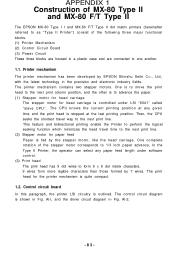
Construction of MX-80 Type II and MX-80 F/T Type II
The EPSON MX-80 Type I I and MX-80 F/T Type II dot matrix printers (hereinafter referred to as "Type II Printer") consist of the following three major functional blocks. (1) Printer Mechanism (2) Control Circuit Board (3) Power Circuit These three blocks are housed in a plastic case and are connected to one another.
1.1. Printer mechanism The...