Sony DCR-PC115 - Digital Video Camera Recorder driver and firmware

Related Sony DCR-PC115 Manual Pages
Download the free PDF manual for Sony DCR-PC115 and other Sony manuals at ManualOwl.com
Operating Instructions - Page 3
... questions about this product, you may call: Sony Customer Information Center 1-800-222SONY (7669) The number below is for the FCC related matters only.
Regulatory Information
Declaration of Conformity
Trade Name:
SONY
Model No.:
DCR-PC120
Responsible Party: Sony Electronics Inc.
Address:
680 Kinderkamack
Road, Oradell,
NJ07649 U.S.A.
Telephone No.:
201-930-6972
This device complies...
Operating Instructions - Page 5
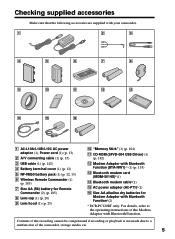
...12, 13) 6 Wireless Remote Commander (1)
(p. 185) 7 Size AA (R6) battery for Remote
Commander (2) (p. 185) 8 Lens cap (1) (p. 20) 9 Lens hood (1) (p. 23)
q; "Memory Stick" (1) (p. 104)
qa CD-ROM (SPVD-004 USB Driver) (1) (p. 142)
qs Modem Adaptor with Bluetooth Function (BTA-NW1) * (1) (p. 155)
qd Bluetooth modem card (MDM-5614G)*(1)
qf Bluetooth modem cable*(1)
qg AC power adaptor (AC-PT1)*(1)
qh...
Operating Instructions - Page 6
... zero set memory function 61
Searching the boundaries of recorded tape by title - Title search 62
Searching a recording by date - Date search 63
Searching for a photo - Photo search/Photo scan 65
Editing
Dubbing a tape 67 Dubbing only desired scenes
- Digital program editing (on tapes 69 Using with analog video unit and your computer - Signal convert function 80 Recording video or TV...
Operating Instructions - Page 8

...Guide
Holding Grip
This chapter introduces you to the basic features of your camcorder. See the page in parentheses "( )" for more information. Pull down the Holding Grip to hold your camcorder as illustrated.
Connecting the power...Insert the cassette in a straight line deeply into the cassette compartment with the window facing out.
3 Close the cassette
compartment by pressing the mark on the ...
Operating Instructions - Page 11
...manual
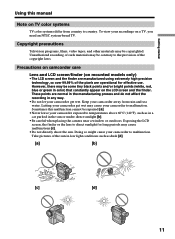
Note on TV color systems
TV color systems differ from country to country. To view your recordings on a TV, you need an NTSC system-based TV.
Copyright precautions
Television programs, films, video tapes, and other materials may be copyrighted. Unauthorized recording...direct sunlight [b].
•Be careful when placing the camera near a window or outdoors. Exposing the LCD screen, the finder...
Operating Instructions - Page 12
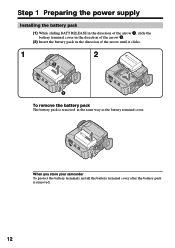
Step 1 Preparing the power supply
Installing the battery pack
(1) While sliding BATT RELEASE in the direction of the arrow 1, slide the battery terminal cover in the direction of the arrow 2....battery pack is removed in the same way as the battery terminal cover.
When you store your camcorder To protect the battery terminals, install the battery terminal cover after the battery pack is removed.
12
Operating Instructions - Page 13
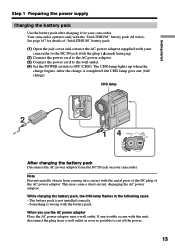
...plug's v mark facing up.
(2) Connect the power cord to the AC power adaptor. (3) Connect the power cord to the wall outlet. (4) Set the POWER switch to OFF (CHG). The CHG lamp lights...flashes in the following cases: - The battery pack is not installed correctly. - Something is wrong with the battery pack.
When you use the AC power adaptor Place the AC power adaptor near a wall outlet. If any trouble...
Operating Instructions - Page 16
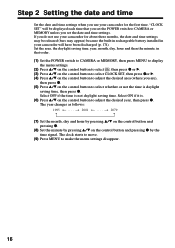
...) because the built-in rechargeable battery installed in your camcorder will have been discharged (p. 174). Set the area, the daylight saving time, year, month, day, hour and then the minute, in that order. (1) Set the POWER switch to CAMERA or MEMORY, then press MENU to display
the menu settings. (2) Press v/V on the control button to select , then press z or...
Operating Instructions - Page 19

...Install the power source.
(2) Slide OPEN/Z EJECT in the direction of the arrow and open the lid.
The cassette compartment automatically lifts up and opens.
(3) Push the middle portion of the back of the cassette to insert.
Insert the cassette in a straight line deeply into the cassette compartment with
the window...cassette with cassette memory Read the instruction about cassette memory to use ...
Operating Instructions - Page 20
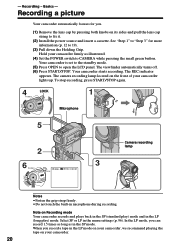
... your camcorder firmly as illustrated.
(4) Set the POWER switch to CAMERA while pressing the small green button. Your camcorder is set to the standby mode.
(5) Press OPEN to open the LCD panel. The viewfinder automatically turns off. (6) Press START/STOP. Your camcorder starts recording. The REC indicator
appears. The camera recording lamp located on the front of...
Operating Instructions - Page 23
... settings when using the battery pack (p. 96).
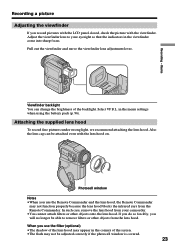
Attaching the supplied lens hood
To record ...fine pictures under strong light, we recommend attaching the lens hood. Also the lens cap can be attached even with the lens hood on.
Photocell window Notes •When you use the Remote Commander and the lens hood, the Remote...flash may not be adjusted correctly if the photocell window is covered.
23
Operating Instructions - Page 31
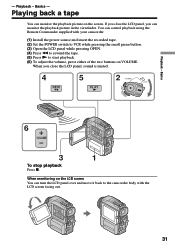
... screen. If you close the LCD panel, you can monitor the playback picture in the viewfinder. You can control playback using the Remote Commander supplied with your camcorder.
(1) Install the power source and insert the recorded tape. (2) Set the POWER switch to VCR while pressing the small green button. (3) Open the LCD panel while pressing OPEN. (4) Press...
Operating Instructions - Page 37
...
phenomenon.
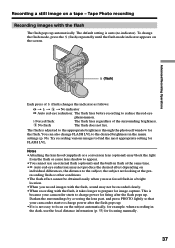
Forced flash:
The flash fires regardless of the surrounding brightness.
No flash:
The flash does not fire.
The flash is adjusted to the appropriate brightness through the photocell window for the flash. You can also change FLASH LVL to the desired brightness in the menu settings (p. 96). Try recording various images to find the most appropriate setting for FLASH LVL.
Notes...
Operating Instructions - Page 80
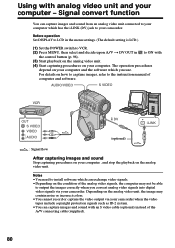
... in to ON with
the control button (p. 96). (3) Start playback on the analog video unit. (4) Start capturing procedures on your computer. The operation procedures
depend on your computer and the software which you use. For details on how to capture images, refer to the instruction manual of computer and software.
AUDIO/VIDEO
S VIDEO
OUT S VIDEO VIDEO
AUDIO
DV (optional)
i.LINK
: Signal flow...
Operating Instructions - Page 141
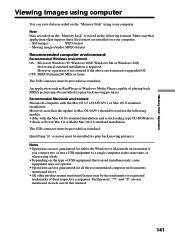
... installation and a slot loading type CD-ROM drive •iBook or Power Mac G4 with the Mac OS 8.6 standard installation
The USB connector must be provided as standard.
QuickTime 3.0 or newer must be installed (to play back moving pictures).
Notes
•Operations are not guaranteed for either the Windows or Macintosh environment if you connect two or more USB equipment to a single computer...
Operating Instructions - Page 142
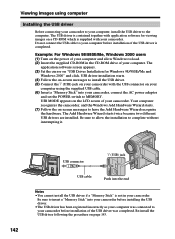
... Do not connect the USB cable to your computer before installation of the USB driver is completed.
Example: For Windows 98/98SE/Me, Windows 2000 users (1) Turn on the power of your computer and allow Windows to load. (2) Insert the supplied CD-ROM in the CD-ROM drive of your computer. The
application software screen appears. (3) Set the cursor on "USB Driver Installation for Windows 98/98SE/Me and...
Operating Instructions - Page 143
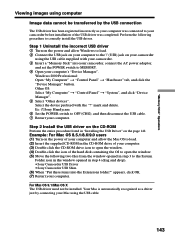
...Control Panel" t "System", and click "Device Manager". 5 Select "Other devices". Select the device prefixed with the "?" mark and delete. Ex: (?)Sony Handycam 6 Set the POWER switch to OFF (CHG), and then disconnect the USB cable. 7 Restart your computer.
Step 2 Install the USB driver on the CD-ROM
Perform the entire procedure listed in "Installing the USB Driver" on the page 142.
Example: For Mac...
Operating Instructions - Page 145

... of the hard disk is not lit.
(2) Drag and drop the "Memory Stick" icon to the Trash or select Eject under the Special menu.
(3) Unplug the USB cable or eject the "Memory Stick."
For Mac OS X users Unplug the USB cable or eject the "Memory Stick" after shutting down your computer.
Notes on using your computer
"Memory Stick"
•"Memory Stick" operations on...
Operating Instructions - Page 161
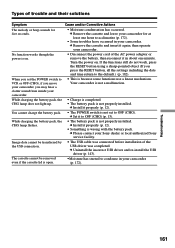
...(p. 12). • The POWER switch is not set to OFF (CHG).
c Set it to OFF (CHG) (p. 13). • The battery pack is not properly installed.
c Install it properly (p. 12). • Something is wrong with the battery pack.
c Please contact your Sony dealer or local authorized Sony service facility.
• The USB cable was connected before installation of the USB driver was completed. c Uninstall...
Operating Instructions - Page 170
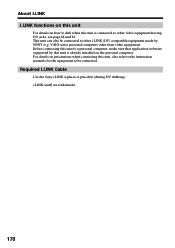
...other i.LINK (DV) compatible equipment made by SONY (e.g. VAIO series personal computer) other than video equipment. Before connecting this unit to a personal computer, make sure that application software supported by this unit is already installed on the personal computer. For details on precautions when connecting this unit, also refer to the instruction manuals for the equipment to be connected...