Brother International BES-941BC driver and firmware
Drivers and firmware downloads for this Brother International item

Related Brother International BES-941BC Manual Pages
Download the free PDF manual for Brother International BES-941BC and other Brother International manuals at ManualOwl.com
Optional Functions Instruction Manual - English - Page 9
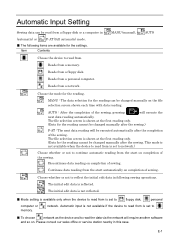
... only when the device to read from is set to
floppy disk,
personal
computer or memory.
network. Automatic input is not available if the device to read from is set to
■ To choose
network as the device and to read the data via the network will require another software
and so on. Please consult our sales office or service station nearby in...
Instruction Manual - English - Page 4
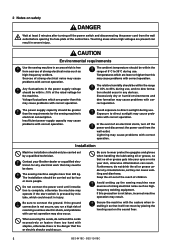
...power switch and disconnecting the power cord from the wall outlet before opening the face plate of the control...power and disconnect the power cord from the wall outlet. Lightning may cause problems with correct operation.
Installation
Machine installation should only be carried out by a qualified technician.
Contact your Brother...the reach of children.
Avoid setting up the sewing machine near ...
Instruction Manual - English - Page 5
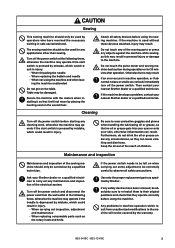
... hook and knife.
If the power switch needs to be left on when carrying out some adjustment, be extremely careful to observe all safety precautions.
Use only the proper replacement parts as specified by Brother.
If any safety devices have been removed, be absolutely sure to re-install them to their original positions and...
Instruction Manual - English - Page 10
... The display is BES-941BC.
Configuration of this manual
This manual consists of the following chapters:
Chapter 1 Preparation of Embroidery Machine This Chapter describes the specifications, installation and ...Embroidering Data Explains how to edit the embroidery data.
Chapter 5 Setting This Chapter describes procedures of setting the machine and working environment.
Chapter 6 Operation of Machine ...
Instruction Manual - English - Page 11

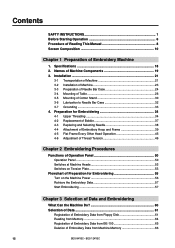
Chapter 9 List of Error Messages Provides information on error codes and action to be taken.
Chapter 10 Troubleshooting Provides troubleshooting for the machine.
Connection and Installation of Optional Equipment Describes connections between the machine/computer and optional equipment available.
BES-941BC • BES-1241BC
9
Instruction Manual - English - Page 14
... Preparation for Embroidering 55 Turn on the Machine Power 56 Retrieve the Embroidery Data 57 Start Embroidering 57
Chapter 3 Selection of Data and Embroidering
What Can the Machine Do 60 Selection of Data 61
Registration of Embroidery Data from Floppy Disk 61 Reading from Memory 64 Registration of Embroidery Data from BE-100...
Instruction Manual - English - Page 17
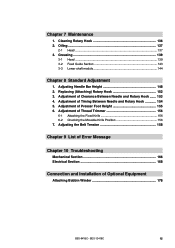
... Oiling 137
2-1 Head ...137 3. Greasing 139
3-1 Head ...139 3-2 Feed Guide Section 143 3-3 Lower shaft module 144
Chapter 8 Standard Adjustment
1. Adjusting Needle Bar... 158
Chapter 9 List of Error Message
Chapter 10 Troubleshooting
Mechanical Section 166 Electrical Section 168
Connection and Installation of Optional Equipment
Attaching Bobbin Winder 178
BES-941BC • BES-1241BC
15
Instruction Manual - English - Page 23
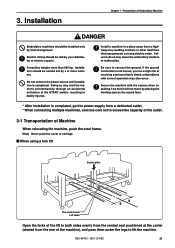
... laid by your distributor or electric experts.
A machine weighs more than 600 kg. Installation should be carried out by 4 or more workers.
Do not connect the power source until installation is completed. Doing so may start the machine unintentionally through an accidental activation of the... the rear of the machine), and pass them under the legs to lift the machine.
BES-941BC • BES-1241BC
21
Instruction Manual - English - Page 25
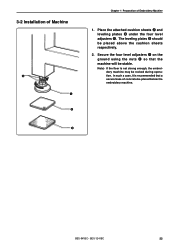
3-2 Installation of Machine
r q e w
Chapter 1 Preparation of Embroidery Machine
1. Place the attached cushion sheets w and leveling plates e under the four level adjusters q. The leveling plates e should be ... embroidery machine may be rocked during operation. In such a case, it is recommended that a secure base of concrete be placed below the embroidery machine.
BES-941BC • BES-1241BC
23
Instruction Manual - English - Page 49
...
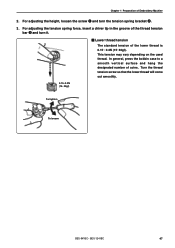
2. For adjusting the height, loosen the screw q and turn the tension spring bracket w. 3. For adjusting the tension spring force, insert a driver tip in the groove of the thread tension
bar e and turn it. Lower thread tension The standard tension of the lower thread is 0.15~...so that the lower thread will come out smoothly.
0.15~0.3N (15~30gf)
To tighten
To loosen
BES-941BC • BES-1241BC
47
Instruction Manual - English - Page 51
Chapter 2
Embroidering Procedures
After installation of machine start embroidering. This chapter explains about the operation panel on the machine as well as precautions for the actual embroidering process.
Instruction Manual - English - Page 54
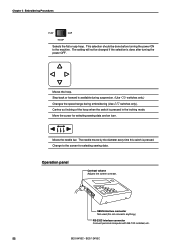
... or cap hoop. This selection should be done before turning the power ON to the machine. The setting will not be changed if the selection is done after turning the power OFF.
Moves the hoop. Step-back or forward is available during... connector Not used (Do not connects anything.)
RS-232C interface connector Connect personal computer with BE-100 installed, etc.
52
BES-941BC • BES-1241BC
Instruction Manual - English - Page 67
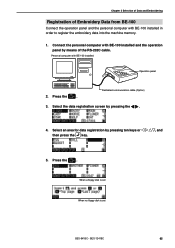
... the RS-232C cable.
Personal computer with BE-100 installed
Operation panel
2. Press the
.
Dedicated communication cable (Option)
3. Select the data registration screen by pressing the
.
4. Select an area for data registration by pressing ten keys or then press the key.
, and
5. Press the
.
When a floppy disk is set
When no floppy disk is set
BES-941BC • BES...
Instruction Manual - English - Page 111
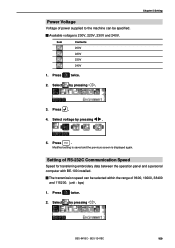
... 240V
1. Press
twice.
2. Select by pressing .
Chapter 5 Setting
3. Press .
4. Select voltage by pressing
.
5. Press END .
Modified setting is saved and the previous screen is displayed again.
Setting of RS-232C Communication Speed
Speed for transferring embroidery data between the operation panel and a personal computer with BE-100 installed.
The transmission speed can be selected within...
Instruction Manual - English - Page 124
Chapter 5 Setting
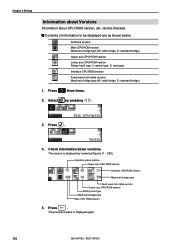
Information about Versions
Information about CPU ROM version, etc. can be checked.
Contents of information to be displayed are as shown below.
Software version Main CPU ROM version Machine's bridge type (W: wide bridge S: standard bridge) Upper axis CPU ROM version Lower axis CPU ROM version Rotary hook type (1: earlier type 2: new type) Interface CPU ROM version Feed wave form ...
Instruction Manual - English - Page 146
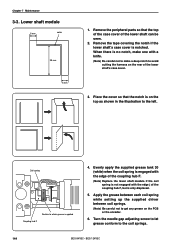
... spring is not engaged with the edge j of the coupling hub F, but is only displaced.
5. Apply the grease between each coil spring while setting up the supplied driver between coil springs.
(Note) Be careful not to get any grease on the PCB or the encoder.
6. Turn the needle gap adjusting screw to...
Instruction Manual - English - Page 147

Chapter 7 Maintenance
7. Turn on the power of the sewing machine and measure the out-of-step limit of the lower shaft module in the test mode.
8. Replace the lower shaft module if it cannot be repaired even if being checked in the test mode.
9. Install the lower shaft's case cover and secure it...
Instruction Manual - English - Page 164
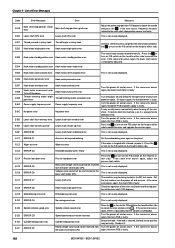
... motor origin point error
Hook motor overcurrent error Thread trimming motor zero point error
Power supply frequency error Power supply frequency error
E-BC No power error
No power error
E-BD Lower shaft flash memory error Lower shaft flash memory error
E-BE Lower shaft version-up error
Lower shaft version-up error
E-BF ERROR BF
Lower shaft motor undefined error
Turn the power off and on...
Instruction Manual - English - Page 168
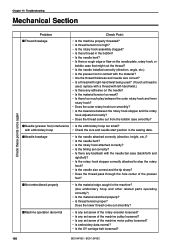
...
bobbin case that might cut the thread? • Is the needle installed correctly (direction, angle, etc.) • Is the presser foot in...8226; Is the rotary hook attached correctly? • Is the timing set correctly? • Is there any backlash with the needle bar case...any set screw of the rotary encoder loosened? • Is any set screw of the machine pulley loosened? • Is any set screw...
Instruction Manual - English - Page 171
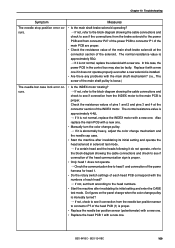
...new one. In this case, the power PCB in the control box may also be faulty. Replace it with a new one if it does not operate properly even after a new solenoid is installed. • Are there any problems...8226; Start the machine after invalidating its initial setting and enter the CASE
test mode. Do figures on the panel change when the color change pulley is manually turned?
If not, check to see if...