Dell Force10 S6000 driver and firmware

Related Dell Force10 S6000 Manual Pages
Download the free PDF manual for Dell Force10 S6000 and other Dell manuals at ManualOwl.com
Installation Guide - Page 3
... Considerations 22 Installing the Dell ReadyRails Switch 23 Configuring a Two-Post Flush-Mount 24 Configuring a Two-Post Center-Mount 25 Configure a Four-Post Thread 26
Installing the S6000 Switch 27 Installing a 1U Front-Rack 27 Attaching the Ground Cable 28 Installing an AC or DC Power Supply 29
Installing QSFP+ Optics 31 Remove QSFP+ Optics 31 Split QSFP+ Ports to SFP+ Ports 31
|3
Installation Guide - Page 4
www.dell.com | support.dell.com
4|
Important Points to Know 31 Power Up the S6000 Switch 32
Power Up Sequence 32
5 Power Supplies
Components 33 Installing an AC or DC Power Supply 34 Replacing an AC or DC Power Supply 35 Connecting a DC Power Supply to the Power Source 35
Removing Power Connector from an S6000 DC Power Supply 36
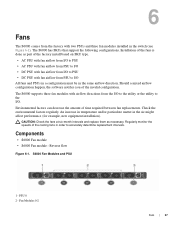
6 Fans
Components 37 Installing a Fan Module 38...
Installation Guide - Page 7
... Notes for the S6000 switch. If you have any questions regarding Dell Networking OS versions and switch upgrades, contact Dell Technical Support. CAUTION: To avoid electrostatic discharge (ESD) damage, wear grounding wrist straps when handling this equipment. WARNING: Only trained and qualified personnel can install this equipment. Read this guide before you install and power up this equipment...
Installation Guide - Page 11
... universal serial bus port (USB Type-A)
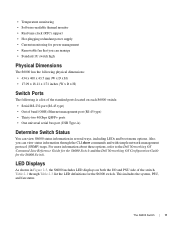
Determine Switch Status
You can view S6000 status information in several ways, including LEDs and boot menu options. Also, you can view status information through the CLI show commands and with simple network management protocol (SNMP) traps. For more information about these options, refer to the Dell Networking OS Command Line Reference Guide...
Installation Guide - Page 14
.../Receive is active.
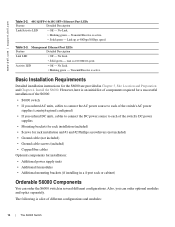
Basic Installation Requirements
Detailed installation instructions for the S6000 are provided in Chapter 3, Site Location and Preparation and Chapter 4, Install the S6000. However, here is an initial list of components required for a successful installation of the S6000:
• S6000 switch • If you ordered AC units, cables to connect the AC power source to each of the...
Installation Guide - Page 17
...; Network telecommunication facilities • Data centers • Other locations where the national electric code (NEC) applies
This chapter contains the following sections regarding where and how you can install the S6000: • Site Selection • Cabinet Placement • Rack Mount • Ground • Fans and Airflow • Power • Storing Components
NOTE: Install the S6000...
Installation Guide - Page 18
.... Ground the equipment rack to the same ground point used by the power service in your area. The ground path must be permanent.
Ground
Use the S6000 in a CBN. Connect the grounding cables as described in Chapter 4, Install the S6000.
Fans and Airflow
The S6000 fans support two airflow options. Be sure to order the fans suitable to...
Installation Guide - Page 19

... the power source.
CAUTION: Always disconnect the power cable before you service the power supply slots. CAUTION: Use the power supply cord as the main disconnect device on the AC system. Make sure that the socket-outlet is located/installed near the equipment and is easily accessible.
Storing Components
If you do not install your S6000 and components immediately, Dell Networking recommends...
Installation Guide - Page 21
... S6000 Switch • Installing a 1U Front-Rack • Attaching the Ground Cable • Installing an AC or DC Power Supply • Installing QSFP+ Optics • Power Up the S6000 Switch
WARNING: ESD damage can occur if components are mishandled. Always wear an ESD-preventive wrist or heel ground strap when handling the S6000 and its components. As with all electrical devices...
Installation Guide - Page 22
www.dell.com | support.dell.com
• If an AC switch, at least one AC power cord (country/region specific) • If a DC switch, at least one DC power cable • Getting Started Guide • Safety and Regulatory Information • Warranty and Support Information • Software License Agreement
Unpacking Steps 1 Place the container on a clean, flat surface and cut all...
Installation Guide - Page 23
... of power strips.
• Do not mount the equipment with the rear panel facing in the downward position.
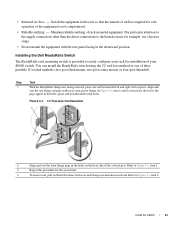
Installing the Dell ReadyRails Switch
The ReadyRails rack mounting switch is provided to easily configure your rack for installation of your S6000 switch. You can install the ...the latch release button on each flange ear and unseat each rail. Refer to Figure 4-1, item 3.
Install the S6000 | 23
Installation Guide - Page 24
...dell.com | support.dell.com
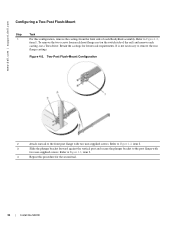
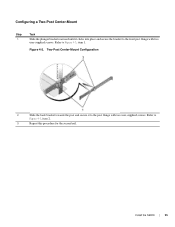
Configuring a Two-Post Flush-Mount
Step
Task
1
For this configuration, remove the castings from the front side of each ReadyRails assembly. Refer to Figure 4-2,
item 1. To remove the two screws from each front flange ear (on the switch side of the rail) and remove each
casting, use a Torx driver...4
Repeat this procedure for the second rail.
24 | Install the S6000
Installation Guide - Page 25
... the post and secure it to the post flange with two user-supplied screws. Refer to
Figure 4-3, item 2.
3
Repeat this procedure for the second rail.
Install the S6000 | 25
Installation Guide - Page 26
www.dell.com | support.dell.com
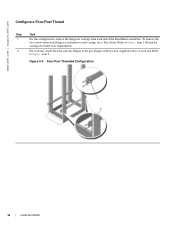
Configure a Four-Post Thread
Step
Task
1
For this configuration, remove the flange ear castings from each end of the ReadyRails assemblies. To remove the
two screws from each flange ear and remove each casting, use a Torx driver. Refer to Figure , item 1. Retain the
castings for future rack requirements.
2
For...
Installation Guide - Page 27
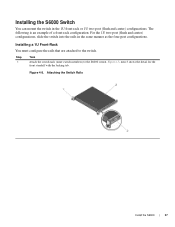
Installing the S6000 Switch
You can mount the switch in the 1U front-rack or 1U two-post (flush and center) configurations. The...the 1U two-post (flush and center) configurations, slide the switch into the rails in the same manner as the four-post configurations.
Installing a 1U Front-Rack You must configure the rails that are attached to the switch.
Step
Task
1
Attach the switch rails (inner ...
Installation Guide - Page 28
www.dell.com | support.dell.com
Step
Task
2
After you have installed both switch rails, line them up on the ...or a workplace.
Figure 4-6. Front Rack Installation
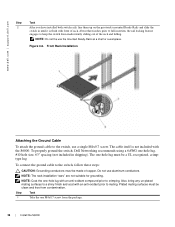
Attaching the Ground Cable
To attach the ground cable to the switch, use a single M4x0.7 screw. The cable itself is not included with the S6000. To properly ground the switch, Dell Networking recommends using a 6AWG one-hole lug...
Installation Guide - Page 37
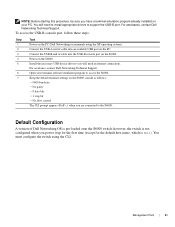
... the same airflow direction. Should a mixed airflow configuration happen, the software notifies you of the invalid configuration.
The S6000 supports three fan modules with airflow directions from the I/O to the utility .../or particulate matter in the air might affect performance (for example, new equipment installation).
CAUTION: Check the fans at six-month intervals and replace them as necessary....
Installation Guide - Page 41
... cable into an available USB port on the PC.
3
Connect the USB-B end of cable into the USB-B console port on the S6000.
4
Power on the S6000.
5
Install the necessary USB device drivers (you will need an internet connection).
For assistance, contact Dell Networking Technical Support.
6
Open your terminal software emulation program to access the S6000.
7
Keep the default terminal settings...
Installation Guide - Page 51
... regarding Dell Networking products, access to software upgrades and patches, and open and manage your technical assistance center (TAC) cases. Dell iSupport provides integrated, secure access to these services.
Accessing iSupport Services
The URL for iSupport is http://support.dell.com/. You must have a userid and password to access iSupport services.
To request a userid and password, follow...
Installation Guide - Page 52
....dell.com | support.dell.com
Contacting the Technical Assistance Center
How to Contact Dell Networking TAC Information to Submit When Opening a Support Case
Managing Your Case Downloading Software Updates Technical Documentation Contact Information
Log in to iSupport at http://support.dell.com/ and select the Service Request tab.
• Your name, company name, phone number, and E-mail address...