Dell PowerEdge 6850 driver and firmware

Related Dell PowerEdge 6850 Manual Pages
Download the free PDF manual for Dell PowerEdge 6850 and other Dell manuals at ManualOwl.com
Upgrade
the BIOS Before Upgrading Your System - Page 1
....
3 Download and flash the latest BIOS version if necessary. See the BIOS download page for instructions on downloading and flashing the BIOS.
4 Install your system upgrade. See "Installing System Components" or "Installing System Options" in the system documentation included on the CDs provided with your system or on support.dell.com. If you are installing a new system board, flash the BIOS again...
Dell OpenManage™ Server Support
Kit Version 4.3 (.pdf) - Page 1
... of available PCI devices on the Dell™ PowerEdge™ 6800 and 6850, the X Window system may not start successfully with the default settings chosen by the Red Hat® installer. To resolve this issue, either change the Driver setting in /etc/X11/XF86Config from radeon to vesa, or update XFree86 to 4.3.0-69 or later through the Red Hat Network.
Information in...
Information Update (.pdf) - Page 1
... 2, 2005 3:20 PM
Information Update
For instructions on installing your Dell™ 2362M Integrated Fibre Channel Module, refer to the PowerEdge™ 6850 Installation and Troubleshooting Guide. Configuration information, drivers, and a list of EMC-approved software are available on support.dell.com.
Using the StorPort Driver with the Microsoft® Windows® Server 2003 Operating System...
Installing the DRAC 4/P (.pdf) - Page 1
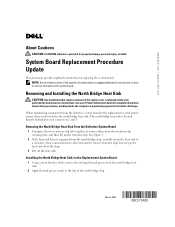
... provides updated information for replacing the system board. NOTE: See the latest version of the system's documentation on support.dell.com for instructions on how to remove and replace the system board.
Removing and Installing the North Bridge Heat Sink
CAUTION: Any installation that requires removal of the system cover is intended solely to be performed by trained service technicians...
Installing the DRAC 4/P (.pdf) - Page 2
...dell.com | support.dell.com
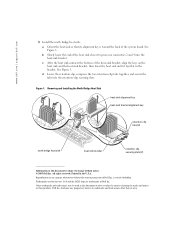
3 Install the north bridge heat sink:
a Orient the heat sink so that its alignment key is toward the back of the system board. See Figure 1.
b Slowly lower the end of the heat sink closest to processor...secure the tabs into the retention-clip securing slots.
Figure 1. Removing and Installing the North Bridge Heat Sink
heat-sink alignment key heat-sink bracket alignment...
Installation and Troubleshooting Guide (.htm) - Page 4
... A NOTE indicates important information that helps you make better use of your computer.
NOTICE: A NOTICE indicates either potential damage to hardware or loss of ...Dell Inc. is strictly forbidden.
Trademarks used in this text: Dell, the DELL logo, RapidRails and VersaRails are trademarks of Dell Inc.; Intel, Pentium and Celeron are registered trademarks of Intel Corporation; Microsoft and Windows...
Installation and Troubleshooting Guide (.htm) - Page 5
... Mounting of Systems 5
Installation Instructions 6 Before You Begin 7 Installation Tasks 8 Recommended Tools and Supplies 8 RapidRails Rack Kit Contents 8 VersaRails Rack Kit Contents 9
Marking the Rack 11 Installing the RapidRails Slide Assemblies 13 Installing the VersaRails Slide Assemblies 15 Installing the System in the Rack 17 Installing the Cable Tray and Cable-Management Arm 19...
Installation and Troubleshooting Guide (.htm) - Page 7

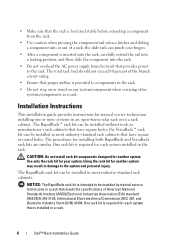
...System rack kits are intended to be installed in an approved rack by trained service technicians. If you install the kit in any other rack, be...Install front and side stabilizers on a single rack or front stabilizers for joined multiple racks before working on the rack.
• Always load the rack from the bottom up, and load the heaviest item in the rack first.
Dell™ Rack Installation Guide...
Installation and Troubleshooting Guide (.htm) - Page 8
... power to the rack. The total rack load should not exceed 80 percent of the branch circuit rating.
• Ensure that proper airflow is provided to components in the rack.
• Do not step on or stand on any system/component when servicing other systems/components in a rack.
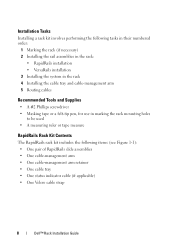
Installation Instructions
This installation guide provides instructions for trained service technicians installing...
Installation and Troubleshooting Guide (.htm) - Page 9
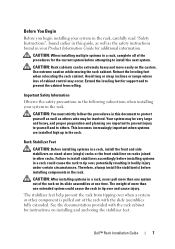
...where loss of cabinet control may occur. Extend the leveling feet for support and to prevent the cabinet from rolling.
Important Safety Information
Observe the safety precautions in the following subsections when installing your system in the...See the documentation provided with the rack cabinet for instructions on installing and anchoring the stabilizer feet.
Dell™ Rack Installation Guide
7
Installation and Troubleshooting Guide (.htm) - Page 10
... tape measure
RapidRails Rack Kit Contents
The RapidRails rack kit includes the following items (see Figure 1-1): • One pair of RapidRails slide assemblies • One cable-management arm • One cable-management arm retainer • One cable tray • One status indicator cable (if applicable) • One Velcro cable strap
8
Dell™ Rack Installation Guide
Installation and Troubleshooting Guide (.htm) - Page 11

... indicator cable (if applicable) 6 VersaRails slide assemblies
VersaRails Rack Kit Contents
The VersaRails rack kit includes the following items (see Figure 1-2): • One pair of VersaRails slide assemblies • One cable-management arm • One cable-management arm retainer • One cable tray • One status indicator cable (if applicable)
Dell™ Rack Installation Guide
9
Installation and Troubleshooting Guide (.htm) - Page 12
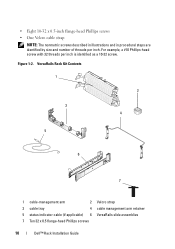
.... For example, a #10 Phillips-head screw with 32 threads per inch is identified as a 10-32 screw. Figure 1-2. VersaRails Rack Kit Contents
1
2
3 4
5
6
7
1 cable-management arm
2 Velcro strap
3 cable tray
4 cable management arm retainer
5 status indicator cable (if applicable) 6 VersaRails slide assemblies
7 Ten 32 x 0.5 flange-head Phillips screws
10
Dell™ Rack Installation Guide
Installation and Troubleshooting Guide (.htm) - Page 13
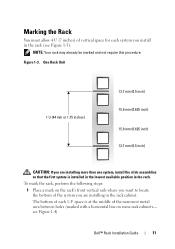
...inches) of vertical space for each system you install in the rack (see Figure 1-3).
NOTE: Your... mm (0.5 inch)
CAUTION: If you are installing more than one system, install the slide assemblies so that the first system is installed in the lowest available position in the rack.... where you want to locate the bottom of the system you are installing in the rack cabinet.
The bottom of each 1-U space is at...
Installation and Troubleshooting Guide (.htm) - Page 14
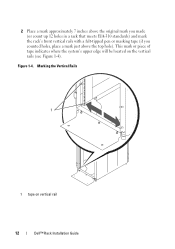
... indicates where the system's upper edge will be located on the vertical rails (see Figure 1-4).
Figure 1-4. Marking the Vertical Rails
1
1 tape on vertical rail
12
Dell™ Rack Installation Guide
Installation and Troubleshooting Guide (.htm) - Page 15
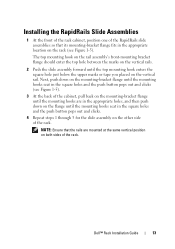
Installing the RapidRails Slide Assemblies
1 At the front of the rack cabinet, position one of the RapidRails slide assemblies so that its mounting-bracket flange fits ... on the other side of the rack.
NOTE: Ensure that the rails are mounted at the same vertical position on both sides of the rack.
Dell™ Rack Installation Guide
13
Installation and Troubleshooting Guide (.htm) - Page 16
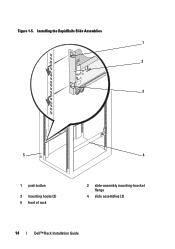
Figure 1-5. Installing the RapidRails Slide Assemblies 1 2
3
5
4
1 push button
3 mounting hooks (2) 5 front of rack
2 slide-assembly mounting-bracket flange
4 slide assemblies (2)
14
Dell™ Rack Installation Guide
Installation and Troubleshooting Guide (.htm) - Page 17
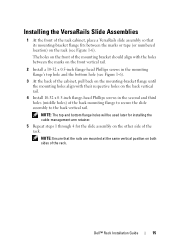
Installing... with the holes between the marks on the front vertical rail.
2 Install a 10-32 x 0.5-inch flange-head Phillips screws in the mounting ... with their respective holes on the back vertical rail.
4 Install 10-32 x 0.5-inch flange-head Phillips screws in the ...The top and bottom flange holes will be used later for installing the cable-management arm retainer.
5 Repeat steps 1 through 4 for the...
Installation and Troubleshooting Guide (.htm) - Page 18
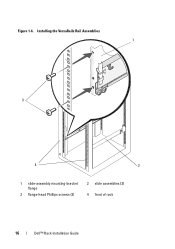
Figure 1-6. Installing the VersaRails Rail Assemblies 1
3
4
2
1 slide-assembly mounting-bracket flange
3 flange-head Phillips screws (2)
2 slide assemblies (2) 4 front of rack
16
Dell™ Rack Installation Guide
Installation and Troubleshooting Guide (.htm) - Page 19
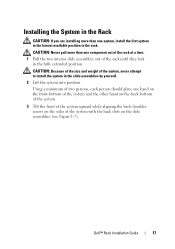
... rack until they lock in the fully extended position.
CAUTION: Because of the size and weight of the system, never attempt to install the system in the slide assemblies by yourself.
2 Lift the system into position.
Using a minimum of two persons, each person... screws on the sides of the system with the back slots on the slide assemblies (see Figure 1-7).
Dell™ Rack Installation Guide
17