Konica Minolta KIP 75 Series driver and firmware
Drivers and firmware downloads for this Konica Minolta item
Related Konica Minolta KIP 75 Series Manual Pages
Download the free PDF manual for Konica Minolta KIP 75 Series and other Konica Minolta manuals at ManualOwl.com
KIP 75 Series Hardware User Manual - Page 2
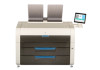
Thank you for purchasing the Multi-Function Printer KIP 7570 Series.
This Hardware Operation Guide contains functional and operational explanations for the KIP 7570 Series. Please read this Hardware Operation Guide carefully before using the printer. Please keep this Hardware Operation Guide for future reference.
1. When this product is installed in North America.
This product complies with part...
KIP 75 Series Hardware User Manual - Page 5
...
2. Use a circuit with a dedicated breaker. 3. Install the product as close to the wall outlet as possible. 4. If you wish to move the printer, please contact your service personnel.
1. Do not remove the screw and do not open the cover if not instructed to do so in this User's Manual. If you ignore this warning, you...
KIP 75 Series Hardware User Manual - Page 6
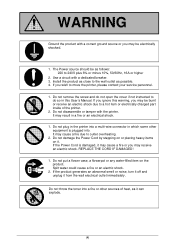
... a humidified room or a dusty room. Also, do not install the printer on an unstable floor as injuries may occur.
1. Unplug the printer before you move it. The power cord may be damaged and it may result in a fire or electric shock.
2. If you do not use the printer for a long duration (holidays, company shutdown) turn...
KIP 75 Series Hardware User Manual - Page 7
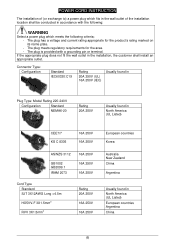
POWER CORD INSTRUCTION
The installation of (or exchange to) a power plug which fits in the wall outlet of the installation location shall be conducted in accordance with the following:
WARNING
Select a power plug which meets the following criteria; - The plug has a voltage and current rating appropriate for the product's rating marked on its name plate. - The plug...
KIP 75 Series Hardware User Manual - Page 8
Chapter 1 Before Use
.
1. 1 Installation Requirements
1. 2 Originals Prohibited from Duplication
1. 3 Features
1. 4 Specifications 1. 4. 1 General 1. 4. 2 Printer Part 1. 4. 3 Scanner part (for MFP Model)
1. 5 Appearance 1. 5. 1 Front view 1. 5. 2 Rear view
1. 6 Specifications for Scan Original (for MFP Model) 1. 6. 1 Original - Standard 1. 6. 2 Special Documents 1. 6. 3 "Do Not Scan" Originals
...
KIP 75 Series Hardware User Manual - Page 9
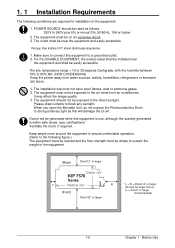
... for installation of the equipment.
1. POWER SOURCE should...RH. (NON CONDENSING) Keep the printer away from water sources, boilers, humidifiers, refrigerators or kerosene (oil) stove.
1. The installation site must not have open flames...sustain the weight of the equipment.
(Rear)
30cm/12" or larger
720mm / 29"
KIP 7570
Series
L*
1560mm / 62"
R*
(Front)
80cm/32" or larger
* L + R = 35cm/14"...
KIP 75 Series Hardware User Manual - Page 11
... (with 36" paper) or, and the minimum is 8.5" (210mm).
(8) Flange type loading mechanism eases operator's media loading work.
(9) Up to 600dpi print resolutions with an enhanced scanning system produces the highest quality images controlled by an advanced KIP Image Process System.
(10) Easy access to USB port allows users to provide efficient productivity by using "File to Print...
KIP 75 Series Hardware User Manual - Page 15
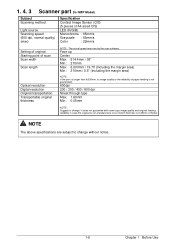
...Color
: 22mm/s
Setting of original Starting point of scan Scan width
Scan length
Optical resolution Digital resolution Original transportation Transportable original thickness
NOTE : The actual speed may vary by the scan software.
Face up Center... 0.05mm
NOTE : Suggest to change "It does not guarantee both scan/copy image quality and original feeding reliability in case the original is non-...
KIP 75 Series Hardware User Manual - Page 16
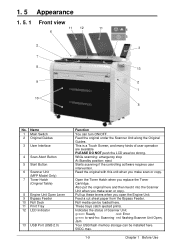
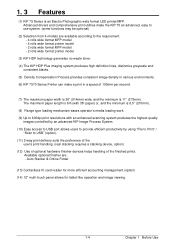
... you open the Engine Unit.
Feed a cut sheet paper from the Bypass Feeder.
Roll media can be loaded here.
These trays catch ejected prints.
Indicates the status of Scanner Unit.
green: Ready
red: Error
green to-and-fro: Scanning red flashing:Scanner Unit Open,
Jam
Your USB flash memory storage can be installed here.
5VDC max.
1-9
Chapter 1 Before Use
KIP 75 Series Hardware User Manual - Page 24
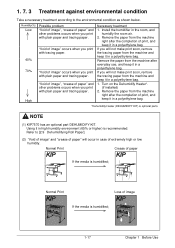
..." and other problems occurs when you print with plain paper and tracing paper.
Necessary treatment
1. Install the humidifier in the room, and humidify the room air.
2. Remove the paper from the machine...paper from the machine and keep it in a polyethylene bag.
1. Turn on the Dehumidify Heater*. (if installed)
2. Remove the paper from the machine right after the completion of print, and keep it in a...
KIP 75 Series Hardware User Manual - Page 29
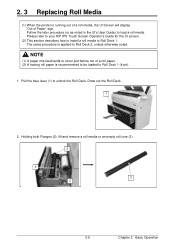
... Media
(1) When the printer is running out of a roll media, the UI Screen will display "Out of Paper" sign. Follow the later procedure (or as noted in the UI's User Guide) to load a roll media. Please refer to your KIP IPS Touch Screen Operator's Guide for the UI screen.
(2) This section describes how to install a roll media...
KIP 75 Series Hardware User Manual - Page 31
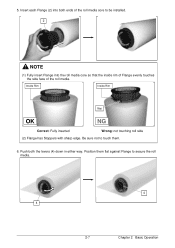
5. Insert each Flange (2) into both ends of the roll media core to be installed. 2
NOTE
(1) Fully insert Flange into the roll media core so that the inside rim of Flange evenly touches the side face of the roll media.
...
KIP 75 Series Hardware User Manual - Page 35
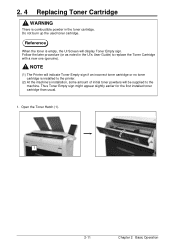
... UI Screen will display Toner Empty sign. Follow the later procedure (or as noted in the UI's User Guide) to replace the Toner Cartridge with a new one (genuine).
NOTE
(1) The Printer will indicate Toner Empty sign if an incorrect toner cartridge or no toner cartridge is installed to the printer.
(2) At the machine's installation, some amount...
KIP 75 Series Hardware User Manual - Page 42
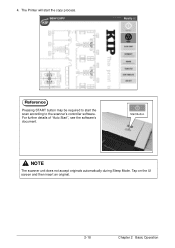
4. The Printer will start the copy process.
Reference
Pressing START button may be required to start the scan according to the scanner's controller software. For further details of "Auto Start", see the software's document.
Start Button
NOTE
The scanner unit does not accept originals automatically during Sleep Mode. Tap on the UI screen and then insert an...
KIP 75 Series Hardware User Manual - Page 45
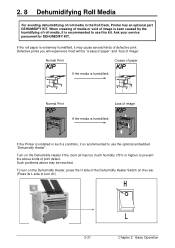
...Printer has an optional part DEHUMIDIFY KIT. When creasing of media or void of image is seen caused by the humidifying of roll media, it is recommended to use this kit. Ask your service...;
If the Printer is installed in such a... condition, it is recommended to use the optional embedded "Dehumidify Heater".
Turn on the Dehumidify Heater if the room air has too much humidity (75...