Sony DSLR A200K - a Digital Camera SLR driver and firmware
Drivers and firmware downloads for this Sony item
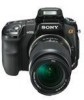
Related Sony DSLR A200K Manual Pages
Download the free PDF manual for Sony DSLR A200K and other Sony manuals at ManualOwl.com
Instruction Manual - Page 3
...instructions completely before operating the appliance, and keep this manual for future reference.
Carefully observe all warnings, precautions and instructions on the appliance, or the one described in the operating instructions and adhere to them.
Use
Power Sources
This set... the exterior of the set.
Installation
Water and Moisture
Do not use power-line operated sets near water - for example...
Instruction Manual - Page 6
... from that to which the receiver is connected.
- Consult the dealer or an experienced radio/TV technician for help.
The supplied interface cable must be used with the equipment in order to comply with the limits for a digital device pursuant to Subpart B of Part 15 of FCC Rules.
For the State of California, USA...
Instruction Manual - Page 11
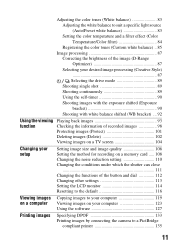
... 98
Protecting images (Protect 101
Deleting images (Delete 102
Viewing images on a TV screen 104
Changing your setup
Setting image size and image quality 106 Setting the method for recording on a memory card ..... 108 Changing the noise reduction setting 110 Changing the conditions under which the shutter can close
111 Changing the functions of the button and dial...
Instruction Manual - Page 13
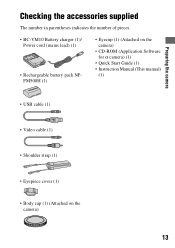
...pieces.
• BC-VM10 Battery charger (1)/ Power cord (mains lead) (1)
• Rechargeable battery pack NPFM500H (1)
• Eyecup (1) (Attached on the camera)
• CD-ROM (Application Software for α camera) (1)
• Quick Start Guide (1) • Instruction Manual (This manual)
(1)
• USB cable (1)
• Video cable (1)
• Shoulder strap (1)
• Eyepiece cover...
Instruction Manual - Page 15
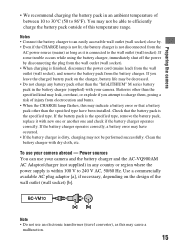
... burns. • When the CHARGE lamp flashes, this may indicate a battery error or that a battery pack other than the specified type have been installed. Check that the battery pack is the specified...To use your camera abroad - Power sources You can use your camera and the battery charger and the AC-VQ900AM AC Adaptor/charger (not supplied) in any country or region where the power supply is within ...
Instruction Manual - Page 76
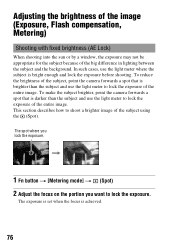
... of the image (Exposure, Flash compensation, Metering)
Shooting with fixed brightness (AE Lock)
When shooting into the sun or by a window, the exposure may not be... the exposure of the entire image. To make the subject brighter, point the camera forwards a spot that is darker than the subject and use the light meter ...want to lock the exposure.
The exposure is set when the focus is achieved.
76
Instruction Manual - Page 94
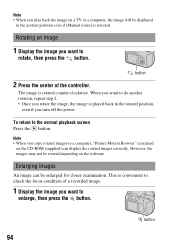
...; When you copy rotated images to a computer, "Picture Motion Browser" contained on the CD-ROM (supplied) can display the rotated images correctly. However, the images may not be rotated depending on the software.
Enlarging images
An image can be enlarged for closer examination. This is convenient to check the focus condition of a recorded image.
1 Display the image...
Instruction Manual - Page 107

... files to be recorded in one memory card, but the image quality will be lower.
Note • For details on the number of images that can be taken when the image quality is
changed, see page 29.
About RAW files You need the "Image Data Converter SR" software included on the CD-ROM (supplied) in...
Instruction Manual - Page 119
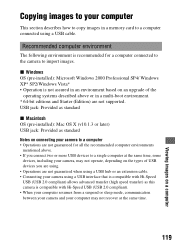
... describes how to copy images in a memory card to a computer connected using a USB cable.
Recommended computer environment
The following environment is recommended for a computer connected to the camera to import images.
x Windows OS (pre-installed): Microsoft Windows 2000 Professional SP4/ Windows XP* SP2/Windows Vista* • Operation is not assured in an environment based on an upgrade of the...
Instruction Manual - Page 121
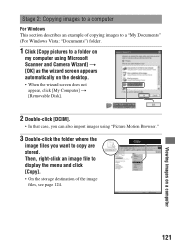
... Copying images to a computer
For Windows This section describes an example of copying images to a "My Documents" (For Windows Vista: "Documents") folder.
1 Click [Copy pictures to a folder on
my computer using Microsoft Scanner and Camera Wizard] t [OK] as the wizard screen appears automatically on the desktop.
• When the wizard screen does not appear, click [My Computer] t [Removable Disk...
Instruction Manual - Page 122
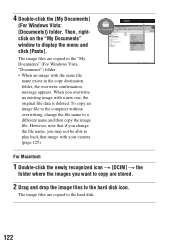
... window to display the menu and click [Paste].
The image files are copied to the "My Documents" (For Windows Vista: "Documents") folder. • When an image with the same file
name exists in the copy ...camera (page 125).
For Macintosh
1 Double-click the newly recognized icon t [DCIM] t the
folder where the images you want to copy are stored.
2 Drag and drop the image files to the hard disk...
Instruction Manual - Page 123
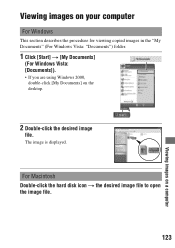
... the procedure for viewing copied images in the "My Documents" (For Windows Vista: "Documents") folder.
1 Click [Start] t [My Documents]
(For Windows Vista: [Documents]).
• If you are using Windows 2000, double-click [My Documents] on the desktop.
2 Double-click the desired image
file.
The image is displayed.
For Macintosh Double-click the hard disk icon t the desired...
Instruction Manual - Page 124
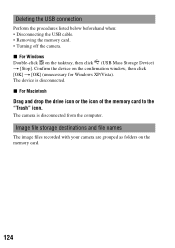
...USB Mass Storage Device) t [Stop]. Confirm the device on the confirmation window, then click [OK] t [OK] (unnecessary for Windows XP/Vista). The device is disconnected. x For Macintosh
Drag and drop the drive icon or the icon of the memory card to the "Trash" icon.
The camera is disconnected from the computer.
Image file storage destinations and file names
The image files recorded with your camera...
Instruction Manual - Page 125
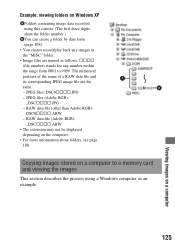
... Adobe RGB): DSC0ssss.ARW - RAW data file (Adobe RGB): _DSCssss.ARW
• The extension may not be displayed depending on the computer.
• For more information about folders, see page 108.
Copying images stored on a computer to a memory card and viewing the images
This section describes the process using a Windows computer as an example.
125
Viewing images on...
Instruction Manual - Page 127
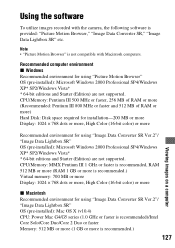
..." OS (pre-installed): Microsoft Windows 2000 Professional SP4/Windows XP* SP2/Windows Vista* * 64-bit editions and Starter (Edition) are not supported. CPU/Memory: Pentium III 500 MHz or faster, 256 MB of RAM or more (Recommended: Pentium III 800 MHz or faster and 512 MB of RAM or more) Hard Disk: Disk space required for installation-200 MB or more Display: 1024...
Instruction Manual - Page 128
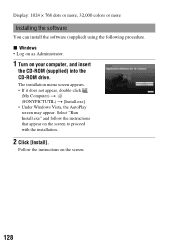
Display: 1024 × 768 dots or more, 32,000 colors or more
Installing the software
You can install the software (supplied) using the following procedure. x Windows • Log on as Administrator.
1 Turn on your computer, and insert
the CD-ROM (supplied) into the CD-ROM drive.
The installation menu screen appears. • If it does not appear, double-click
(My Computer) t (SONYPICTUTIL) t [...
Instruction Manual - Page 129
... can get secure and useful customer support. http://www.sony.net/registration/di/
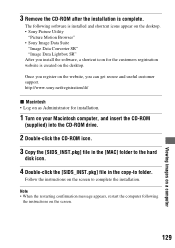
x Macintosh • Log on as Administrator for installation.
1 Turn on your Macintosh computer, and insert the CD-ROM
(supplied) into the CD-ROM drive.
2 Double-click the CD-ROM icon.
3 Copy the [SIDS_INST.pkg] file in the [MAC] folder to the hard
disk icon.
4 Double-click the [SIDS_INST...
Instruction Manual - Page 130
... CD burner drive or DVD burner drive.
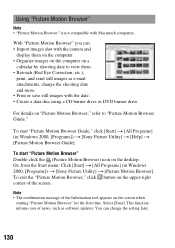
For details on "Picture Motion Browser," refer to "Picture Motion Browser Guide."
To start "Picture Motion Browser Guide," click [Start] t [All Programs] (in Windows 2000, [Programs]) t [Sony Picture Utility] t [Help] t [Picture Motion Browser Guide].
To start ...]. This function informs you of news, such as software updates. You can change the setting later.
130
Instruction Manual - Page 131
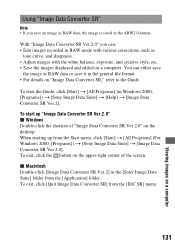
..., etc. • Save the images displayed and edited on a computer. You can either save
the image as RAW data or save it in the general file format. • For details on "Image Data Converter SR," refer to the Guide.
To start the Guide, click [Start] t [All Programs] (in Windows 2000, [Programs]) t [Sony Image Data Suite] t [Help...
Instruction Manual - Page 132
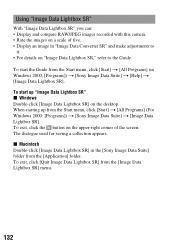
... images recorded with this camera. • Rate the images on a scale of five. • Display an image in "Image Data Converter SR" and make adjustments to
it. • For details on "Image Data Lightbox SR," refer to the Guide.
To start the Guide from the Start menu, click [Start] t [All Programs] (in Windows 2000, [Programs]) t [Sony Image...