Brother International XL-3510 driver and firmware
Drivers and firmware downloads for this Brother International item


Related Brother International XL-3510 Manual Pages
Download the free PDF manual for Brother International XL-3510 and other Brother International manuals at ManualOwl.com
Accessory Catalog - Page 5
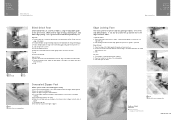
...guide screw, adjust the fabric guide to the edge of the fabric, and lower
the presser foot. 3. Sew.
SA133 ABCDEFJKMN
SA134 GHILOP
SA128 All Brother home-use sewing machines
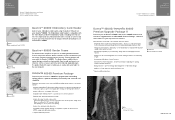
Concealed Zipper Foot
Allows you to install.... 2. Place the fold at the left side of the center guide. 3. Sew and open the fabric.
SA184 All Brother home-use sewing machines
Ring Bearer Pillow & Hankerchief
Innov-is Project...
Accessory Catalog - Page 7
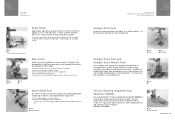
... be used with all Brother presser feet. Can be used for stitching heavy fabrics together.
1. Attach the seam guide on the needle plate with the thumbscrew of the seam guide. 2. Adjust the distance...stitching especially on thin fabrics or small pieces of patchworks. Installing the Straight Stitch Needle Plate automatically sets the needle position to the center straight stitching position on selected...
Accessory Catalog - Page 13
....)
Brother Embellishment
Feet
Pin Tuck Foot
24
Ruffler Foot
Pin Tuck Foot
This presser foot has 7 grooves and produces perfect pin tucks and corded pin tucks using a twin needle on lightweight fabric. A specially designed bobbin cover is also included with this presser foot.
1. Install and manually thread a twin needle. 2. Draw a reference line to guide...
Accessory Catalog - Page 16
... own unique embroidery patterns in the easy steps. Comes with USB card writer, 4M blank memory card and software compatible with Windows 2000 or later. SAVR8.0 Upgrade kit is compatible with PE-DESIGN 5.0, 6.0 & 7.0.
PE-DESIGN® Lite
New to embroidery software? Master basic digitizing and embroidery design work with Brother's easy to use PE-DESIGN® Lite.
PE-DESIGN®...
Accessory Catalog - Page 17
... QuattroTM 6000D
SAVR4000D Innov-is 4000D
QuattroTM 6000D Embroider y Card Reader
Connect your embroidery card reader using the built-in USB port on your QuattroTM 6000D. This Embroidery Card Reader is compatible with the entire library of Brother Embroidery Cards, including licensed content. The simple and easy USB attachment takes seconds to connect and ensures your treasured collection...
Users Manual - English - Page 4
... machine to be repaired.
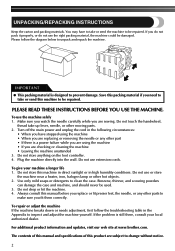
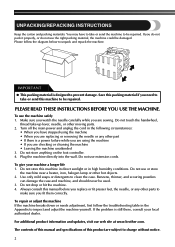
PLEASE READ THESE INSTRUCTIONS BEFORE YOU USE THE MACHINE.
To use...or other moving parts. 2. Turn off the main power and unplug the cord in the following circumstances:
...machine unattended 3. Do not store anything on the foot controller. 4. Plug the machine directly into the wall. Do ...updates, visit our web site at www.brother.com.
The contents of this manual and specifications of...
Users Manual - English - Page 9
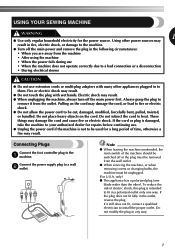
...cords or multi-plug adapters with many other appliances ... foot controller plug to the 1 machine.
Connect the power supply ...plug to a wall 2 outlet.
Note
● When leaving the machine unattended, the main switch of the machine should be switched off or the plug must be removed from the wall outlet.
● When servicing...install the proper outlet. Do not modify the plug in any way.
7
Users Manual - English - Page 12
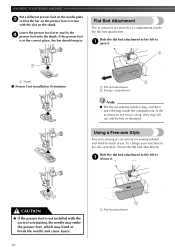
... attachment to the left to 1 open it.
1
1
1 Shank
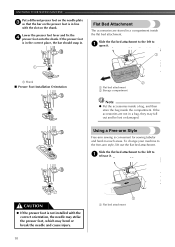
■ Presser Foot Installation Orientation
2
1 Flat bed attachment 2 Storage compartment
Note
● Put the accessories inside a bag, and then store the bag inside ... to the left to 1 release it.
CAUTION
● If the presser foot is not installed with the correct orientation, the needle may strike the presser foot, which may bend or break...
Users Manual - English - Page 36
...plastic insert at the
front of the frame.
CAUTION
● If the presser foot is not installed with the correct orientation, the needle may strike the presser foot, which may bend or break ... the presser foot.
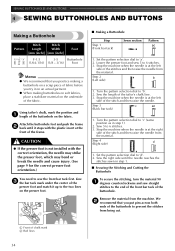
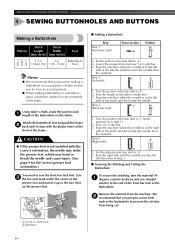
■ Making a Buttonhole
Step
Step 1 (Front bar tack)
Sewn section a
Pattern
1. Set the pattern selection dial to 'a'. 2. Lower the presser foot and sew 5 to 6 stitches. 3. Stop the ...
Users Manual - English - Page 47
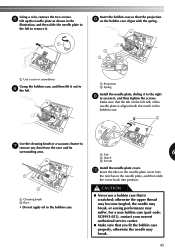
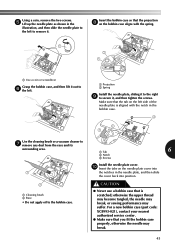
...vacuum cleaner to
7 remove any dust from the race and its
surrounding area.
1 Tab
6
2 Notch
3 Screws
Install the needle plate cover. 0 Insert the tabs on the needle plate cover into
the notches in the needle plate, ... bobbin case (part code: XC8993-021), contact your nearest authorized service center.
● Make sure that you fit the bobbin case properly, otherwise the needle may break.
45
Owner's Manual (Español) - Spanish - Page 4
... machine to be repaired.
PLEASE READ THESE INSTRUCTIONS BEFORE YOU USE THE MACHINE.
To use...or other moving parts. 2. Turn off the main power and unplug the cord in the following circumstances:
...machine unattended 3. Do not store anything on the foot controller. 4. Plug the machine directly into the wall. Do ...updates, visit our web site at www.brother.com.
The contents of this manual and specifications of...
Owner's Manual (Español) - Spanish - Page 9

...cords or multi-plug adapters with many other appliances ... foot controller plug to the 1 machine.
Connect the power supply ...plug to a wall 2 outlet.
Note
● When leaving the machine unattended, the main switch of the machine should be switched off or the plug must be removed from the wall outlet.
● When servicing...install the proper outlet. Do not modify the plug in any way.
7
Owner's Manual (Español) - Spanish - Page 12
... attachment to the left to 1 open it.
1
1
1 Shank
■ Presser Foot Installation Orientation
2
1 Flat bed attachment 2 Storage compartment
Note
● Put the accessories inside a bag, and then store the bag inside ... to the left to 1 release it.
CAUTION
● If the presser foot is not installed with the correct orientation, the needle may strike the presser foot, which may bend or break...
Owner's Manual (Español) - Spanish - Page 36
...plastic insert at the
front of the frame.
CAUTION
● If the presser foot is not installed with the correct orientation, the needle may strike the presser foot, which may bend or break ... the presser foot.
■ Making a Buttonhole
Step
Step 1 (Front bar tack)
Sewn section a
Pattern
1. Set the pattern selection dial to 'a'. 2. Lower the presser foot and sew 5 to 6 stitches. 3. Stop the ...
Owner's Manual (Español) - Spanish - Page 47
...vacuum cleaner to
7 remove any dust from the race and its
surrounding area.
1 Tab
6
2 Notch
3 Screws
Install the needle plate cover. 0 Insert the tabs on the needle plate cover into
the notches in the needle plate, ... bobbin case (part code: XC8993-021), contact your nearest authorized service center.
● Make sure that you fit the bobbin case properly, otherwise the needle may break.
45